Platefulkitchen
Strawberry Cheesecake Dessert Cups: A Beginner-Friendly Delight
Introduction
Hey there, fellow foodies! 🎉 Have you ever wanted to impress your friends with a delicious dessert but found yourself unsure about where to start? Well, you’re in for a treat today, because I’m sharing a delightful recipe that balances sophistication with simplicity: Strawberry Cheesecake Dessert Cups. These little beauties are perfect for any occasion—be it a family gathering, a dinner party, or just a well-deserved treat after a long week. Trust me, if I can whip these up, so can you!
Picture this: layers of creamy cheesecake, tangy strawberries, and a crunchy pretzel crust all tucked into charming little cups. It’s the kind of dessert that makes my heart sing, and I think you’ll feel the same way once you take a bite. Plus, they look adorable on any table spread, making them perfect to show off to your friends! Let’s dive into this fun culinary adventure that brings together flavors and textures in a way that’s both satisfying and easy to replicate at home.
As we go through the steps, I’ll share a bit of my story, some helpful tips, and ideas to customize these dessert cups to make them truly your own. Are you ready to grab your apron? Let’s do this!
Personal Story
Ah, strawberries! 🍓 They remind me of the summers I spent in my grandma’s backyard, where we had a bountiful patch of strawberries just waiting to be picked. I can still feel the warmth of the sun on my back as I would race to fill my little bucket with the juiciest, ripest berries. Grandma would always find a way to incorporate those strawberries into something spectacular. One of her signature treats was her irresistible strawberry cheesecake—an absolute crowd-pleaser!
When I first attempted to recreate her magic in the kitchen, I realized that cheesecakes could be a little intimidating for us home cooks. The crust, the filling, the baking—oh my! But then it hit me: why not simplify this classic with a no-bake version in individual cups? That way, I could capture all those nostalgic flavors without the fuss. And thus, Strawberry Cheesecake Dessert Cups were born!
Ingredients
Before we get started, let’s take a moment to gather all of our ingredients. Here’s what you’ll need for these delightful dessert cups:
-
2 cups frozen strawberries
Frozen strawberries are perfect because they are picked at the peak of ripeness and frozen immediately, preserving that fresh flavor. If you prefer fresh strawberries, feel free to swap them in, but remember to slice them and add a little sugar to draw out the juices. -
¼ cup granulated sugar
This will sweeten your strawberry mixture. If you’re looking to reduce sugar, you can use honey or agave syrup in its place. -
2 tbsp lemon juice
Lemon juice brightens the flavor of the strawberries and adds a lovely tartness. You can substitute with lime juice if you’re feeling zesty! -
1 tbsp cornstarch
A thickening agent for the strawberry mixture. If you’re avoiding cornstarch, try using arrowroot powder or tapioca starch instead. -
1 tbsp water
Just a splash to help dissolve the cornstarch before mixing it with the strawberries. -
1 ½ cups crushed salted pretzels
These will create the deliciously crunchy crust. If gluten is a concern, gluten-free pretzels work like a charm! -
2 tbsp granulated sugar
This will sweeten the crust. You may substitute with coconut sugar for a little caramel touch. -
6 tbsp unsalted butter, melted
The fat here binds everything together for that perfect crust. Coconut oil can be a great dairy-free alternative. -
8 oz cream cheese, room temperature
Make sure to let it soften so that it blends smoothly. If you’d like a lighter version, consider using Neufchâtel cheese instead. -
¾ cup granulated sugar
Sweetening the cheesecake filling. You can also use powdered sugar for a smoother texture if you prefer. -
2 tsp vanilla extract
This adds lovely flavor to the filling. Bourbon or almond extract can be delightful alternatives, just use sparingly. -
1 ½ cups heavy cream
Whipped cream creates the light and airy texture in your filling. If you wish for a lower-fat option, you can use whipped coconut cream.
Step-by-Step Instructions
Now that we’ve covered the ingredients, let’s cook! Here’s how to create your very own Strawberry Cheesecake Dessert Cups step by step.
Step 1: Prepare the Strawberries
In a medium-sized saucepan, combine the frozen strawberries, ¼ cup granulated sugar, and 2 tbsp lemon juice. Mix them well and bring the mixture to a medium heat. As it starts to bubble, mix the cornstarch with 1 tbsp of water in a small bowl until smooth, then pour it into the strawberry mixture. Stir gently until the mixture thickens slightly (about 5–7 minutes), then remove from heat and let it cool down. Pro tip: If you want an extra touch of elegance, you can mash some of the strawberries for a bit of texture and leave others whole to create a beautiful garnish!
Step 2: Prepare the Pretzel Crust
While your strawberries cool, let’s tackle the crust! In a mixing bowl, combine the crushed pretzels, 2 tbsp granulated sugar, and melted butter. Mix everything until it resembles wet sand. If it feels too dry, add a little more melted butter. Grab your serving cups or jars (small mason jars work great!), and scoop about 2 tablespoons of the crust mixture into each cup. Press it down firmly using the back of a spoon or your fingers. Chef hack: If you want neat layers, pack the crust really well—I promise it makes a difference in presentation.
Step 3: Make the Cheesecake Filling
In a large mixing bowl, beat the cream cheese using an electric mixer until smooth—this takes about 1 minute. Add in ¾ cup granulated sugar and 2 tsp vanilla extract, then continue mixing until well blended and free of lumps. In a separate bowl, whip the heavy cream until stiff peaks form. Gently fold the whipped cream into the cream cheese mixture, taking care to retain that wonderful airy texture. My secret here? Don’t rush this step; folding gently helps keep your filling fluffy!
Step 4: Assemble the Dessert Cups
Time to layer! Start by adding a scoop of the cheesecake filling on top of the pretzel crust in each cup. Use about 2 tablespoons—more if you’re feeling adventurous! Next, add a layer of your strawberry mixture on top of the cheesecake. Repeat the layers until your cups are filled to your desired height. Top with a few pieces of leftover strawberries and a dollop of whipped cream if you fancy! It’s like a flavor party!
Step 5: Chill and Serve
Cover the dessert cups with plastic wrap and place them in the refrigerator for at least 2 hours (or overnight, if you can wait that long). This helps the flavors meld together beautifully and creates that perfect texture. When you’re ready to serve, pull them out, sprinkle a little extra crushed pretzels on top for crunch, and enjoy the smiles around the table
Serving Suggestions
To plate your dessert, simply leave them in those adorable cups or jars. You can also serve them on a beautiful platter surrounded by fresh strawberries and mint leaves for a pop of color. Adding a sprinkle of crushed pretzels on top just before serving gives an extra crunch that everyone loves!
Recipe Variations
-
Chocolate Lovers: Add cocoa powder or melted chocolate into the cream cheese mixture for a chocolaty twist.
-
Nutty Crunch: Swap out pretzels for crushed walnuts or almonds for a healthier, nutty crust variation.
-
Berry Medley: Feel free to mix in raspberries or blueberries with your strawberries for a colorful and delicious berry medley!
-
Zesty Twist: Add a teaspoon of grated lemon or orange zest into the cheesecake filling for a refreshing citrusy flavor.
-
Vegan Version: Use dairy-free cream cheese and coconut whipped cream to keep it all plant-based without losing that creamy texture.
Chef’s Notes
Let me tell you, these dessert cups have evolved over time! When I first started making them, I experimented with tons of flavors: caramel, chocolate, even matcha! But what I keep coming back to is this classic combination; there’s something so nostalgic about it. I recommend using seasonal ingredients whenever possible, as it makes a noticeable difference in flavor and freshness. Every time I make these, I’m reminded of those sunny afternoons in Grandma’s garden, and I simply can’t resist sharing them with my loved ones. And honestly? Even my friends who claim they “can’t bake” find a way to pull off this recipe with flying colors!
FAQs and Troubleshooting
-
Why is my cheesecake filling not thick enough?
If your filling isn’t thickening, make sure the cream cheese was at room temperature. Cold cream cheese won’t incorporate as easily. Also, properly whipping the heavy cream until you reach stiff peaks helps! -
How do I prevent the crust from being too soggy?
Make sure to press the pretzel crust firmly into the bottom of your cups and let it chill well. The butter helps bind the pretzels together. -
Can I make these cups ahead of time?
Absolutely! These dessert cups can be made a day in advance. Just keep them covered in the fridge to maintain freshness. -
What if I don’t have cornstarch?
No problem! You can skip the cornstarch altogether, but keep in mind your strawberry mixture may be a little runnier.
Nutritional Info
(Per serving, assuming 8 servings)
Calories: ~290
Fat: 20g
Carbohydrates: 25g
Fiber: 2g
Protein: 3g
Sugar: 18g
Conclusion
And there you have it—your ultimate guide to Strawberry Cheesecake Dessert Cups! It’s a straightforward, delicious, and customizable recipe that’ll surely wow your friends and family (and maybe even yourself!). Remember, cooking is all about having fun, experimenting, and creating memorable moments around the table. I can’t wait for you to try this recipe, and I’d love to hear how it turns out! So, grab those strawberries and let’s fill those cups with love and flavor! Happy cooking! 🍓💕
Strawberry Cheesecake Dessert Cups
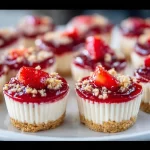
A delightful no-bake dessert featuring layers of creamy cheesecake, tangy strawberries, and a crunchy pretzel crust in charming cups.
- Prep Time: 30 minutes
- Cook Time: 15 minutes
- Total Time: 120 minutes
- Yield: 8 servings 1x
- Category: Dessert
- Method: No-Bake
- Cuisine: American
- Diet: Vegetarian
Ingredients
- 2 cups frozen strawberries
- ¼ cup granulated sugar (for strawberries)
- 2 tbsp lemon juice
- 1 tbsp cornstarch
- 1 tbsp water
- 1 ½ cups crushed salted pretzels
- 2 tbsp granulated sugar (for crust)
- 6 tbsp unsalted butter, melted
- 8 oz cream cheese, room temperature
- ¾ cup granulated sugar (for filling)
- 2 tsp vanilla extract
- 1 ½ cups heavy cream
Instructions
- Prepare the Strawberries: In a saucepan, combine frozen strawberries, ¼ cup sugar, and lemon juice. Heat until bubbling, then add cornstarch mixed with water. Stir until thickened. Let cool.
- Prepare the Pretzel Crust: Mix crushed pretzels, 2 tbsp sugar, and melted butter. Pack mixture into cups.
- Make the Cheesecake Filling: Beat cream cheese until smooth, add ¾ cup sugar and vanilla, then fold in whipped cream.
- Assemble the Dessert Cups: Layer cheesecake filling and strawberry mixture in cups. Repeat until filled.
- Chill and Serve: Cover and refrigerate for at least 2 hours. Garnish with crushed pretzels and serve.
Notes
These dessert cups can be made a day in advance and are perfect for impressing guests!
Nutrition
- Serving Size: 1 serving
- Calories: 290
- Sugar: 18g
- Sodium: 300mg
- Fat: 20g
- Saturated Fat: 12g
- Unsaturated Fat: 8g
- Trans Fat: 0g
- Carbohydrates: 25g
- Fiber: 2g
- Protein: 3g
- Cholesterol: 45mg
Keywords: cheesecake, dessert, strawberries, no-bake, easy recipe