Platefulkitchen
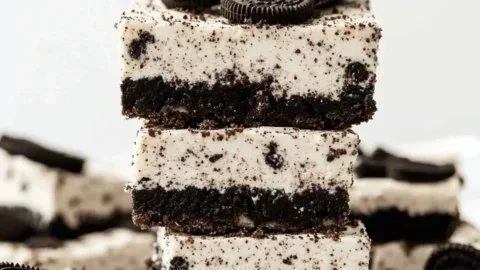
No-Bake Oreo Cheesecake Bars: A Sweet Slice of Nostalgia
Hey there, fellow food lovers! I’m so glad you’ve found your way to Plateful Kitchen, where deliciousness is just a step away. Today, I’m bursting to share with you an irresistible treat that’s guaranteed to satisfy that sweet tooth — No-Bake Oreo Cheesecake Bars! If you’re like me, a dessert aficionado who believes a good sweet should involve minimal fuss but maximum flavor, then you’re in for a real treat.
Let’s be honest: Who doesn’t love the combination of creamy cheesecake and crunchy Oreos? This no-bake recipe is the epitome of simplicity, requiring just a few ingredients you might already have in your pantry. Plus, it’s perfect for warm days when turning on the oven sounds like a recipe for disaster. This delightful dessert comes together with minimal effort, meaning more time for you to kick back, relax, and enjoy.
But wait, there’s more! The real magic happens when you share this dessert with loved ones. Picture this: gathered around a table, laughter ringing in the air, and an enchanting dish of Oreo Cheesecake Bars in the center. With each creamy bite, memories of past gatherings flood back, and new ones are created. So grab your apron, and let’s whip up these beauties together!
Personal Story
I’ll never forget the first time I made these No-Bake Oreo Cheesecake Bars. It was a sunny Saturday afternoon, and I had invited my best friends over for a movie marathon. As I scoured my pantry for snack ideas, the idea for these bars popped into my head. I remembered the delight in my sister’s eyes years ago when I had made a similar cheesecake for her birthday — it was her favorite!
That day back then had felt like pure magic, with the kitchen filled with the sugary aroma of cream cheese and vanilla and the chocolatey essence of Oreos. Fast forward years later, when I decided to recreate the joy of that dessert with an easier, no-bake version! Everyone loved those creamy bites of heaven and before I knew it, my kitchen felt like it was hosting a mini party! I joyfully watched as my friends devoured every last crumb, occasionally pausing to ask me for the recipe. And just like that, these bars became a part of my kitchen repertoire — a treasured creation overflowing with nostalgic flavor.
Ingredients
Here’s what you’ll need to craft your own No-Bake Oreo Cheesecake Bars:
-
1.5 cups Oreo cookie crumbs (from a regular family-sized package, crushed)
- Chef Insight: You want those cookies finely crumbled for a better crust. You can use a food processor for this, or just toss them in a zip-top bag and smash away with a rolling pin!
-
4 tbsp unsalted butter, melted
- Substitution Tip: If you’re looking for a dairy-free option, you could use coconut oil instead! It adds a slight coconut flavor, which pairs quite nicely with the oreos!
-
16 oz cream cheese, softened(full-fat recommended)
- Quick Tip: Make sure it’s softened! Take it out of the fridge about 30 minutes before you start. This will ensure a creamy filling without lumps, which is the key to a dreamy cheesecake.
-
3 tbsp confectioners’ sugar
- Chef Hack: Adjust the sugar to taste. If you like your desserts sweeter, feel free to add an extra tablespoon!
-
1 tsp vanilla extract
- Pro Tip: Always opt for pure vanilla extract if possible. It makes a world of difference in flavor!
-
8 oz whipped topping, thawed (such as Cool Whip)
- Note: Look for stability in whipped toppings; this helps your cheesecake bars set properly.
-
1.5 cups Oreo cookies, crushed (for filling and topping)
- Insight: Use regular Oreos for the best flavor, but feel free to experiment with different variations, like golden Oreos or mint Oreos!
Step-by-Step Instructions
Ready to get your hands into some serious dessert-making? Let’s dive into the step-by-step process!
-
Prepare the Pan:
Start by lining an 8×8-inch baking dish with parchment paper, leaving some overhang on the sides for easy removal later. This simple step guarantees that your cheesecake bars come out effortlessly. -
Make the Crust:
In a large mixing bowl, combine the Oreo cookie crumbs with the melted butter. Use a fork to mix until the crumbs are evenly moistened. The mixture should resemble wet sand. Tip: Press this mixture into the bottom of your prepared pan firmly to create a sturdy crust. You can use the back of a measuring cup to really pack it down! -
Mix the Filling:
Next up, grab a medium mixing bowl and beat the softened cream cheese with an electric mixer until it’s creamy and smooth. Add the confectioners’ sugar, vanilla extract, and mix until well combined. Chef Note: Scrape down the sides of the bowl occasionally to ensure everything gets mixed in evenly! -
Fold in the Whipped Topping:
Gently fold the whipped topping into the cream cheese mixture using a spatula. Be careful not to deflate the whipped cream — you want that light, airy texture in your filling! This is where the magic happens; the mixture should become fluffy and luscious. -
Add the Oreo Crumbs:
Now, fold 1.5 cups of crushed Oreos into the cheesecake filling. This added texture will give delightful bites throughout the cheesecake. Insider Tip: Reserve a little bit of those Oreo crumbs for decoration on top! -
Assemble the Bars:
Pour the creamy mixture over the Oreo crust in the prepared pan. Smooth the top with a spatula or the back of a spoon. Pro Tip: Get every last drop of that delicious filling out of the bowl! -
Chill:
Cover the pan with plastic wrap and place it in the refrigerator for at least 4 hours, or overnight if you can resist. The longer you let it chill, the better it sets. Waiting is hard, but it’s worth it! -
Cut and Serve:
Once fully chilled, remove the cheesecake from the pan using the parchment overhang. Place it on a cutting board and, using a sharp knife, cut into bars. Tip: For clean cuts, dip the knife in hot water and wipe it dry before cutting between slices!
Serving Suggestions
When it’s time to serve these delicious bars, consider adding a dollop of whipped cream on top and a sprinkle of those reserved Oreo crumbs for extra flair. Not only does it look inviting, but the addition of these little touches makes each slice feel like a special treat. Pair them with fresh strawberries or a drizzle of chocolate sauce for an extra wow factor!
Recipe Variations
Want to take your No-Bake Oreo Cheesecake Bars to the next level? Here are a few creative twists to consider:
-
Caramel Swirl: Drizzle caramel sauce on top of the cheesecake before chilling for a sweet, gooey surprise.
-
Minty Fresh: Use mint Oreos instead of regular ones for a refreshing twist. Add a few drops of peppermint extract to the filling for extra minty flavor.
-
Fruit Topper: Layer fresh raspberries or strawberries on top for a bright, fruity contrast against the creamy cheesecake.
-
Chocolate Lovers: Stir mini chocolate chips into the filling for an extra chocolatey crunch.
-
Nutty Delight: Incorporate finely chopped nuts like pecans or almonds into the crust for added texture and flavor.
Chef’s Notes
Creating these No-Bake Oreo Cheesecake Bars has been such a fun adventure over the years! One of my favorite moments was when my niece decided to take the recipe into her own hands and made them for a school bake sale (with a little help from me, of course!). She adorned them with colorful sprinkles and called them “Oreo Bliss Bars” — a title I might just steal!
This recipe has been tweaked and perfected in my kitchen, but one thing remains the same: the joy it brings to everyone who takes a bite. Whether hosting a gathering or enjoying a quiet night in, these bars bring comfort with each creamy, chocolatey morsel.
FAQs and Troubleshooting
1. My cheesecake is too soft! What happened?
- If your cheesecake filling is too soft, it might not have chilled long enough. Give it more time in the fridge — it needs to set firmly in order to cut into bars effectively.
2. Can I make this a day in advance?
- Absolutely! In fact, it tastes even better the next day as the flavors have time to meld. Just store it well covered in the fridge.
3. What can I substitute for cream cheese if I’m lactose intolerant?
- Look for lactose-free cream cheese at your grocery store. There are some fantastic dairy alternatives available today that work beautifully in this recipe.
4. Why did my cream cheese mixture have lumps?
- Often, the cream cheese hasn’t been softened enough before mixing. Make sure to leave it out at room temperature for at least 30 minutes before you start, or gently microwave it for a few seconds to get it soft.
Nutritional Info
Per serving (1 bar):
- Calories: 250
- Total Fat: 18g
- Saturated Fat: 10g
- Cholesterol: 40mg
- Sodium: 200mg
- Total Carbohydrates: 22g
- Dietary Fiber: 1g
- Sugars: 12g
- Protein: 3g
Feel free to adjust ingredient measurements for your dietary needs!
Thank you for joining me in this delicious journey! I hope these No-Bake Oreo Cheesecake Bars find a special place in your heart (and your kitchen). Keep sharing the love, and let’s keep filling those plates! Happy cooking! 🍰
PrintNo-Bake Oreo Cheesecake Bars
This no-bake Oreo cheesecake bars recipe combines creamy cheesecake with crunchy Oreo cookies, making it a quick and delicious dessert.
- Prep Time: 15 minutes
- Cook Time: 0 minutes
- Total Time: 240 minutes
- Yield: 16 servings 1x
- Category: Dessert
- Method: No-Bake
- Cuisine: American
- Diet: Vegetarian
Ingredients
- 1.5 cups Oreo cookie crumbs
- 4 tbsp unsalted butter, melted
- 16 oz cream cheese, softened
- 3 tbsp confectioners’ sugar
- 1 tsp vanilla extract
- 8 oz whipped topping, thawed
- 1.5 cups Oreo cookies, crushed (for filling and topping)
Instructions
- Prepare the Pan: Line an 8×8-inch baking dish with parchment paper.
- Make the Crust: Combine the Oreo cookie crumbs with the melted butter until moistened, then press into the bottom of your prepared pan.
- Mix the Filling: Beat the softened cream cheese until creamy, then mix in the confectioners’ sugar and vanilla extract.
- Fold in the Whipped Topping: Gently fold the whipped topping into the cream cheese mixture.
- Add the Oreo Crumbs: Fold 1.5 cups of crushed Oreos into the cheesecake filling.
- Assemble the Bars: Pour the mixture over the Oreo crust and smooth the top.
- Chill: Cover with plastic wrap and refrigerate for at least 240 minutes before serving.
- Cut and Serve: Remove from the pan and cut into bars.
Notes
Drizzle with chocolate sauce or add fresh fruit for serving.
Nutrition
- Serving Size: 1 bar
- Calories: 250
- Sugar: 12g
- Sodium: 200mg
- Fat: 18g
- Saturated Fat: 10g
- Unsaturated Fat: 7g
- Trans Fat: 0g
- Carbohydrates: 22g
- Fiber: 1g
- Protein: 3g
- Cholesterol: 40mg
Keywords: Oreo cheesecake, no-bake dessert, creamy dessert, easy dessert