Platefulkitchen
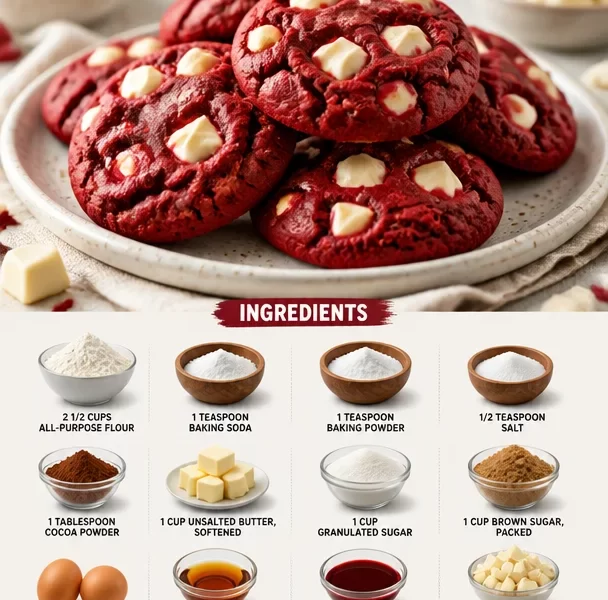
Red Velvet Cookies: A Sweet Indulgence Worth Sharing
Hello, cookie lovers! If you’re anything like me, just the thought of biting into a soft, chewy red velvet cookie, bursting with sweetness and that gorgeous crimson hue, sends your taste buds into a flutter. Today, we’re diving into the world of Red Velvet Cookies—because what’s better than a classic red velvet cake? You guessed it: portable, delicious cookies that carry all that flavor right to your hands!
When I think of red velvet, my mind immediately drifts back to family moments filled with laughter, culinary trials, and, of course, a bit of frosting-fueled chaos. Baking has always been a joyful affair in my kitchen, but red velvet recipes? They hold a special place in my heart and stomach!
A Taste of Nostalgia
I still remember the first time I baked something red velvet at home. It was a rainy Saturday afternoon, and I was scrolling through my mom’s collection of recipes when I stumbled upon one that sparked my interest. As I read through the ingredients, I felt a mixture of excitement and a pinch of fear. Cocoa powder for a cookie? Baking soda, baking powder… and don’t get me started on that vibrant red food coloring. The mere idea of creating something so eye-catching in the kitchen ignited a fiery passion in me!
My mom was always around to guide me, but I had to step up to make it my own. I remember pouring the bright red batter into a bowl and wondering if it would actually transform into something magical. Spoiler: it did! From the moment those cookies came out of the oven, wafting warm, inviting aromas throughout the house, I was hooked! Each bite was like indulging in a piece of rich history, taking me back to that cozy kitchen filled with joy and connection. Today, let’s recreate that magic with a delicious batch of Red Velvet Cookies that are bound to become a part of your kitchen story too!
Ingredients
Here’s what you’ll need to create these luscious red velvet cookies, along with some handy tips and insights to elevate your baking game:
-
2 1/2 cups all-purpose flour
The backbone of any cookie recipe! For a gluten-free option, you can substitute with a 1:1 gluten-free flour blend. Just make sure to check the brand for the best results. -
1 teaspoon baking soda
This helps the cookies rise and achieve that perfect texture. Be sure it’s fresh; old baking soda can lead to flat cookies that wouldn’t make the cut! -
1 teaspoon baking powder
This works hand-in-hand with baking soda to ensure our cookies achieve a lovely, fluffy consistency. -
1/2 teaspoon salt
Salt enhances the flavors in your cookies, balancing out the sweetness. It’s essential, so don’t skip it! -
1 tablespoon cocoa powder
A touch of cocoa powder means your cookies will pack chocolatey goodness without overwhelming the red velvet flavor. You could use Dutch-processed cocoa for a richer flavor if desired. -
1 cup unsalted butter, softened
Softened butter blends better with sugars, leading to a smooth, creamy dough. If you forgot to take your butter out ahead of time, you can place it in the microwave for 10-second intervals until soft! -
1 cup granulated sugar
This adds sweetness and contributes to that satisfying crunch of the cookie’s edges. -
1 cup brown sugar, packed
For a richer flavor and chewier texture, brown sugar is your best friend! You could use coconut sugar for a lower glycemic index option. -
2 large eggs
Eggs provide moisture and help bind everything together. They should be at room temperature for the best incorporation. -
1 tablespoon vanilla extract
Vanilla elevates the overall flavor—think of it as that secret ingredient that pulls everything together! -
1 tablespoon red food coloring
Make sure to use gel food coloring for the vibrancy! If you’d prefer natural options, you can try beet juice—but it may affect the flavor slightly. -
1 cup white chocolate chunks
These add a creamy, sweet richness to every bite. You can swap them out for dark chocolate chips for a delightful contrast or even throw in some nuts for extra crunch!
Step-by-Step Instructions
Now that we have our ingredients prepped and ready, let’s dive into the steps! Don your apron and get excited—you’re just moments away from cookie heaven!
-
Preheat the oven: Begin by preheating your oven to 350°F (175°C). This ensures that your cookies bake evenly and come out just right.
-
Mix the dry ingredients: In a large bowl, whisk together the all-purpose flour, baking soda, baking powder, salt, and cocoa powder. Mixing these ingredients separately ensures even distribution of the leaveners and cocoa.
-
Cream the butter and sugars: In another bowl, beat together the softened unsalted butter, granulated sugar, and brown sugar using an electric mixer on medium speed. You’ll want to cream the mixture until it’s light and fluffy—this step is key for a chewy texture. Think about 3-4 minutes should do the trick.
-
Add the eggs and vanilla: Beat in the eggs one at a time, then add the vanilla extract and red food coloring. Mix until everything is well combined. Smile at the vibrant, eye-catching color!
-
Combine wet and dry mixtures: Gradually add the dry mixture into the wet mixture, combining on low speed until just blended together. Overmixing can cause the cookies to become tough—nobody wants that!
-
Add the white chocolate chunks: Gently fold in the white chocolate chunks using a spatula. You’ll want to ensure these beauties are evenly dispersed throughout the dough.
-
Scoop the dough: Use a cookie scoop (or two spoons) to drop dough onto a parchment-lined baking sheet. Leave some space between each cookie to allow for spreading—about 2 inches works perfectly.
-
Bake to perfection: Pop your baking sheet into the preheated oven and bake for 10-12 minutes. You want the edges to be set and the centers to look a little soft—that’s how they’ll stay chewy!
-
Let them cool: After baking, let the cookies rest on the sheet for 5 minutes, then transfer them to wire racks to cool completely. This step is crucial for preventing soft-bottomed cookies.
Now, while the smell of warm cookies fills your kitchen, take a moment to relax. You’ve earned it!
Serving Suggestions
These delightful Red Velvet Cookies are perfect just on their own, but pairing them with a glass of milk or a warm cup of coffee can elevate the experience even further. Stack them high on a beautiful platter, maybe with a sprinkle of powdered sugar on top for that extra touch of elegance.
Or, if you’re feeling fancy, you can sandwich two cookies with a layer of cream cheese frosting in between. Yum! It’s a dessert-stacked dream come true!
Recipe Variations
Want to mix things up? Here are a few fun variations to consider:
-
Chocolate Swirl: Marble in some chocolate dough to create a beautiful visual effect!
-
Nutty Upgrade: Add in some chopped pecans or walnuts for added texture and flavor.
-
S’mores Style: Mix in mini marshmallows and graham cracker bits for a unique cookies and cream vibe.
-
Spiced Version: Add in a dash of cinnamon or nutmeg for a warm, comforting twist.
-
Vegan-friendly: Substitute eggs with flax eggs and replace the butter with coconut oil for a vegan version!
Chef’s Notes
Trust me when I say these Red Velvet Cookies are like a warm hug on a plate. Over time, I’ve experimented with different ingredients, and it’s been nothing short of delightful! The more I play in the kitchen, the more I learn to embrace creativity.
Funny enough, I once forget to add the sugar when I was making these cookies for a friend’s birthday. Let me tell you, my kitchen had quite the laugh when I tasted the bland cookie batter! But once I mixed it in, the smiles came back.
Every batch you make tells a story—the blending of flavors, the swirl of colors, the joy of sharing. So don’t be afraid to experiment and let your personality shine through these cookies. After all, that’s what cooking is all about!
FAQs and Troubleshooting
1. Why did my cookies flatten?
This could be due to over-mixing the dough or not having enough flour. Make sure to measure it correctly, and don’t overdo the mixing once you add the flour!
2. My cookies are too hard! What went wrong?
Overbaking is typically the culprit. Make sure to check your cookies a minute or two early, as ovens can vary. You want them to look barely set in the center.
3. Can I make the dough in advance?
Absolutely! You can prepare the dough a day ahead and refrigerate it. Just let it sit at room temperature for about 10-15 minutes before baking.
4. How should I store my cookies?
Keep them in an airtight container at room temperature for up to a week. If you want them to last longer, you can freeze them for up to a month—just don’t forget to thaw them at room temperature before enjoying!
Nutritional Info
If you’re curious about the nutritional breakdown, each cookie (yielding about 24) is approximately:
- Calories: 180
- Protein: 2g
- Fat: 8g
- Carbohydrates: 26g
- Sugars: 12g
(Note: Nutritional info can vary based on specific brands and measurements used, so it’s always a good idea to check based on your ingredients.)
And there you have it, my friends! A delicious journey into the world of Red Velvet Cookies that’s bound to warm hearts and fill bellies. Remember, cooking is not just a task; it’s a flavorful life experience waiting to be shared. So roll up your sleeves, make a mess, and most importantly, enjoy every bite! Happy baking!
PrintRed Velvet Cookies

Indulge in soft, chewy red velvet cookies bursting with sweetness and a gorgeous crimson hue, perfect for sharing.
- Prep Time: 15 minutes
- Cook Time: 12 minutes
- Total Time: 27 minutes
- Yield: 24 cookies 1x
- Category: Dessert
- Method: Baking
- Cuisine: American
- Diet: Vegetarian
Ingredients
- 2 1/2 cups all-purpose flour
- 1 teaspoon baking soda
- 1 teaspoon baking powder
- 1/2 teaspoon salt
- 1 tablespoon cocoa powder
- 1 cup unsalted butter, softened
- 1 cup granulated sugar
- 1 cup brown sugar, packed
- 2 large eggs
- 1 tablespoon vanilla extract
- 1 tablespoon red food coloring
- 1 cup white chocolate chunks
Instructions
- Preheat the oven to 350°F (175°C).
- Mix the dry ingredients: In a large bowl, whisk together flour, baking soda, baking powder, salt, and cocoa powder.
- Cream the butter and sugars: In another bowl, beat the butter, granulated sugar, and brown sugar until light and fluffy.
- Add the eggs one at a time, then add vanilla extract and red food coloring.
- Combine the wet and dry mixtures on low speed until just blended.
- Add the white chocolate chunks and fold in gently.
- Scoop dough onto a parchment-lined baking sheet with space in between.
- Bake for 10-12 minutes until edges are set and centers are soft.
- Let cool for 5 minutes on the sheet before transferring to wire racks.
Notes
These cookies are perfect with milk or coffee. You can also sandwich two cookies with cream cheese frosting for an extra touch of indulgence.
Nutrition
- Serving Size: 1 cookie
- Calories: 180
- Sugar: 12g
- Sodium: 150mg
- Fat: 8g
- Saturated Fat: 5g
- Unsaturated Fat: 3g
- Trans Fat: 0g
- Carbohydrates: 26g
- Fiber: 0g
- Protein: 2g
- Cholesterol: 30mg
Keywords: red velvet cookies, dessert, baking, cookies, sweet treats