Platefulkitchen
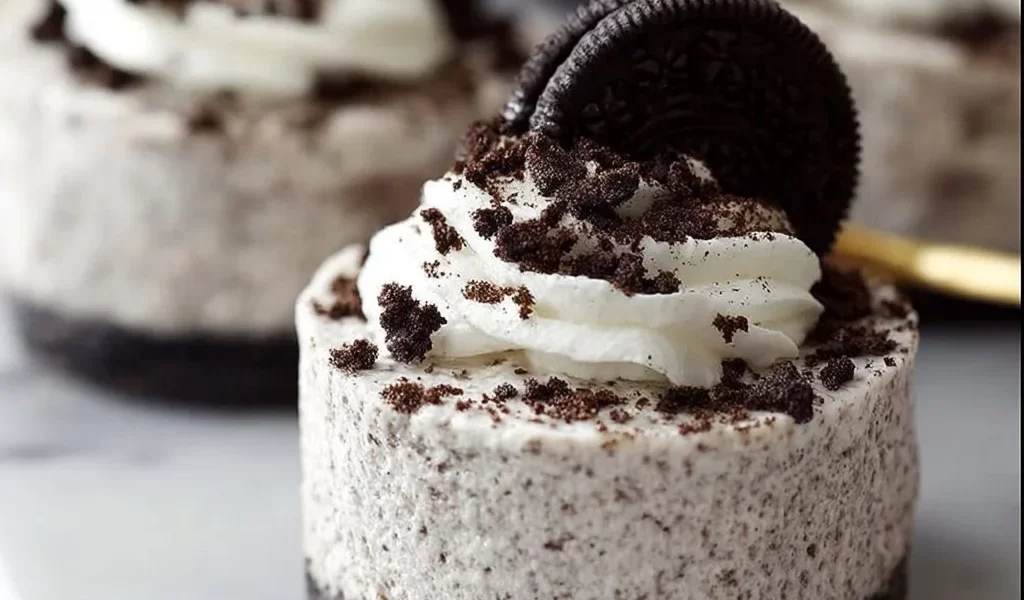
No-Bake Oreo Cheesecakes: A Sweet Treat to Remember
Hey there, sweet tooth adventurers! Let’s dive into a dessert that’s been a superstar in my kitchen: the No-Bake Oreo Cheesecake. This delightful treat is not only easy to whip up, but it has an irresistible flavor that’ll leave everyone asking for seconds. Whether it’s a casual family gathering or a special occasion, these mini cheesecakes are the perfect way to satisfy your cravings without turning on the oven.
Picture this: it’s a warm summer evening, the sun is setting, and friends are gathered around chatting and laughing. You bring out these little beauties, and within moments, the sweet aroma of Oreos combined with creamy cheesecake fills the air. There’s something magical about this dessert that sparks joy and nostalgia. It’s the kind of treat that instantly transports you back to carefree childhood days filled with cookie crumbs and laughter.
Plus, what I adore about these cheesecakes is that they’re dairy-free, making them a hit for those with dietary restrictions, and they’re no-bake, which means less mess and more magic! Imagine impressing your friends with such a simple yet stunning dessert without breaking a sweat – that’s the dream, right? As you crush those Oreo cookies and blend them into a creamy filling, you’ll find yourself grinning with anticipation for the deliciousness to come.
So, grab your apron, let’s have some fun in the kitchen, and make some No-Bake Oreo Cheesecakes that will satisfy your sweet tooth and make sweet memories. Ready? Let’s do this!
Personal Story
The first time I made a no-bake cheesecake, I was a teenager trying to impress my friends for a movie night. I had just learned how to make the classic baked version and was curious about the no-bake approach. Armed with a handful of ingredients and an endless supply of Oreos, I set out to create something delicious.
As I crushed the Oreos, my younger brother wandered into the kitchen, curious about the delicious sounds and smells. With a mischievous glint in his eye, he offered to help, but his idea of helping me was to dunk his little hands right into the cookie crumbs. We ended up in a full-on Oreo war, bits of chocolate cookie flying everywhere!
Needless to say, we cleaned up our mess, but the chaos brought so much laughter and joy to that evening. When we finally tasted our creation, it was the sweet triumph of our teamwork, and we proudly served our friends tiny cups of Oreo cheesecake topped with whipped cream and more crushed Oreos. That night marked the beginning of many more Oreo cheesecake adventures, each coming with its share of memories and laughter.
Now, every time I make these no-bake little delights, I’m reminded of that whirlwind evening filled with sweet chaos, friendship, and most importantly, deliciousness. Let’s recreate that laughter and love in your own kitchen!
Ingredients
To get started on your No-Bake Oreo Cheesecakes, you’ll need the following ingredients:
-
16 Oreo cookies
Perfect for creating that crumbly crust and incorporating into the filling for a double dose of chocolatey goodness. You can swap these for gluten-free Oreos or any chocolate sandwich cookie if you have dietary preferences. -
2 cups dairy-free cream cheese
This lends that creamy, smooth texture crucial for any cheesecake. Brands like Kite Hill or Tofutti are personal favorites. If you’re not dairy-free, feel free to use regular cream cheese! -
1/2 cup powdered sugar
Sweetness is key! This sugar dissolves easily, making your cheesecake velvety smooth. If you’re looking to cut down on sugar, you can use coconut sugar or a sugar substitute like erythritol. -
1 teaspoon vanilla extract
A splash of vanilla elevates the flavor profile astonishingly. You can swap this with almond extract for a nutty twist. -
1/2 cup non-dairy whipped cream
This adds that fluffy, light texture that makes cheesecake oh-so-indulgent. If you can’t find non-dairy whipped cream, you can whip coconut cream instead for a delicious alternative. -
Additional Oreo cookies for topping
These are optional but recommended for that extra crunch and classic look. You can also drizzle chocolate sauce or add fresh berries for a pop of color.
Each ingredient contributes to a delightful experience that’s not only satisfying but also keeps the process simple and stress-free. Enjoy customizing as you go!
Step-by-Step Instructions
Now, let’s get cooking! Here’s a detailed breakdown on how to bring these no-bake cheesecakes to life:
-
Crush the Oreo Cookies
Start by placing 16 Oreo cookies in a sturdy ziplock bag and use a rolling pin or your hands to crush them into fine crumbs. If you have a food processor, simply toss them in and pulse until you achieve a sandy texture. This will be the base for your crust. (Chef’s hack: Save a bit for topping by putting aside a couple of tablespoons before crushing!) -
Prepare the Cheesecake Filling
In a mixing bowl, combine the dairy-free cream cheese and powdered sugar. Beat them together using an electric mixer until smooth and creamy, about 2-3 minutes. The goal is to eliminate any lumps and create a silky texture. (Tip: Make sure your cream cheese is at room temperature before mixing; it helps everything blend more smoothly.) -
Add the Vanilla and Whipped Cream
Next, mix in the vanilla extract until incorporated. Gently fold in the non-dairy whipped cream until you see no streaks left; this will enhance the lightness of our cheesecake. Remember, be gentle when folding so you don’t deflate the whipped cream too much! -
Incorporate the Crushed Oreos
Now, add in those crushed Oreo crumbs, saving just a tablespoon or so for garnish later. Mix until evenly combined. You want bits of cookie throughout the filling for that signature Oreo flavor. (Pro tip: Taste the filling before scooping it into cups; adjust sweetness if needed, but remember you’ll be topping them with whipped cream too!) -
Assemble the Cheesecakes
Grab your individual dessert cups or a large serving dish. Start by adding a spoonful of the Oreo filling into each cup, smoothing it out gently. Alternate with a layer of the remaining crushed Oreos, then finish with another layer of filling. This creates a delicious layered look, but feel free to keep it simple if you prefer! (Chef’s note: Consider using clear cups to showcase those beautiful layers!) -
Chill Until Set
Pop your assembled cheesecakes in the refrigerator for at least 4 hours, or overnight if you can wait that long. This chilling time allows the flavors to meld together and gives that cheesecake the creamy texture we love. (Tip: If you’re in a hurry, a shorter chill time of about 2 hours will still yield delicious results, but patience is key for the ultimate indulgence!)
Serving Suggestions
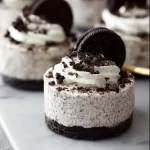
Once your cheesecakes have chilled and are nice and firm, it’s time to serve! You can plate them in the cups for an easy presentation or transfer them to individual plates. Top each cheesecake with a generous dollop of non-dairy whipped cream, then sprinkle on that reserved Oreo crumb for some added crunch. For even more flair, consider adding a chocolate drizzle or fresh berries on the side. It’s all about that Instagram-worthy presentation!
Recipe Variations
Feeling adventurous? Here are a few fun twists you can try with this basic recipe:
-
Mint Chocolate Oreo Cheesecake: Substitute your regular Oreos with mint-flavored ones for a refreshing spin. Add a dash of peppermint extract to the filling for that cool aftertaste!
-
Peanut Butter Swirl: Mix in some creamy peanut butter into the filling or create a peanut butter drizzle on top for a delightful sweet and salty treat.
-
Fruit Topped: Incorporate fresh strawberries, raspberries, or even mango puree to cut through the richness and add a pop of vibrant color.
-
Chocolate Ganache Topping: Drizzle a rich chocolate ganache on top for an extra indulgent treat that looks sophisticated and tastes divine.
-
Nutty Variation: Swap out some of the Oreos with crushed nuts, such as pecans or almonds, for a crunch that complements the creaminess beautifully.
Feel free to get creative! Each twist is another delicious way to experience these delightful cheesecakes.
Chef’s Notes
Over the years, my no-bake Oreo cheesecake recipe has gone through its fair share of adjustments! I’ve tried various types of cream cheese, whipped creams, and Oreos, and each variation has its charm. I’ve even hosted Oreo cheesecake taste tests with family and friends to see which one they loved the most.
One surprise moment? I once accidentally swapped in spicy cinnamon graham crackers for the base! Let’s just say, while it was an unexpected combination, everyone admired my "experiment." Sometimes, those little accidents in the kitchen lead to exciting flavors and delightful stories.
I love that even the simplest recipes carry their stories, memories, and laughter. May your no-bake cheesecake journey be filled with fun surprises too!
FAQs and Troubleshooting
1. Why is my cheesecake too soft?
If your cheesecake doesn’t set properly, it may need more chill time in the refrigerator. Additionally, ensure you’re using enough whipped cream to help it hold its structure.
2. Can I freeze these cheesecakes?
Absolutely! These cheesecakes freeze well. Just ensure they’re tightly wrapped in plastic wrap and stored in an airtight container to prevent freezer burn. Let them thaw in the fridge before serving.
3. How can I make this recipe without a food processor?
No food processor? No problem! Just place the Oreos in a ziplock bag and crush them with a rolling pin or your hands. This also adds a little extra workout to your cooking session!
4. Can I make these in advance?
Yes! These no-bake cheesecakes are perfect for making ahead. They last about 5-7 days in the fridge, so feel free to prepare them a few days prior to your event.
Nutritional Information (Optional)
While I generally like to focus more on the joy of cooking and eating, if you’re curious, here’s a rough idea of the nutritional info:
- Serving size: 1 small cheesecake
- Calories: Approximately 250-300 calories
- Total fat: 18g
- Saturated fat: 9g
- Carbohydrates: 30g
- Sugars: 14g
- Protein: 2g
Remember that these numbers can vary based on the specific brands and ingredients you choose!
And there you have it—your complete guide to creating scrumptious No-Bake Oreo Cheesecakes that not only delight the palate but also stir up heartwarming memories along the way. I can’t wait for you to try this recipe—may it bring joy and sweetness to your table! Grab your plates, pull up a chair, and let’s indulge in some heavenly cheesecakes! Happy baking!
PrintNo-Bake Oreo Cheesecakes
These delightful no-bake Oreo cheesecakes are easy to whip up and perfect for any occasion, offering a creamy texture and rich flavor that satisfies every sweet tooth.
- Prep Time: 15 minutes
- Cook Time: 240 minutes
- Total Time: 255 minutes
- Yield: 4 servings 1x
- Category: Dessert
- Method: No-Bake
- Cuisine: American
- Diet: Vegan
Ingredients
- 16 Oreo cookies
- 2 cups dairy-free cream cheese
- 1/2 cup powdered sugar
- 1 teaspoon vanilla extract
- 1/2 cup non-dairy whipped cream
- Additional Oreo cookies for topping
Instructions
- Crush the Oreo cookies by placing them in a ziplock bag and using a rolling pin or hands to crush them until fine.
- Prepare the cheesecake filling by mixing dairy-free cream cheese and powdered sugar in a bowl until smooth.
- Add the vanilla extract and gently fold in the non-dairy whipped cream until fully incorporated.
- Incorporate the crushed Oreos, saving a tablespoon for garnish, and mix until evenly combined.
- Assemble the cheesecakes in cups by adding layers of the filling and crushed Oreos.
- Chill the assembled cheesecakes in the refrigerator for at least 4 hours until set.
Notes
Feel free to customize the toppings or even try variations like mint chocolate or peanut butter swirl.
Nutrition
- Serving Size: 1 cheesecake
- Calories: 300
- Sugar: 14g
- Sodium: 200mg
- Fat: 18g
- Saturated Fat: 9g
- Unsaturated Fat: 7g
- Trans Fat: 0g
- Carbohydrates: 30g
- Fiber: 2g
- Protein: 2g
- Cholesterol: 0mg
Keywords: no-bake cheesecake, Oreo cheesecake, dessert recipe, vegan dessert