Platefulkitchen
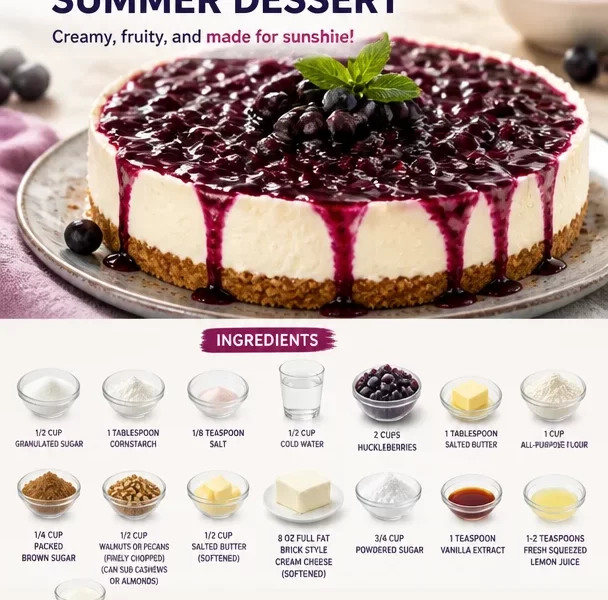
No Bake Huckleberry Cheesecake Recipe
Introduction
Hello, friends! Today, I’m thrilled to share one of my all-time favorite desserts with you: a No Bake Huckleberry Cheesecake. As soon as the weather starts to warm up and huckleberries begin appearing at the local markets, my heart races with excitement. I can’t help but remember the joy of picking those sweet little berries with my family during our summer outings. The way they burst with flavor is an experience that’s both nostalgic and delicious.
This cheesecake is the perfect companion for hot days when you want something cool and refreshing, yet rich and satisfying. The beauty of a no-bake cheesecake is that it’s not just simple to whip up—it’s also a fabulous way to showcase those gorgeous huckleberries. They add not only a pop of color but also a sweet-tart flavor that perfectly balances the creamy, dreamy cheesecake filling.
What’s more? This recipe is approachable, fun, and a surefire way to impress your friends and family. With just a few simple steps and a dash of love, you can create a beautiful dessert that feels like it comes straight from a fancy restaurant—but in reality, it’s just a little magic happening in your kitchen. So let’s dive in and fill our plates with this incredible No Bake Huckleberry Cheesecake!
Personal Story
Growing up, summer meant berry-picking outings with my family. My parents would take us to a charming little farm where we would spend the day wandering through rows of berry bushes. With the sun shining and laughter ringing in the air, our baskets quickly filled with juicy huckleberries. I fondly remember the thrill of seeking out the ripest, plumpest berries, mindful of not eating more than I collected (though let’s be real, some made it to my mouth!).
Once we got home, there was always a delicious dessert on the horizon. My mom has a way of transforming our bounty into something exquisite. One summer, she introduced me to the world of no-bake cheesecakes. I was mesmerized by how easy it was to create something so delicious without turning on the oven. We’d dollop freshly whipped cream on top and garnish it with those vibrant huckleberries, and I remember feeling like we were feasting on treasures. That love for no-bake cheesecakes has only deepened through the years, and now, I can’t wait for you to share in this delightful experience with my huckleberry twist!
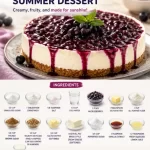
Ingredients
-
1/2 cup granulated sugar
Sweetener to balance the tanginess of the cream cheese and huckleberries. You can substitute with coconut sugar for a healthier option. -
1 Tablespoon cornstarch
This helps thicken the huckleberry sauce; tapioca starch also works in a pinch! -
1/8 teaspoon salt
Just a touch brings out all the flavors beautifully. -
1/2 cup cold water
Essential for making the huckleberry sauce. You can use fruit juice for added flavor! -
2 cups huckleberries (fresh or frozen)
These beauties are the star of the show! If you can’t find huckleberries, wild blueberries are a fantastic substitute. -
1 Tablespoon salted butter
Adds a rich flavor to the huckleberry sauce. Unsalted butter is fine too; just adjust the salt later. -
1 cup all-purpose flour
Used for the crust, it creates a sturdy base for our cheesecake. -
1/4 cup packed brown sugar
This brings a hint of caramel sweetness. You can swap with granulated sugar if necessary. -
1/2 cup walnuts or pecans (finely chopped)
Adds crunch to the crust; for a nut-free option, consider using oats. -
1/2 cup salted butter (softened)
Important for the crust to hold everything together. Using unsalted butter is perfectly fine. -
8 oz full-fat brick style cream cheese (softened)
Cream cheese gives us that luscious texture. Make sure it’s softened or it won’t blend smoothly. -
3/4 cup powdered sugar
Sweetens the filling without adding any grittiness. You can also use honey or maple syrup for a natural sweetener. -
1 teaspoon vanilla extract
Essential for flavor! Use pure vanilla extract for the best results. -
1-2 teaspoons fresh squeezed lemon juice
Brightens up the cheesecake and balances flavors—adjust according to your preference! -
1 cup heavy whipping cream (36% – 40% fat)
This is what gives our cheesecake a rich, fluffy texture. Don’t skimp on the fat content!
Step-by-Step Instructions
Step 1: Prepare the Huckleberry Sauce
In a small saucepan, combine the huckleberries, granulated sugar, cornstarch, salt, and cold water. Place over medium heat and stir gently. Once the mixture begins to bubble, reduce the heat to low, and let it simmer for about 5-7 minutes, or until the sauce has thickened slightly. Remove from heat, add the salted butter, and stir until melted. Allow this to cool while you work on the crust.
Chef Note: Don’t be afraid to taste and adjust the sweetness at this stage! If your huckleberries are tart, a pinch more sugar can work wonders.
Step 2: Make the Crust
In a mixing bowl, combine all-purpose flour, brown sugar, and chopped walnuts. Pour in the softened butter and mix until crumbly. Press this mixture into the bottom of a 9-inch springform pan, ensuring it’s even and compact. Bake at 350°F (175°C) for about 10 minutes or until lightly golden. Let it cool completely before filling.
Tip: If you prefer a no-bake crust, simply blend 1 cup of crushed graham crackers with the butter and sugar and press it into the pan!
Step 3: Prepare the Cheesecake Filling
In a large mixing bowl, beat the cream cheese with an electric mixer until smooth. Gradually add the powdered sugar, vanilla extract, and lemon juice, mixing until fully incorporated. In a separate bowl, whip the heavy cream until stiff peaks form. Gently fold the whipped cream into the cream cheese mixture until no streaks remain. This mixture should be fluffy and light.
Pro Tip: Be careful not to overmix the whipped cream into the cheesecake mixture to keep it airy and creamy!
Step 4: Assemble the Cheesecake
Spread half of the cheesecake filling over the cooled crust. Spoon half of the huckleberry sauce on top and swirl gently with a knife for a marbled effect. Add the remaining cheesecake filling, followed by the remaining huckleberry sauce. Lightly swirl again. Refrigerate for at least 4 hours (or overnight) to set.
Step 5: Serve
When ready to serve, remove the cheesecake from the springform pan. Slice and enjoy!
Serving Suggestions
To serve your No Bake Huckleberry Cheesecake, simply plate individual slices on dessert plates, and consider garnishing them with additional huckleberries or a dollop of sweetened whipped cream. A light dusting of powdered sugar adds a beautiful finishing touch. And for a festive flair, try topping your slices with a sprig of mint!
Recipe Variations
-
Mixed Berry Cheesecake: Swap out huckleberries for your favorite mixed berries for a delightful change of pace!
-
Chocolate Swirls: Melt some dark chocolate and swirl it into the cheesecake filling for a decadent chocolate-huckleberry experience.
-
Nut-Free Crust: Use crushed graham crackers or oats instead of nuts for those with allergies.
-
Dairy-Free Option: Use coconut cream in place of cream cheese and heavy cream, and a dairy-free butter substitute for the crust.
-
Lemon Huckleberry Twist: Add extra lemon zest to the filling to enhance that citrus flavor and brighten the overall dessert.
Chef’s Notes
Every time I make this cheesecake, I’m reminded of those sunny summer days spent berry-picking with my family. The laughter and joy of sharing good food—it’s a tradition that continues to inspire my cooking journey. This recipe has evolved over the years, from a simple huckleberry dessert into a showstopper that can hold its own at any occasion. I’ve learned to appreciate the power of a no-bake dessert that comes together effortlessly yet impresses just as much as a traditional baked cheesecake.
And hey, if you ever find yourself in a sticky situation, like running out of huckleberries, don’t panic! Embrace the hiccup and get creative; that’s what cooking— and dessert—is all about!
FAQs and Troubleshooting
1. Can I use frozen huckleberries?
Absolutely! Frozen huckleberries work wonderfully in this recipe. Just ensure they are thawed and well-drained before use.
2. Why is my cheesecake filling runny?
Make sure your cream cheese is fully softened before mixing, and don’t skip the heavy whipping cream; it’s vital for that perfect texture. Whipping enough air into the cream is key to creating volume!
3. Can I make this ahead of time?
Yes! In fact, making this cheesecake the day before allows the flavors to meld beautifully. Just keep it covered in the fridge until you’re ready to serve.
4. How long will the cheesecake last?
Stored in an airtight container in the fridge, it should last for about 4-5 days. Just be sure to keep it covered to prevent it from drying out.
Nutritional Info (if applicable)
This No Bake Huckleberry Cheesecake serves about 12 slices, with an approximate nutritional breakdown per slice as follows (varies based on specific ingredients used):
- Calories: 360
- Fat: 26g
- Carbohydrates: 30g
- Protein: 4g
- Sugar: 20g
I hope you enjoy making this No Bake Huckleberry Cheesecake as much as I do! It’s the perfect way to bring a taste of summer into your kitchen, and I can’t wait to hear your stories in the comments below. Happy baking, and let’s fill those plates!
PrintNo Bake Huckleberry Cheesecake
A refreshing and rich no-bake cheesecake featuring huckleberries, perfect for summer gatherings.
- Prep Time: 20 minutes
- Cook Time: 10 minutes
- Total Time: 240 minutes
- Yield: 12 servings 1x
- Category: Dessert
- Method: No-Bake
- Cuisine: American
- Diet: Vegetarian
Ingredients
- 1/2 cup granulated sugar
- 1 Tablespoon cornstarch
- 1/8 teaspoon salt
- 1/2 cup cold water
- 2 cups huckleberries (fresh or frozen)
- 1 Tablespoon salted butter
- 1 cup all-purpose flour
- 1/4 cup packed brown sugar
- 1/2 cup walnuts or pecans (finely chopped)
- 1/2 cup salted butter (softened)
- 8 oz full-fat brick style cream cheese (softened)
- 3/4 cup powdered sugar
- 1 teaspoon vanilla extract
- 1–2 teaspoons fresh squeezed lemon juice
- 1 cup heavy whipping cream (36% – 40% fat)
Instructions
- Prepare the huckleberry sauce by combining huckleberries, granulated sugar, cornstarch, salt, and cold water in a saucepan over medium heat. Stir until bubbling, then simmer for 5-7 minutes until thickened. Remove from heat, add salted butter, and let cool.
- Make the crust by mixing all-purpose flour, brown sugar, and chopped nuts. Add softened butter and mix until crumbly. Press into a 9-inch springform pan and bake at 350°F (175°C) for 10 minutes until golden. Let cool.
- Prepare the cheesecake filling by beating cream cheese until smooth. Gradually add powdered sugar, vanilla extract, and lemon juice. Whip the heavy cream to stiff peaks and fold into the cream cheese mixture.
- Assemble the cheesecake by spreading half of the filling over the crust, topping with half of the huckleberry sauce, swirling gently. Add remaining filling and sauce and refrigerate for at least 4 hours.
- Serve by slicing the cheesecake and enjoying!
Notes
For a no-bake crust, substitute with crushed graham crackers. This cheesecake can be made a day in advance for optimal flavor.
Nutrition
- Serving Size: 1 slice
- Calories: 360
- Sugar: 20g
- Sodium: 300mg
- Fat: 26g
- Saturated Fat: 15g
- Unsaturated Fat: 6g
- Trans Fat: 0g
- Carbohydrates: 30g
- Fiber: 1g
- Protein: 4g
- Cholesterol: 80mg
Keywords: no-bake cheesecake, huckleberry dessert, summer dessert, easy cheesecake, berry cheesecake