Platefulkitchen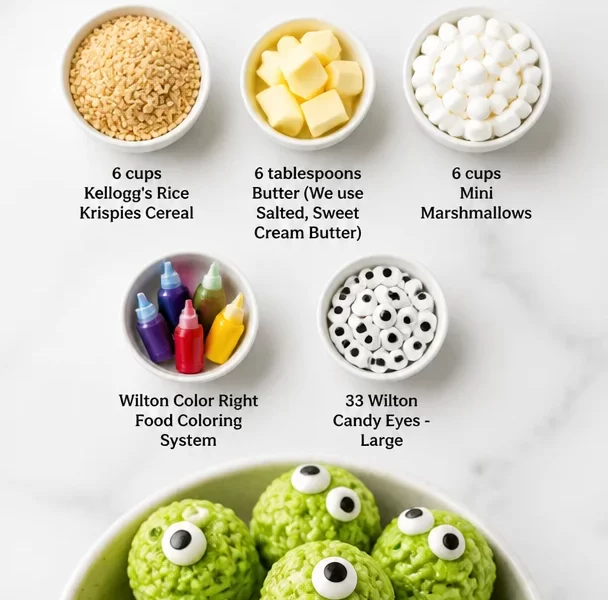
Monster Eye Balls Rice Krispie Bites: A Spooktacular Treat
Welcome back to the kitchen, friends! Today we’re diving into a thrilling culinary adventure that’s sure to turn your world upside down in the best possible way. Get ready to whip up some delightful Monster Eye Balls Rice Krispie Bites! These sweet and spooky snacks are perfect for Halloween parties, school events, or just a fun family treat. They’re eye-catching, addictive, and a blast to make with your little monsters. So, grab your mixing bowls and let’s get started!
Personal Story: A Hauntingly Delicious Memory
Whenever I think about treats like Rice Krispie treats, I can’t help but smile, remembering the Halloween festivities from my childhood. I’d race home from school as the leaves crunched beneath my feet, carried away by the crisp autumn air, and rush to the kitchen, where my mom was always whipping up something delightful. One particular Halloween, she surprised us with her take on Rice Krispie treats, but she added a spooky twist—just like I’m doing today.
My siblings and I took turns molding the melted marshmallow goo into spooky shapes, our little hands sticky and covered in gooey goodness. When we were finally done, we adorned them with candy eyes, making each treat come alive with personality. It felt magical to take something so simple and turn it into a fun, monster-themed delight. Those treats became a Halloween staple in our home, and I can’t wait to carry on that joy with you today. Let’s make our own memories in the kitchen!
Ingredients
Here’s what you’ll need to create these sweet, spooky bites:
-
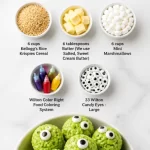
6 cups Kellogg’s Rice Krispies Cereal
The classic cereal that gives these treats their iconic crunch! If you want a gluten-free option, check for gluten-free Rice Krispies or switch to another crisped cereal. -
6 tablespoons Butter (We use Salted, Sweet Cream Butter)
Butter is essential for adding richness and flavor. Unsalted butter works just as well—just adjust the salt in your recipe accordingly. -
6 cups Mini Marshmallows
The star ingredient for binding. Feel free to use colored marshmallows if you want to ramp up the fun! You can also try marshmallow fluff in a pinch, but the texture will be different. -
Wilton Color Right Food Coloring System
This is your secret weapon for creating vibrant colors for your monster eyeballs. Don’t have it? Gel food coloring can be a great substitute; just a little bit goes a long way! -
33 Wilton Candy Eyes – Large
These little guys are what truly turn your snacks into monster eyeballs! If you’re feeling adventurous, you can even melt white chocolate and create your own eyeballs using chocolate drizzle.
Step-by-Step Instructions
Now that you have your ingredients ready, it’s time to dive into the fun part—cooking! Let’s break it down step-by-step.
-
Prepare Your Workspace
Start by lining a large baking pan (about 13×9 inches) with parchment paper. This will make removing your treats easier once they’ve cooled. Lightly grease your hands with a bit of butter to prevent the marshmallow from sticking to you later! -
Melt the Butter
In a large pot over low heat, melt the 6 tablespoons of butter. Stir frequently to ensure it doesn’t burn. The aroma of melting butter will soon fill your kitchen, and trust me, it’s a wonderful sign that you’re on the right track! -
Add the Marshmallows
Once the butter is melted, add all 6 cups of mini marshmallows to the pot. Stir gently until the marshmallows are fully melted and combined with the butter, creating a gooey, sticky mixture. Patience is key here—keep it on low heat, and don’t rush! -
Color it Up
As soon as the marshmallows are melted, it’s time to bring in the fun! If you’re going for colorful eyeballs, add your food coloring to the marshmallow mixture. Start small—you can always add more until you achieve your desired color. Stir well until evenly distributed. -
Mix in the Rice Krispies
Remove the pot from the heat and start adding the Rice Krispies cereal, one cup at a time. Use a spatula to fold the cereal into the marshmallow mixture gently. This part is crucial because you want to avoid crushing the cereal while making sure every piece is coated. -
Form the Monster Eyeballs
Once everything is combined, let the mixture cool for just a minute. Then, use your greased hands to scoop out small portions and roll them into balls (about 1-2 inches in size). Place them on a parchment-lined baking sheet, leaving some space in between for them to cool completely. -
Add the Candy Eyes
While the Rice Krispie balls are still slightly warm, gently press a candy eye onto the center of each ball. This is where they come to life—your little monster eyeballs will look ready to stare back at you. Let them cool and set for about 30 minutes. -
Enjoy!
Once they’ve cooled, they’re ready to serve. Place them on a spooky platter, or let the kids decorate them with more candy or drizzled chocolate if you want to take it up a notch!
Serving Suggestions
For a fun presentation, serve your Monster Eye Balls in a Halloween-themed bowl decorated with spooky decorations or alongside some fake spider webbing for an added fright element. If you’re bringing these to a party, grab a cute cake stand and let those eyeballs steal the show!
Recipe Variations
- Chocolate Drizzled Eyeballs: After forming the balls, drizzle melted chocolate over them for a decadent twist.
- Nutty Variation: Add chopped peanuts or almonds to the Rice Krispies mixture for added crunch and flavor.
- Monster Munch: Mix in some candy corn, gummy worms, or other favorite candies for a fun mix.
- Vegan Version: Use vegan butter and marshmallows for a plant-based take that everyone can enjoy!
- Colorful Surprise: Instead of just one color, create marbled eyeballs by using two colors of food coloring and intertwining them as you form the balls.
Chef’s Notes
These Monster Eye Balls are more than just a delicious snack; they’re a way to bring a little creativity and joy into your kitchen! Over the years, I’ve experimented with various flavors and fillings, finding that adding a hint of vanilla extract gives a delightful depth to the flavor. I’ve even seen some friends add a touch of peanut butter for a nutty flavor explosion! This is a recipe that grows and evolves with each holiday season, and it’s always amazing to see what new creations pop up.
FAQs and Troubleshooting
1. My Rice Krispie mixture is too sticky! What did I do wrong?
It’s likely that the mixture needed a little more stirring while melting the marshmallows. Adding the Rice Krispies too soon can also cause them to stick together. Make sure to let it cool slightly before rolling.
2. How do I store these?
Keep them in a cool, dry place in an airtight container for up to a week. If it’s particularly warm, they may melt, so consider refrigerating them if it’s hot.
3. Can I freeze these treats?
Yes! They freeze beautifully. Just make sure to wrap them in plastic wrap and place them in an airtight container. Thaw them at room temperature for a couple of hours before serving.
4. What if I don’t have candy eyes?
No worries! You can use chocolate chips, M&M’s, or even small fruit candies for decoration. Get creative!
Nutritional Info
Disclaimer: The following nutritional info is an estimation and may vary based on specific brands and ingredient choices.
- Calories: 130-150 per serving (based on 36 servings)
- Total Fat: 5g
- Saturated Fat: 3g
- Carbohydrates: 21g
- Sugars: 8g
- Protein: 1g
And there you have it—your very own Monster Eye Balls Rice Krispie Bites that are sure to delight and excite! Whether you’re celebrating a holiday, throwing a party, or just looking to indulge, these will surely bring a smile to everyone’s face. Happy cooking, and let’s get creative in the kitchen together!
PrintMonster Eye Balls Rice Krispie Bites
Sweet and spooky snacks perfect for Halloween parties or family treats.
- Prep Time: 15 minutes
- Cook Time: 10 minutes
- Total Time: 25 minutes
- Yield: 36 servings 1x
- Category: Dessert
- Method: No Bake
- Cuisine: American
- Diet: Vegetarian
Ingredients
- 6 cups Kellogg’s Rice Krispies Cereal
- 6 tablespoons Salted Sweet Cream Butter
- 6 cups Mini Marshmallows
- Wilton Color Right Food Coloring System
- 33 Wilton Candy Eyes – Large
Instructions
- Prepare your workspace by lining a large baking pan with parchment paper and greasing your hands with butter.
- Melt the butter in a large pot over low heat, stirring frequently.
- Add the mini marshmallows and stir until fully melted and combined with the butter.
- Color the mixture by adding food coloring to achieve your desired hue.
- Mix in the Rice Krispies cereal one cup at a time, folding gently to avoid crushing.
- Form small balls with the mixture and place them on a parchment-lined baking sheet.
- Add a candy eye to the center of each ball while they are still warm.
- Enjoy! Serve them on a spooky platter after they’ve cooled.
Notes
Drizzle with melted chocolate or add other candies for variations.
Nutrition
- Serving Size: 1 serving
- Calories: 130
- Sugar: 8g
- Sodium: 50mg
- Fat: 5g
- Saturated Fat: 3g
- Unsaturated Fat: 2g
- Trans Fat: 0g
- Carbohydrates: 21g
- Fiber: 0g
- Protein: 1g
- Cholesterol: 15mg
Keywords: Halloween treats, Rice Krispie bites, spooky snacks, kids recipes