Platefulkitchen
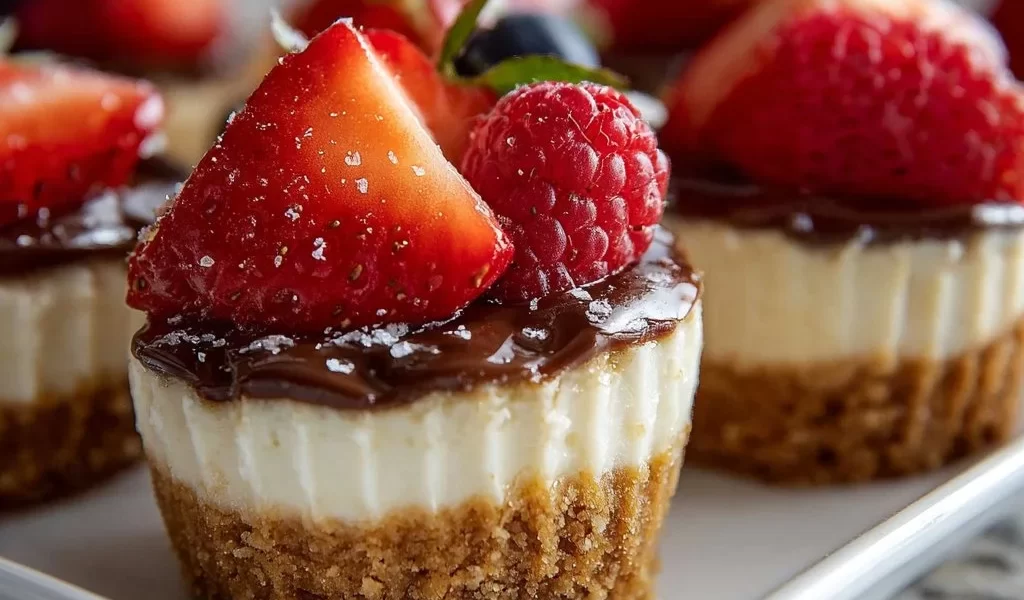
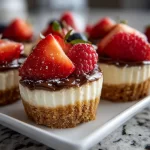
Irresistible No-Bake Mini Cheesecake Cups in 15 Minutes
Hello, dear friends! Today, we’re diving into a dessert that will take you right back to your childhood kitchen adventures—Mini No-Bake Cheesecake Cups! These little delights are not just easy to whip up; they’re versatile, creamy, and downright delicious. Ideal for gatherings, parties, or a sweet treat on a quiet evening, these cheesecakes are sure to impress, no baking required!
I remember the first time I discovered the joy of no-bake desserts. I was having a lazy summer afternoon, flipping through an old family cookbook while the sun streamed in. As I stumbled upon a simple cheesecake recipe that didn’t require an oven, I felt a little spark of creativity and excitement. “Could it be this easy?” I thought! I decided to make a mini version, and what followed was a kitchen escapade filled with laughter, a little mess, and the most gratifying taste of sweet cream cheese bliss. Since then, no-bake desserts hold a special place in my heart and pantry.
Now, the great thing about these Mini Cheesecake Cups is that you can customize them to fit your mood. Want a zesty lemon kick? Add some lemon zest! Craving chocolate? Let’s drizzle a bit of melted chocolate on top! Whether you’re entertaining guests or just want a sweet indulgence for yourself, these mini cheesecakes will have your taste buds dancing.
So, gather your ingredients and let’s make some magic happen in the kitchen!
Personal Story
I’ll never forget one specific family dinner when I attempted to make a classic baked cheesecake. It was the height of summer, and the heat in the kitchen was almost unbearable. I had misjudged the time needed and ended up with a cracked, overcooked cheesecake instead of the creamy creation I envisioned. Everyone was polite about that culinary flop, but in that moment of defeat, I thought, “There has to be a better way!”
That’s when no-bake desserts became my go-to solution. They’re quick, easy, and, best of all, they let me share that joy of homemade sweets with my loved ones without the fuss of turning on the oven in the summer heat. This no-bake mini cheesecake recipe has since become a family favorite, bringing everyone together around a table full of these delicious little cups. Now, whenever I make them, I’m reminded of that lesson learned: Sometimes, the simplest recipes are the best—and they often carry the sweetest memories!
Ingredients
Let’s get started with our no-bake mini cheesecake cups! Here’s what you’ll need:
Crust
-
1 cup graham cracker crumbs
These provide that classic cheesecake crust flavor! If you’re looking for a gluten-free option, try using almond flour or gluten-free cookies crushed into crumbs. -
3 tbsp melted butter
Butter helps bind the crumbs together. You can substitute it with coconut oil for a dairy-free version, though the flavor will be slightly different.
Filling
-
8 oz cream cheese, softened
The star of our show! Make sure it’s at room temperature for that creamy texture. For a lighter option, you can use low-fat cream cheese or Greek yogurt, though this will change the flavor slightly. -
1/4 cup sugar
This adds sweetness to our cheesecake. For a healthier alternative, consider using honey or maple syrup (but adjust the quantity to taste)! -
1 tsp vanilla extract
A splash of vanilla brings it all together! You can even experiment with almond extract for a nutty flavor twist. -
1/2 cup heavy cream
Whipped cream gives the cheesecake a lovely lightness. Replace it with a non-dairy whipped topping to make it vegan.
Topping
- Fresh berries for topping
Berries not only add a burst of color, they’re also a perfect compliment to the creamy cheesecake. Feel free to use strawberries, blueberries, raspberries, or even a mix of all three!
Step-by-Step Instructions
Alright, let’s dive into the fun part: making these delightful mini cheesecakes!
-
Prepare Your Containers:
Grab some small cups or jars for serving—mini mason jars work perfectly! This is where the charm of your cheesecakes will come to life. -
Make the Crust:
In a medium-sized bowl, combine the graham cracker crumbs and melted butter. Stir until well combined and the mixture resembles damp sand. I like to taste a little just to make sure it’s buttery enough—just a small nibble for quality assurance, right? -
Fill the Bottom:
Evenly distribute the crust mixture into the bottom of each cup, pressing it down firmly with the back of a spoon or your fingers. You want that crust to hold together, so don’t be shy! -
Whip the Cream:
In another bowl, beat the heavy cream until it forms soft peaks. This step adds fluffiness to your cheesecake filling! Make sure to go slow at first, or you’ll have whipped cream all over your kitchen. -
Prepare the Cheesecake Mixture:
In a separate large bowl, beat the softened cream cheese until smooth. Add in sugar and vanilla extract, and mix until fully combined. Don’t scratch the sides of the bowl too much; we want all the ingredients to mingle nicely without creating a mess! -
Combine the Mixtures:
Carefully fold in the whipped cream into the cream cheese mixture. Use a spatula and be gentle to keep that airy texture. This step is crucial for achieving that light and creamy consistency. -
Fill the Cups:
Spoon your cheesecake filling into each cup over the crust, filling them to the top—but not overflowing! Again, I like to use a piping bag for a neater finish, but a simple spoon works just as well. -
Chill:
Place the filled cups in the refrigerator for at least 30 minutes to set (though 2 hours is even better!). This allows the flavors to meld together beautifully! -
Top with Fresh Berries:
Just before serving, place a few fresh berries on top of each cheesecake cup. This adds a lovely pop of color and a fruity burst to balance the richness. -
Enjoy!
Serve these adorable mini cheesecakes to your friends and family, and watch their faces light up with joy. Don’t forget to take pictures—I guarantee you’ll want to share these little triumphs on social media!
Serving Suggestions
For a beautiful presentation, arrange your mini cheesecake cups on a large platter. You can even add a sprig of mint or edible flowers to each cup for that extra touch of elegance. If you’re feeling fancy, drizzle a little berry sauce or chocolate syrup on top for added flavor and flair.
Recipe Variations
Here are a few fun variations you can try to mix things up:
-
Chocolate Mini Cheesecakes: Add melted chocolate to the cheesecake mixture for a rich chocolate flavor. You can also crush chocolate cookies for the crust!
-
Lemon Zest Twist: Add the zest of one lemon plus a little lemon juice to the filling for a refreshing citrus kick.
-
Peanut Butter Swirl: Mix in a couple of tablespoons of peanut butter into the filling for a nutty flavor that pairs beautifully with chocolate or chocolate crust.
-
Tropical Delight: Add crushed pineapple or coconut flakes to the filling for a tropical vibe. A cream-cheese coconut topping is a must here!
-
Sugar-Free Option: Substitute sugar with a sugar replacement like Stevia, ensuring your dessert is friendly for those watching their sugar intake!
Chef’s Notes
This recipe is near and dear to my heart, and I love how it has adapted over the years. When I first started making these cheesecakes, I didn’t even know what whipped cream was—but look at me now! The fun part is experimenting with new flavors and finding perfect toppings.
One funny story: the first time I made these for a party, I got a little too excited and forgot to chill them before bringing them out. Let’s just say we ended up with a creamy mush! Since then, I’ve added a sticky note to my kitchen reminding me to chill before serving—and now you get that nugget of wisdom too!
FAQs and Troubleshooting
1. My cheesecake mixture is too runny. What happened?
Make sure your cream cheese is softened properly; cold cream cheese won’t blend well. If it’s too runny, whip in a bit more heavy cream until it thickens up, and avoid over-mixing.
2. Can I use a different type of cookie for the crust?
Absolutely! Oreos, vanilla wafers, or digestive biscuits work wonderfully too, just remember to adjust the sugar based on the type of cookie.
3. What if I want to make this ahead of time?
You can prepare your cheesecake cups a day in advance! Just keep them covered in the fridge. However, it’s best to add the fresh berries right before serving for that ultimate freshness.
4. Can I freeze these mini cheesecakes?
Yes! Once set, they can be frozen for up to a month. Just allow them to thaw in the fridge before serving, and they’ll taste just as delightful!
Nutritional Info
(Adjust accordingly based on portions and ingredients chosen)
- Serving Size: 1 mini cheesecake cup
- Calories: Approximately 220 calories
- Fat: 15g
- Carbohydrates: 20g
- Protein: 3g
Conclusion
And there you have it! Irresistible No-Bake Mini Cheesecake Cups that are simple, sweet, and oh-so-delicious! With just a few ingredients and a pinch of love, you’ll create a dessert that not only satisfies those sweet cravings but also becomes a memorable part of your gatherings. Remember, cooking is all about having fun and sharing joy with the people you love. Let’s fill the plate and make some kitchen memories together!
So, what are you waiting for? Dust off those jars and start whipping up these mini cheesecakes today! Happy cooking! 🍰
PrintNo-Bake Mini Cheesecake Cups
Deliciously creamy no-bake mini cheesecake cups, perfect for gatherings or a sweet indulgence.
- Prep Time: 15 minutes
- Cook Time: 0 minutes
- Total Time: 45 minutes
- Yield: 4 servings 1x
- Category: Dessert
- Method: No-Bake
- Cuisine: American
- Diet: Vegetarian
Ingredients
- 1 cup graham cracker crumbs
- 3 tbsp melted butter
- 8 oz cream cheese, softened
- 1/4 cup sugar
- 1 tsp vanilla extract
- 1/2 cup heavy cream
- Fresh berries for topping
Instructions
- Prepare your containers: Grab some small cups or jars for serving.
- Make the crust: Combine graham cracker crumbs and melted butter in a bowl.
- Fill the bottom: Evenly distribute the crust mixture into each cup.
- Whip the cream: Beat the heavy cream until it forms soft peaks.
- Prepare the cheesecake mixture: Beat the cream cheese until smooth, then add sugar and vanilla.
- Combine the mixtures: Gently fold in the whipped cream into the cream cheese mixture.
- Fill the cups: Spoon the cheesecake filling into each cup.
- Chill: Refrigerate the filled cups for at least 30 minutes.
- Top with fresh berries: Add berries on top just before serving.
- Enjoy! Serve and savor the delightful mini cheesecakes.
Notes
Add your favorite toppings for an extra twist, like chocolate or lemon zest.
Nutrition
- Serving Size: 1 serving
- Calories: 220
- Sugar: 10g
- Sodium: 250mg
- Fat: 15g
- Saturated Fat: 9g
- Unsaturated Fat: 6g
- Trans Fat: 0g
- Carbohydrates: 20g
- Fiber: 1g
- Protein: 3g
- Cholesterol: 30mg
Keywords: cheesecake, no-bake, dessert, mini dessert, sweet treat