Platefulkitchen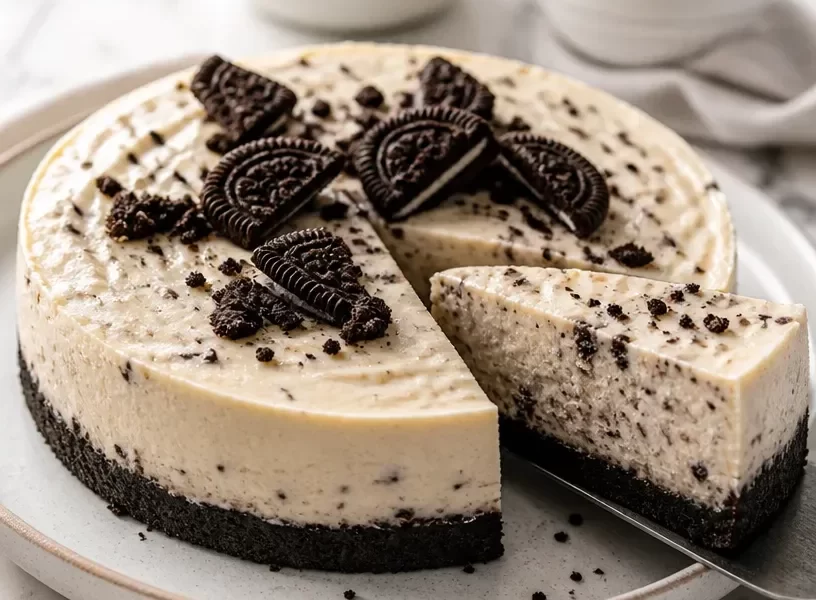
Whipping Up Delight: Protein Cookies & Cream Cheesecake
Hello, fellow food lovers! Today, we’re diving into a delicious twist on a classic dessert: Protein Cookies & Cream Cheesecake. This recipe is perfect for anyone looking to satisfy their sweet tooth while keeping it balanced and nutritious— and who doesn’t love cheesecake, right?
Just imagine creamy layers of cheesecake goodness blended with the irresistible crunch of cookies and a touch of protein magic. It checks all the boxes for a comforting dessert that feels indulgent yet is rooted in wholesome ingredients. Grab your apron and let’s get started!
A Slice of Nostalgia
Whenever I think of cheesecake, I’m taken back to memorable family gatherings at my grandma’s house, where dessert was always the grand finale. She had a magical way of making everything feel special, especially her signature cheesecake. It was rich and creamy, filled with laughter and warmth as we all indulged in sweet bites after a hearty dinner.
Fast forward to today, I find that those cherished moments often get revived in my kitchen— and what better way to relive those memories than with a modern, healthier take? Enter the Protein Cookies & Cream Cheesecake! With every bite, I feel transported back to those lively gatherings. Every slice tells a story of comfort, love, and a little bit of cheeky indulgence.
Ingredients
Now, let’s take a look at our superstar ingredients. Here’s what we need:
-
Greek Yogurt or Cottage Cheese (2 cups)
This is the creamy base of our cheesecake! Greek yogurt is thicker and adds a protein boost, while cottage cheese offers a lighter texture. Both are excellent choices. If you want a silkier cheesecake, opt for Greek yogurt. -
Protein Powder (1 scoop, any flavor)
I recommend vanilla or cookies & cream flavor to enhance the yum factor. Choose a quality protein powder that you enjoy! If you’re vegan, look for plant-based options. -
Light Flour Alternative (1 cup)
Almond flour or oat flour works wonders here. They add texture without weighing down the cheesecake. You can also use whole wheat flour for a heartier version. -
Reduced-Fat Cream Cheese (8 ounces)
This is where our cheesiness comes from! Using reduced-fat cream cheese keeps things lighter, but feel free to go full-fat for that rich, velvety texture. -
Sweetener (1/2 cup, your choice)
I love using honey or maple syrup for a natural sweetness, but feel free to adjust according to your taste. If you prefer a sugar-free version, you can use a sugar substitute like stevia or erythritol. -
Flavor-Specific Ingredients
- Crushed Cookies (1 cup): Oreos or any chocolate cookies will rock this recipe! For a healthier twist, try whole grain or gluten-free cookies.
- Vanilla Extract (1 teaspoon): This adds depth to the cheesecake flavor.
- Salt (a pinch): Don’t skip this! It balances the sweetness beautifully.
Step-by-Step Instructions
Alright, let’s get to the fun part—making our Protein Cookies & Cream Cheesecake!
-
Preheat the Oven: Start by preheating your oven to 325°F (160°C). This step is crucial! A hot oven helps to achieve that luscious, creamy texture in the cheesecake.
-
Prepare the Baking Dish: Grab a 9-inch springform pan or any round cake pan with sides. Lightly grease it with cooking spray or line the bottom with parchment paper for easy removal later.
-
Mix the Base: In a mixing bowl, combine the reduced-fat cream cheese and Greek yogurt or cottage cheese. Use an electric mixer on medium speed until it’s smooth and fluffy. This process builds air, which makes the cheesecake rise beautifully.
-
Add the Sweetener: Gradually mix in your sweetener of choice, followed by the protein powder and flour. Make sure everything is thoroughly combined! A little tip: don’t overmix—just until smooth. We don’t want it too fluffy.
-
Incorporate Vanilla and Salt: Add the vanilla extract and a pinch of salt, then mix until evenly distributed. This combination of flavors is about to take your taste buds to cheesecake heaven!
-
Stir in the Cookies: Gently fold in the crushed cookies using a spatula. This is where the fun happens! You’ll have those delightful cookie pieces throughout the cheesecake for extra crunch.
-
Pour into the Pan: Transfer the cheesecake mixture into your prepared pan, smoothing out the top with a spatula. This step makes it look nice and neat!
-
Bake Your Cheesecake: Pop it in the oven and bake for 30-35 minutes, or until the edges are set and the center has a slight jiggle. Every oven is different, so keep an eye on it!
-
Cool and Chill: Once baked, turn off the oven and crack the door open. Let the cheesecake cool in the oven for about 30 minutes—this helps prevent cracks on the surface. After that, move it to the fridge and chill for at least 2 hours (or overnight for best results).
-
Serve It Up: Once chilled, release the cheesecake from the springform pan, slice it up, and get ready to dig in!
Serving Suggestions
To serve your Protein Cookies & Cream Cheesecake, place a generous slice on a plate. You can garnish it with a dollop of whipped cream or a sprinkle of crushed cookies on top for that extra flair. Drizzle some chocolate sauce or caramel if you’re feeling indulgent! Don’t forget to grab a fork and enjoy every creamy, crunchy bite.
Recipe Variations
-
Chocolate Swirl: Before baking, swirl in a couple of tablespoons of melted dark chocolate into the cheesecake mix for a decadently rich flavor.
-
Fruit-Infused: Add a layer of fresh berries (like strawberries or raspberries) on top before serving, or even fold them into the cheesecake mix for a fruity twist.
-
Nutty Addition: Mix in some chopped nuts like pecans or walnuts for extra texture. Toast them lightly for an added depth of flavor!
-
Vegan Version: Swap the cream cheese for a vegan alternative, use silken tofu instead of Greek yogurt, and replace the eggs with flaxseed meal or chia seeds.
-
Seasonal Flavors: For a pumpkin cheesecake version, add canned pumpkin and spices like cinnamon and nutmeg during the mixing phase.
Chef’s Notes
This Protein Cookies & Cream Cheesecake has become a go-to recipe in my household. I remember experimenting with the texture at first, and it was a bit of a journey to get it just right. But what I discovered was magical—layering the flavors together not only made for a delicious dessert but also sparked many enjoyable evenings with friends and family.
One funny kitchen story—while mixing my ingredients one day, I got a bit too enthusiastic with my electric mixer, sending a dollop of cheesecake batter flying across the kitchen! It made for a good laugh and an even better lesson in moderation!
FAQs and Troubleshooting
1. What can I do if my cheesecake cracks?
Cheesecakes can crack if they bake too quickly. To reduce the chances, always bake at a lower temperature and allow it to cool gradually in the oven before transferring to the fridge.
2. How do I know when my cheesecake is done?
The edges should be set, while the center will have a slight jiggle—sort of like Jell-O. It will set up perfectly as it cools in the fridge.
3. Can I freeze the cheesecake?
Absolutely! Wrap it well in plastic wrap and foil, and it can be frozen for up to 2 months. Thaw in the fridge before serving.
4. Why is my cheesecake too dense?
Overmixing your batter can lead to a dense texture. Remember to mix just until combined, and use room temperature ingredients for a smoother batter.
Nutritional Info
While I didn’t provide exact nutritional information, using Greek yogurt and reduced-fat cream cheese definitely keeps this cheesecake on the lighter side! It’s a delicious way to indulge without going overboard on calories.
There you have it! A delightful Protein Cookies & Cream Cheesecake that’s not only delicious but also a fun way to bring your family together at the table. I hope you enjoy making it as much as I do! Until next time, happy cooking, and remember: let’s fill the plate together!
PrintProtein Cookies & Cream Cheesecake
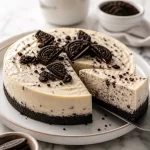
A delicious twist on classic cheesecake made healthier with protein-packed ingredients.
- Prep Time: 15 minutes
- Cook Time: 35 minutes
- Total Time: 120 minutes
- Yield: 8 servings 1x
- Category: Dessert
- Method: Baking
- Cuisine: American
- Diet: Protein-rich, Vegetarian
Ingredients
- 2 cups Greek Yogurt or Cottage Cheese
- 1 scoop Protein Powder (any flavor)
- 1 cup Light Flour Alternative (Almond or Oat Flour)
- 8 ounces Reduced-Fat Cream Cheese
- 1/2 cup Sweetener (honey, maple syrup, or sugar substitute)
- 1 cup Crushed Cookies (Oreos or any chocolate cookies)
- 1 teaspoon Vanilla Extract
- a pinch Salt
Instructions
- Preheat the oven to 325°F (160°C).
- Prepare a 9-inch springform pan by greasing it or lining with parchment paper.
- Mix the reduced-fat cream cheese and Greek yogurt or cottage cheese until smooth.
- Add the sweetener, protein powder, and flour; mix until combined.
- Incorporate the vanilla extract and salt, then mix until evenly distributed.
- Stir in the crushed cookies gently.
- Pour the cheesecake mixture into the prepared pan, smoothing the top.
- Bake for 30-35 minutes until edges are set and center jiggles slightly.
- Cool in the oven for 30 minutes, then chill in the fridge for at least 2 hours.
- Serve and enjoy your cheesecake!
Notes
This cake pairs beautifully with a drizzle of chocolate sauce or crushed cookies on top.
Nutrition
- Serving Size: 1 slice
- Calories: 250
- Sugar: 10g
- Sodium: 300mg
- Fat: 8g
- Saturated Fat: 3g
- Unsaturated Fat: 4g
- Trans Fat: 0g
- Carbohydrates: 30g
- Fiber: 2g
- Protein: 15g
- Cholesterol: 25mg
Keywords: cheesecake, protein, dessert, healthy dessert, creamy dessert