Platefulkitchen
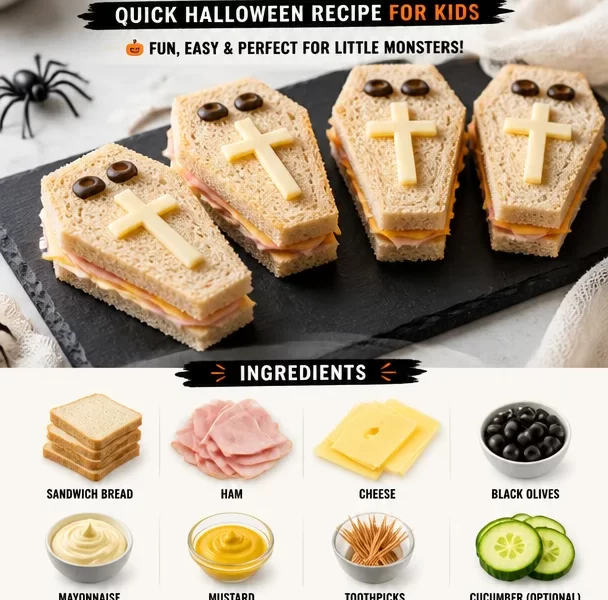
Terrifying Tombstone Sandwiches: A Spooktacular Recipe from El Puchero de Mari
Hello, fellow food enthusiasts! Welcome back to Plateful Kitchen, where we whip up dishes that are as comforting as they are fun! Today, I’m sharing a Halloween-inspired treat that will bring a smile (and maybe a little fright) to your dining table—Terrifying Tombstone Sandwiches! It’s a fun and creative recipe that’s perfect for gathering with friends and family during this spooky season.
Imagine a table filled with eerie decorations, laughter echoing around as everyone dives into these delicious and whimsical sandwiches. My heart races just thinking about the delight on everyone’s faces as they unwrap these tasty treats, revealing gooey fillings and spookily shaped bread. It’s all about the moments we share, whether it’s over a plateful of good food or a frightful feast. Now, let’s dive into how to create these creepy yet delightful sandwiches!
My Spooky Sandwich Story
Growing up, Halloween was a holiday that made our kitchen buzz with excitement. My mom had a knack for creating thrilling yet delicious treats. I remember one year, we transformed ordinary sandwiches into “witch fingers" with sliced carrots for nails and sardines for an unsettling twist—trust me, my sister and I were both terrified and intrigued.
That memory stayed with me, sparking my love for fun, thematic cooking. When I set out to create my own twist on Halloween meals, the idea of these Terrifying Tombstone Sandwiches popped into my head. They’re not only easy to make but also a great way to engage kids in the kitchen, letting them explore their creativity while learning the value of good food. With a little flair and some imagination, we can turn mundane meals into something that sets the mood for the season!
Ingredients
Here’s what you’ll need to create these delightful haunted sandwiches:
-
Bread (Preferably Whole Wheat or Rye)
- Gives a wonderful grainy flavor and spooky look. Feel free to swap for gluten-free bread or your favorite variety.
-
Cream Cheese or Soft Goat Cheese
- Acts as a delicious base for the fillings. Substitute with hummus for a dairy-free option or a herbed cheese spread for more flavor.
-
Sliced Deli Meats (Turkey, Ham, or Salami)
- The meaty layer adds protein and richness. You can easily switch to roasted veggies for a vegetarian twist.
-
Sliced Cheese (Cheddar or Swiss)
- Provides that creamy perfect melt. Vegan cheese can work here too for those avoiding dairy.
-
Olives (Black or Green)
- A spooky addition for those “eyes” on your tombstones! Use grapes or capers if you want a different texture.
-
Thinly Sliced Vegetables (Cucumbers, Bell Peppers)
- Adds crunch and freshness. Carrots, radishes, or lettuce also make excellent choices.
-
Edible Markers or Food Coloring
- These are essential for decorating! If you don’t have them, use paprika or sesame seeds to create little tombstone designs.
Step-by-Step Instructions
-
Prepare Your Work Area:
- Start by cleaning your workspace. Cooking is always more enjoyable in a tidy environment! Set out all of your ingredients close at hand—it makes the assembly much smoother.
-
Cut the Bread:
- Use a fun tombstone-shaped cookie cutter to cut out your bread slices. If you don’t have one, a knife will work magic! Cut the corners to create that classic tombstone shape.
-
Spread the Cheese:
- Generously spread your choice of cream cheese or goat cheese on one side of the bread. This will hold your fillings and give that creaminess we all crave.
-
Layer on the Meats and Cheeses:
- Place your sliced deli meats and cheese on top of the spread. Make sure you have enough to fill the sandwich but not so much that it spills everywhere. Think about balance—the creamy, the salty, and that tiny crunch from the veggies!
-
Add Veggies:
- Layer the thinly sliced veggies over your meats and cheese. You can think of these as the “earthy” elements of your tombstones.
-
Assemble and Top It Off:
- Place another slice of tombstone-shaped bread on top to complete the sandwich. Press down gently to ensure it holds together.
-
Decorate Your Tombstones:
- Grab your edible markers and let your creativity run wild! Draw creepy designs or write spooky names on the top piece of bread—let the kids join in and make it a family art session!
-
Cutting Into Pieces:
- For a more manageable bite, slice your sandwiches into halves or quarters (triangular cuts mimic grave markers perfectly).
-
Store or Serve:
- If you’re not serving immediately, cover your sandwiches with a damp paper towel and seal them in an airtight container to keep them fresh until it’s time to eat!
Serving Suggestions
Arrange your Terrifying Tombstone Sandwiches on a spooky serving platter garnished with plastic spiders, eerie candlelight, and some vibrant vegetable garnishes for color. You could even create a graveyard scene with some crumbled crackers as dirt. Your guests will be thrilled and impressed by this haunting presentation!
Recipe Variations
- Sweet & Spooky: Swap out the savory elements for peanut butter and jelly, and decorate with chocolate chips and banana slices for eyes.
- Regional Twist: Use traditional fillings from different cuisines, like spiced chickpea spread and roasted eggplant for a Mediterranean twist.
- Vegan Version: Replace all dairy with plant-based options and incorporate avocado or tofu to add richness.
- Flavor Explosion: Add herbs and spices like basil or chipotle mayo for added zing.
Chef’s Notes
Whenever I make these sandwiches, it reminds me of the sheer joy of creativity in cooking. It’s a chance to let out that inner child and have fun with food. My dear friend once laughed at me when I turned a simple sandwich into a Halloween masterpiece, but by the end of the night, they were begging me for the recipe. Cooking should be about playfulness, flavor, and fun—don’t be afraid to make a mess in the kitchen!
FAQs and Troubleshooting
1. What if I can’t find a tombstone cookie cutter?
- No worries! You can simply use any cookie cutter shape or cut the bread freehand. A knife works just as well, and sometimes that makes for the most interesting shapes!
2. Can I make these ahead of time?
- Absolutely! You can prep the sandwiches a few hours in advance. Just make sure to store them in an airtight container to keep the bread fresh and soft.
3. How can I make them gluten-free?
- Substituting regular bread for gluten-free options works wonderfully. Check the label to ensure your other ingredients are also gluten-free.
4. What can I do with leftover ingredients?
- Use leftover veggies and cheese in salads, or whip up a tasty dip with the extra cream cheese. Just remember—waste not, want not in the kitchen!
With these Terrifying Tombstone Sandwiches, you’re not just preparing food; you’re creating an experience—one that’s about fun, creativity, and deliciousness. So, grab your family, your friends, and your favorite spooky playlist, and let’s make this Halloween a feast to remember! Happy cooking, and until next time, let’s fill our plates with joy!
PrintTerrifying Tombstone Sandwiches

A Halloween-inspired treat that combines creativity and deliciousness for a spooky gathering.
- Prep Time: 15 minutes
- Cook Time: 0 minutes
- Total Time: 15 minutes
- Yield: 4 servings
- Category: Snack
- Method: No-Cook
- Cuisine: American
- Diet: Vegetarian
Ingredients
- Whole Wheat or Rye Bread
- Cream Cheese or Soft Goat Cheese
- Sliced Deli Meats (Turkey, Ham, or Salami)
- Sliced Cheese (Cheddar or Swiss)
- Olives (Black or Green)
- Thinly Sliced Vegetables (Cucumbers, Bell Peppers)
- Edible Markers or Food Coloring
Instructions
- Prepare Your Work Area: Clean your workspace and set out all ingredients.
- Cut the Bread: Use a tombstone-shaped cookie cutter or knife for the bread slices.
- Spread the Cheese: Generously spread cream cheese or goat cheese on one side of the bread.
- Layer on the Meats and Cheeses: Add sliced deli meats and cheese on top of the spread.
- Add Veggies: Layer sliced veggies over the meats and cheese.
- Assemble and Top It Off: Place another slice of bread on top and press gently.
- Decorate Your Tombstones: Use edible markers to create designs or names on the bread.
- Cutting Into Pieces: Slice sandwiches into halves or quarters for easier bites.
- Store or Serve: Cover sandwiches with a damp paper towel and seal in an airtight container if not serving immediately.
Notes
These sandwiches can be prepared ahead of time and stored in an airtight container.
Nutrition
- Serving Size: 1 sandwich
- Calories: 400
- Sugar: 3g
- Sodium: 600mg
- Fat: 20g
- Saturated Fat: 9g
- Unsaturated Fat: 8g
- Trans Fat: 0g
- Carbohydrates: 36g
- Fiber: 5g
- Protein: 15g
- Cholesterol: 30mg
Keywords: Halloween, sandwiches, spooky food, kids cooking, fun recipes