Platefulkitchen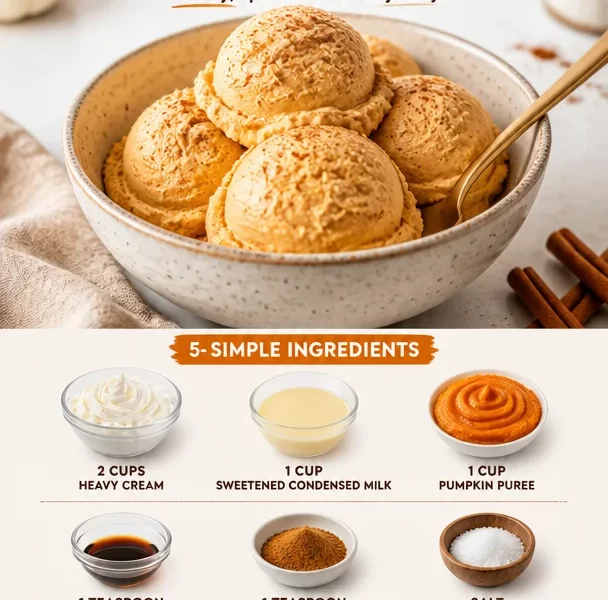
No-Churn Pumpkin Ice Cream: Fall’s Creamy Delight
Hello, my fellow food lovers! Are you ready to indulge in a delicious treat that will have you dreaming of fall? Today, I’m excited to share with you a delightful recipe for No-Churn Pumpkin Ice Cream. Yes, you heard it right—no ice cream maker necessary! This easy recipe is all about creating a creamy, dreamy dessert that’s perfect for chilly evenings or any moment when you want to taste a little bit of autumn bliss.
This delectable pumpkin ice cream captures the essence of fall in every spoonful. With spices that will warm your heart and a pumpkin flavor that’s both comforting and nostalgic, you’ll find yourself falling in love with this treat—just like I have! Let’s dive into this delicious journey together, shall we?
A Spoonful of Nostalgia
Growing up, autumn meant a family gathering around the table, where the smell of freshly baked pies would fill the air. My grandmother was the queen of pumpkin pie, and every year, she would whip up her famous recipe, filling our home with the scents of cinnamon, nutmeg, and joy. I remember sneaking into the kitchen, trying to steal spoonfuls of the unbaked filling, reveling in that velvety flavor.
Later, during my college years, I discovered the magic of no-churn ice cream thanks to a friend who had no kitchen-making skills but an insatiable sweet tooth. Together, we blended what we had on hand—heavy cream, a can of pumpkin, and some pantry spices. As we licked the spoon clean, I knew we had created something special—a dessert that carried forward those cherished moments and scents of my childhood pumpkin experiences. That recipe eventually evolved into what I proudly share with you today, a comforting and unbelievably delicious No-Churn Pumpkin Ice Cream.
Ingredients
Let’s gather our ingredients! Here’s what you’ll need for this scrumptious pumpkin ice cream:
-
2 cups heavy cream: This is the base of our ice cream, providing that lovely creamy, rich texture. If you prefer a lighter version, you can substitute it with half-and-half, but the creaminess will be slightly sacrificed.
-
1 cup sweetened condensed milk: This sweet goodness not only adds sweetness but also creates that dreamy consistency. If you want to DIY, you can make homemade sweetened condensed milk or use store-bought alternatives like coconut condensed milk for a dairy-free version.
-
1 cup pumpkin puree: Make sure you use pure pumpkin puree and not pumpkin pie filling, which contains added sugars and spices. You can also opt for homemade pumpkin puree if you’re feeling adventurous.
-
1 teaspoon vanilla extract: This ingredient enhances the overall flavor and adds a touch of warmth. Look for pure vanilla extract for the best taste; imitation vanilla can leave an artificial aftertaste.
-
1 teaspoon pumpkin pie spice: An essential mix of spices that gives this ice cream its cozy, fall flavor! You can substitute it with a mix of cinnamon, nutmeg, and ginger if you bake your own spice blend.
-
Salt to taste: A pinch of salt elevates the flavors and makes them shine. Don’t skip this step; it’s a game changer!
Step-by-Step Instructions
Ready to create ice cream magic in your kitchen? Let’s get started!
-
Whip the Cream: In a large mixing bowl, pour the heavy cream and whip it using an electric mixer or whisk until stiff peaks form. This process should take about 4-5 minutes. Don’t rush it—those stiff peaks are crucial for that light, airy texture!
-
Mix the Pumpkin Base: In a separate bowl, combine the pumpkin puree, sweetened condensed milk, vanilla extract, pumpkin pie spice, and a pinch of salt. Stir these together until smooth. At this stage, be sure to taste the mixture and adjust the spice to your liking. Maybe you like a little more cinnamon or nutmeg? Feel free to get creative!
-
Fold It All Together: Once your cream is fluffy and your pumpkin mixture is perfectly spiced, gently fold the two together. Use a spatula to combine the whipped cream with the pumpkin mixture, being careful not to deflate that lovely air you just whipped into it. Mix until you see a beautiful marbled effect—don’t worry about achieving complete uniformity!
-
Transfer to Freezer Container: Pour the combined mixture into a clean, airtight container, smoothing the top with a spatula. Seal the container and make sure it’s freezer-ready!
-
Freeze: Place the container in the freezer and let it chill for at least 6 hours or overnight. This waiting game is tough, but trust me, it’ll be worth it when you have a scoop of creamy goodness waiting for you!
Serving Suggestions
When it’s time to serve, grab your favorite ice cream scooper and dish out generous helpings. For an extra special touch, consider serving it in a waffle cone, alongside some gingersnap cookies, or with a sprinkle of crushed pecans or walnuts on top—how inviting and cozy does that sound? You can even drizzle some caramel or chocolate sauce over it for a decadent finish!
Recipe Variations
Now that you’ve mastered the base No-Churn Pumpkin Ice Cream, let’s talk about ways to mix it up:
-
Maple-Pecan Delight: Swirl in a couple of tablespoons of maple syrup and fold in toasted pecans before freezing for a nutty twist.
-
Chocolate Chunk Pumpkin: Add a cup of chopped chocolate or chocolate chips into the pumpkin mixture for a lovely contrast of flavors.
-
Spiced Rum Pumpkin: A tablespoon of spiced rum can elevate the flavor profile and add a festive kick. Perfect for an adult gathering!
-
Nut-Free Option: Ensure all ingredients are nut-free and consider swapping in sunflower seeds for a fun crunch.
-
Vegan Pumpkin Ice Cream: Use coconut cream in place of heavy cream and opt for coconut condensed milk to create a creamy delight everyone can enjoy!
Chef’s Notes
This No-Churn Pumpkin Ice Cream has evolved a lot since that day in college when I first made it. I’ll never forget the laughter and happy dance of triumph when I took that first bite. Since then, I’ve refined it, experimented with flavors, and it has grown into a recipe that fills me with joy and nostalgia, ensuring every scoop shared brings people together, creates memories, and brings back that autumn charm.
Additionally, if you happen to over-whip the cream (yikes!), don’t panic! Just fold in a tablespoon or two of fresh cream to bring it back to the right texture.
FAQs and Troubleshooting
1. Can I use fresh pumpkin instead of canned?
Absolutely! Just make sure it’s cooked and pureed until smooth. You might have to add in some sweetener since fresh pumpkin can be less sweet than canned.
2. Why didn’t my ice cream freeze well?
Make sure you’re using heavy cream with a high fat content for best results. If it still doesn’t set, it could be due to the kitchen temperature or the ingredients not being mixed properly.
3. How long does this ice cream last?
In the freezer, this ice cream can last up to a month. But let’s be honest—you’re going to enjoy it long before then!
4. What can I do if my ice cream is too hard to scoop?
Before serving, let the ice cream sit at room temperature for about 5-10 minutes. The warmth will soften it just enough for you to scoop out that delightful creamy goodness!
Nutritional Info
Per Serving (1/2 cup):
- Calories: 290
- Total Fat: 22g
- Saturated Fat: 13g
- Carbohydrates: 25g
- Sugar: 20g
- Protein: 2g
And there you have it! Our No-Churn Pumpkin Ice Cream is not just a dessert; it’s a way to bring loved ones together, share laughter, and savor those precious moments. I hope this recipe finds its way into your kitchens, filling your home with warmth and deliciousness. Thanks so much for joining me today at Plateful Kitchen. Let’s keep creating, exploring, and filling our plates with joy! Enjoy your ice cream, and happy cooking!
PrintNo-Churn Pumpkin Ice Cream
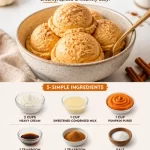
Indulge in this delicious No-Churn Pumpkin Ice Cream that captures the essence of fall with creamy pumpkin and warm spices.
- Prep Time: 15 minutes
- Cook Time: 0 minutes
- Total Time: 360 minutes
- Yield: 4 servings 1x
- Category: Dessert
- Method: Freezing
- Cuisine: American
- Diet: Vegetarian
Ingredients
- 2 cups heavy cream
- 1 cup sweetened condensed milk
- 1 cup pumpkin puree
- 1 teaspoon vanilla extract
- 1 teaspoon pumpkin pie spice
- Salt to taste
Instructions
- Whip the Cream: In a large mixing bowl, pour the heavy cream and whip it using an electric mixer or whisk until stiff peaks form. This should take about 4-5 minutes.
- Mix the Pumpkin Base: In a separate bowl, combine the pumpkin puree, sweetened condensed milk, vanilla extract, pumpkin pie spice, and a pinch of salt. Stir until smooth.
- Fold It All Together: Gently fold the whipped cream into the pumpkin mixture using a spatula, being careful not to deflate the air.
- Transfer to Freezer Container: Pour the mixture into a clean, airtight container, smoothing the top with a spatula. Seal the container.
- Freeze: Place in the freezer for at least 6 hours or overnight.
Notes
For extra flavor, consider serving with waffle cones and gingersnap cookies, or drizzle with caramel or chocolate sauce.
Nutrition
- Serving Size: 1/2 cup
- Calories: 290
- Sugar: 20g
- Sodium: 90mg
- Fat: 22g
- Saturated Fat: 13g
- Unsaturated Fat: 9g
- Trans Fat: 0g
- Carbohydrates: 25g
- Fiber: 1g
- Protein: 2g
- Cholesterol: 60mg
Keywords: pumpkin ice cream, no-churn dessert, fall recipes, easy dessert, vegetarian recipes