Platefulkitchen
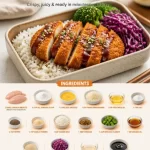
Chicken Katsu Bento Box: An Easy Japanese Lunch Idea
Hello food lovers! Today, I’m thrilled to share with you one of my all-time favorite recipes that perfectly embodies the spirit of Plateful Kitchen: the Chicken Katsu Bento Box. This delightful dish not only packs a punch of flavors but also brings a sense of nostalgia to my kitchen. Picture this: crunchy, golden chicken, fluffy rice, vibrant veggies, and a drizzle of tangy sauce—all beautifully arranged in a bento box, just waiting to be devoured. Let’s dive in!
A Walk Down Memory Lane
I still remember the first time I tasted Chicken Katsu. It was during a summer trip to Japan with my family. We stumbled upon a quaint little restaurant tucked away in a bustling alleyway. The moment we stepped inside, the comforting aroma of frying chicken filled the air, and I felt at home.
As we sat down, my excitement grew. I ordered the Chicken Katsu, intrigued by its crispy breadcrumbs and tender meat. When it arrived, I was captivated not only by its appearance but also by its flavor. The marriage of the crunchy exterior and juicy interior was something I couldn’t forget!
From that day on, I couldn’t get enough of this dish. Back home, I began experimenting in my kitchen; it became a staple for family dinners and lunchtime snacks. And now, sharing it with you feels like passing on a warm hug from my kitchen to yours. Let’s make some Chicken Katsu!
Ingredients
For our Chicken Katsu Bento Box, you’ll need the following ingredients:
-
2 small chicken breasts (about 170g/6 oz each)
Chicken breasts are a tender protein that cooks quickly. For a twist, you might use boneless, skinless thighs for a richer flavor. -
¼ cup all-purpose flour
This will help with the initial coating. If you’re looking for a gluten-free option, try rice flour or a gluten-free blend. -
1 large egg (beaten)
The egg acts as a binding agent. You could use a flax egg (1 tablespoon ground flaxseed mixed with 2.5 tablespoons water) if you want a vegan alternative. -
1 cup Panko breadcrumbs
These Japanese breadcrumbs are light and crispy, giving our katsu that perfect crunch. You can substitute with regular breadcrumbs in a pinch, but the texture will be different. -
1 cup vegetable oil
This is for frying our chicken to golden perfection. Feel free to use canola or peanut oil if you prefer a different flavor. -
¾ tsp salt
Essential for enhancing all the flavors. -
¼ tsp pepper
A little kick never hurts! Adjust to your taste. -
¼ tsp garlic powder
This adds a lovely depth to the flavor. Fresh minced garlic could also work here if you prefer. -
1 cup cooked rice
This will serve as the base for your bento. Sushi rice is a great option, but any short-grain rice works just as well. -
1 tbsp furikake
This is a Japanese seasoning mix, often made with seaweed, sesame seeds, and dried fish. Feel free to skip if you can’t find it, though it adds a lovely umami touch. -
½ cup broccoli florets
Steamed or sautéed, broccoli adds color and nutrients. You can swap it with other veggies like snap peas or bell peppers. -
1 tsp sesame oil
This oil brings a rich, nutty flavor to your dish. You could use olive oil for a milder taste. -
1 tsp sesame seeds
Perfect for garnishing and adding some extra crunch. -
¼ cup red cabbage (shredded thin)
This gives a lovely crunch and color to our bento box. Feel free to mix it up with other leafy greens like spinach. -
1 tbsp rice vinegar
Adds a tangy kick to the cabbage. Apple cider vinegar can be a good alternative. -
1 tbsp tonkatsu sauce
This sweet and tangy sauce is a must for your katsu. If you can’t find it, try mixing ketchup with Worcestershire sauce for a similar flavor.
Step-by-Step Instructions
Now that we have our ingredients ready, let’s turn up the heat and get cooking!
-
Prepare the Chicken: Place the chicken breasts between two sheets of plastic wrap. Using a meat mallet or rolling pin, gently pound them to an even thickness of about 1/2-inch. This helps them cook evenly and stay juicy. Don’t be too aggressive; we want to flatten, not shred!
-
Set Up a Breading Station: Grab three shallow bowls. In the first bowl, add the all-purpose flour mixed with salt, pepper, and garlic powder. In the second bowl, beat the egg. In the third bowl, place the Panko breadcrumbs.
-
Coat the Chicken: Dip each chicken breast into the flour, shaking off any excess. Next, dunk it into the egg, letting any extra drip off before transferring it to the Panko breadcrumbs. Press the breadcrumbs onto the chicken to coat evenly, ensuring the whole surface is covered.
-
Heat the Oil: In a large frying pan, pour in the vegetable oil and heat over medium-high until it shimmers. You want it hot enough so that the chicken sizzles when it hits the pan.
-
Fry the Chicken: Carefully place the breaded chicken into the hot oil. Cook for about 4-5 minutes on each side, until golden brown and cooked through (internal temperature should reach 165°F). If your pan is small, fry in batches to avoid overcrowding; this will keep the heat consistent and the chicken crispy.
-
Drain the Chicken: Once cooked, transfer the chicken to a paper towel-lined plate to absorb excess oil. While it’s resting, you can prepare your sides!
-
Steam the Broccoli: In the same pan (after draining most of the oil), add your broccoli florets. Sauté in a bit of sesame oil until bright green and tender, about 3-4 minutes. Toss in a sprinkle of sesame seeds for an extra crunch.
-
Prepare the Cabbage: In a small mixing bowl, toss the shredded red cabbage with rice vinegar and a pinch of salt. This adds a refreshing crunch to your bento.
-
Cook the Rice: If you haven’t prepared your rice yet, do so now! Follow the package instructions, and once cooked, fluff it with a fork. Mix in the furikake for added flavor.
-
Slice the Chicken: After resting, slice the chicken katsu into strips. This not only looks beautiful but also makes it easy to eat.
Serving Suggestions
Now it’s time to put it all together! Grab your bento box or a plate and begin layering. Start with a generous scoop of rice on one side, topped with some furikake. Nestle the chicken katsu strips beside the rice, and fill the other compartments with the sautéed broccoli and tangy cabbage. Drizzle a bit of tonkatsu sauce over the katsu just before serving for that extra flavor.
Recipe Variations
Feeling adventurous? Here are some quick twists to customize your Chicken Katsu Bento Box:
- Spicy Katsu: Add a splash of Sriracha to your egg wash for a spicy kick.
- Vegetarian Option: Swap out the chicken for thick slices of eggplant or zucchini. Coat and fry just like you would the chicken.
- Make it a Salad: Serve the katsu on a bed of mixed greens with a drizzle of sesame ginger dressing for a lighter fare.
- Sushi-Style: Use sushi rice and layer some avocado, cucumber, and a sprinkle of wasabi for a fusion twist.
Chef’s Notes
This Chicken Katsu has evolved quite a bit over the years. I used to deep-fry it which, while delicious, felt a little heavy. Now, I love using just enough oil for that perfect crisp without feeling weighed down. Also, I’ve started to incorporate more vegetables into my bento; it’s a great way to balance the meal and sneak in some greens!
A funny story—one time I decided to impress my friends with my Katsu-making skills. I was so excited that I accidentally used powdered garlic instead of fresh, and let’s say, it was a bit overpowering! Now I always measure twice to avoid a mishap like that.
FAQs and Troubleshooting
1. My katsu isn’t crispy! What went wrong?
If your katsu isn’t crispy, the oil may not have been hot enough when you started frying. Ensure the oil is shimmering before adding chicken, and be sure to drain excess oil after frying.
2. What if my chicken is overcooked?
Overcooked chicken can become dry. To prevent this, use a meat thermometer to check for doneness, or keep a close eye on the chicken while frying.
3. Can I make this ahead of time?
Absolutely! You can bread the chicken and store it in the fridge for a few hours before frying. Assemble your bento box just before serving to ensure everything stays fresh.
4. How do I reheat the katsu?
For the best results, reheat in a toaster oven or air fryer to retain crispiness. A microwave can work, but it may soften the crust.
Nutritional Info
While I won’t dive too deep into numbers here, a Chicken Katsu Bento Box typically provides protein from the chicken, carbohydrates from the rice, and a variety of vitamins from colorful vegetables like broccoli and red cabbage, making it a balanced meal option.
I hope you’re as excited to make this Chicken Katsu Bento Box as I am! Cooking should be an enjoyable experience full of flavors and memories, and I can’t wait for you to share it with your loved ones. Grab a plate, pull up a chair, and let’s fill our plates with deliciousness together! Happy cooking!
PrintChicken Katsu Bento Box
A delightful Chicken Katsu Bento Box featuring crispy chicken, fluffy rice, vibrant veggies, and tangy sauce, perfect for lunch or dinner.
- Prep Time: 15 minutes
- Cook Time: 30 minutes
- Total Time: 45 minutes
- Yield: 2 servings 1x
- Category: Main Course
- Method: Frying
- Cuisine: Japanese
- Diet: Non-Vegetarian
Ingredients
- 2 small chicken breasts (about 170g/6 oz each)
- ¼ cup all-purpose flour
- 1 large egg (beaten)
- 1 cup Panko breadcrumbs
- 1 cup vegetable oil
- ¾ tsp salt
- ¼ tsp pepper
- ¼ tsp garlic powder
- 1 cup cooked rice
- 1 tbsp furikake
- ½ cup broccoli florets
- 1 tsp sesame oil
- 1 tsp sesame seeds
- ¼ cup red cabbage (shredded thin)
- 1 tbsp rice vinegar
- 1 tbsp tonkatsu sauce
Instructions
- Prepare the chicken: Place the chicken breasts between two sheets of plastic wrap and pound them to an even thickness of about 1/2-inch.
- Set up a breading station with three shallow bowls: flour mixed with salt, pepper, and garlic powder; beaten egg; and Panko breadcrumbs.
- Coat the chicken: Dip each breast in flour, then egg, then Panko, pressing to ensure a full coating.
- Heat the oil: In a large frying pan, heat the vegetable oil over medium-high until shimmering.
- Fry the chicken: Cook each chicken breast for about 4-5 minutes on each side until golden brown and cooked through.
- Drain the chicken on a paper towel-lined plate to absorb excess oil.
- Steam the broccoli: Sauté in sesame oil for about 3-4 minutes until bright green and tender.
- Prepare the cabbage: Toss shredded red cabbage with rice vinegar and a pinch of salt.
- Cook the rice: Follow the package instructions and mix in the furikake after fluffing.
- Slice the chicken katsu into strips for serving.
Notes
For a vegetarian option, swap chicken for eggplant or zucchini. Serve with a drizzle of tonkatsu sauce for extra flavor.
Nutrition
- Serving Size: 1 serving
- Calories: 550
- Sugar: 5g
- Sodium: 600mg
- Fat: 30g
- Saturated Fat: 4g
- Unsaturated Fat: 20g
- Trans Fat: 0g
- Carbohydrates: 50g
- Fiber: 5g
- Protein: 30g
- Cholesterol: 75mg
Keywords: Chicken Katsu, Bento Box, Japanese Cuisine, Easy Lunch, Comfort Food