Platefulkitchen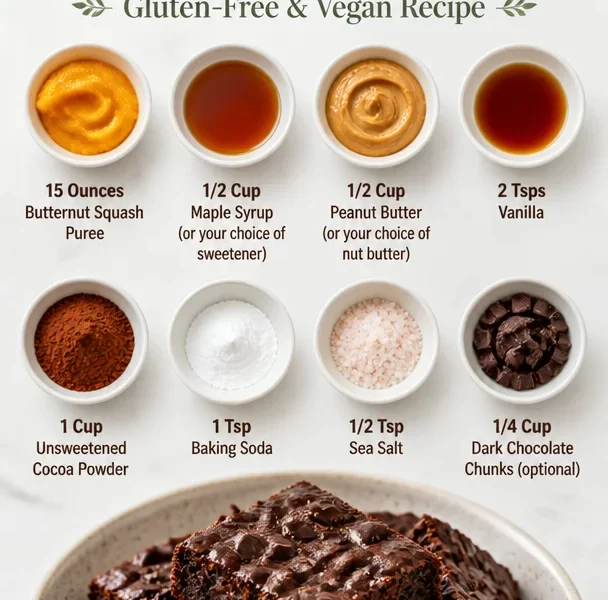
Healthy Butternut Squash Fudge Brownies: Gluten-Free & Vegan Recipe
Hello there, fellow food lovers! Today, I’m excited to share a recipe that’s both scrumptious and healthy: Healthy Butternut Squash Fudge Brownies! If you’ve ever found yourself hesitating before diving into a dessert because you want to keep things on the lighter side, you’re in the right place. These brownies are a fantastic blend of rich chocolate flavor and the natural sweetness of butternut squash, making them a guilt-free treat that satisfies your sweet tooth without the compromise.
A Slice of Nostalgia
Let me take you back to my childhood kitchen, where every Saturday morning began with the delicious aroma of freshly baked goods wafting through the house. My mom, a baking enthusiast, was a pro at turning ordinary ingredients into extraordinary treats. One weekend, she called us in for a surprise: “Today, we’re experimenting with something new!” She brought out a vibrant orange pot of what I later learned was butternut squash puree.
Now, granted, as a kid, I wasn’t the biggest fan of vegetables – I mean, who is? But there was something magical about how Mom blended the squash with cocoa powder and maple syrup that had all of us fawning over these gooey brownies. Looking back, it was a moment that opened my eyes to the possibilities of cooking and how simple ingredients could transform into nourishing delights. Fast forward to today, and this Healthy Butternut Squash Fudge Brownie recipe is a nod to those moments that shaped my love for delicious, comforting food.
Ingredients
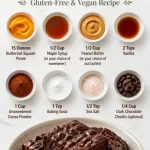
To make these rich, fudgy brownies, you’ll need the following:
- 15 Ounces Butternut Squash Puree: This is the star of the show! It adds moisture and a subtle sweetness. You can use store-bought puree or make your own by roasting the squash until tender and blending it until smooth.
- 1/2 Cup Maple Syrup (or your choice of sweetener): Maple syrup gives a lovely caramel-like flavor and keeps things vegan. You can substitute it with agave syrup or coconut sugar if you prefer.
- 1/2 Cup Peanut Butter (or your choice of nut butter): Peanut butter brings richness and creaminess. Feel free to use almond butter or sunflower seed butter if you want a nut-free option.
- 2 Tsps Vanilla: A splash of vanilla extract elevates the flavor profile, adding warmth to the brownies.
- 1 Cup Unsweetened Cocoa Powder: Make sure you’re using unsweetened cocoa for that rich chocolate taste without added sugars. Dark cocoa powder can also work for a deeper flavor.
- 1 Tsp Baking Soda: This will give our brownies a nice rise.
- 1/2 Tsp Sea Salt: A pinch of salt enhances the flavors and balances the sweetness beautifully.
- 1/4 Cup Dark Chocolate Chunks (optional): I mean, who doesn’t love more chocolate? This is an optional addition, but I highly recommend it for that extra gooey chocolatey experience!
Step-by-Step Instructions
Now let’s get our hands dirty and whip up these delightful brownies!
-
Preheat Your Oven: Preheat your oven to 350°F (175°C). This is a crucial step, as it helps create that chewy texture we’re aiming for.
-
Mix the Wet Ingredients: In a large mixing bowl, combine the butternut squash puree, maple syrup, peanut butter, and vanilla extract. Use a whisk or a fork to blend it all together until smooth. You want these ingredients to marry seamlessly. (Chef Tip: If your peanut butter is really thick, slightly heat it in the microwave for 10-15 seconds to make it easier to mix!)
-
Incorporate the Dry Ingredients: In another bowl, combine the cocoa powder, baking soda, and sea salt. Gradually add this mixture into the wet ingredients, stirring gently. This is where the magic happens! (Chef Insight: Be careful not to overmix at this stage; it can make the brownies tough. Just combine until no dry flour remains.)
-
Add Chocolate Chunks: If you’ve decided to include those delectable dark chocolate chunks, fold them in now. They’ll melt into gooey goodness as they bake — yum!
-
Prepare the Baking Dish: Grab an 8×8 inch baking dish and line it with parchment paper for easy removal. Make sure to leave some overhang, which is super handy when you’re cutting the brownies later.
-
Pour and Spread: Pour the brownie batter into the prepared baking dish, using a spatula to spread it evenly.
-
Bake Time: Pop the dish into your preheated oven and bake for about 25-30 minutes. It’s done when a toothpick inserted into the center comes out mostly clean but with a few crumbs. Remember, brownies continue to cook slightly after removal, so go for that fudgy center!
-
Cool and Slice: Once out of the oven, let them cool in the dish for about 10 minutes before lifting out using the parchment paper. Let them cool completely on a wire rack before cutting into squares. Trust me, the wait is worth it!
Serving Suggestions
For a delightful presentation, serve these brownies on a rustic wooden board or a chic white plate. Top them with a dusting of cocoa powder or a drizzle of maple syrup for a spectacular finish. Want to take it up a notch? Pair with a scoop of dairy-free vanilla ice cream and fresh berries for a mouthwatering dessert that’s sure to impress!
Recipe Variations
- Nut-Free Option: Substitute peanut butter with sunflower seed butter for a completely nut-free dessert.
- Add Spice: Incorporate a teaspoon of cinnamon or a pinch of cayenne for an extra flavor kick.
- Seeds and Nuts: Throw in some chopped walnuts or pecans for added crunch and nutty flavor!
- Coconut Flakes: Add unsweetened shredded coconut to the batter for a tropical twist.
- Keep It Simple: If you prefer, you can skip the chocolate chunks to keep these brownies a bit lighter.
Chef’s Notes
These brownies have been a labor of love! I’ve tweaked the recipe over time, experimenting with different sweeteners and butters to achieve the perfect balance. One memorable mishap was when I accidentally swapped salt for sugar — talk about a salty surprise! My family knows me as the “Queen of Brownies” ever since that fateful baking session, and now I can’t wait to see how these work for you!
FAQs and Troubleshooting
1. Why are my brownies too gooey in the center?
If your brownies are underbaked, they may be too gooey. Ensure that you are baking for the full 25-30 minutes and do the toothpick test. Also, remember that brownies will continue cooking slightly after being removed from the oven.
2. Can I use frozen butternut squash puree?
Absolutely! Just make sure to thaw it and drain any excess liquid before measuring. Frozen puree works just as well as fresh.
3. How do I store leftover brownies?
Store your brownies in an airtight container at room temperature for up to 3 days or in the refrigerator for about a week. They also freeze beautifully! Just wrap them tightly and place them in a freezer-safe container.
4. Can I double the recipe?
You bet! Just use a 9×13 inch baking dish and be sure to check for doneness around the 30-35 minute mark.
Nutritional Info
These brownies are packed with nutrients thanks to the butternut squash! You can expect each brownie to contain approximately 120 calories, 4g protein, 6g fat, and 15g carbohydrates, depending on specific ingredient brands. They’re not just delicious; they’re nourishing too!
So there you have it, my delightful friends! Healthy Butternut Squash Fudge Brownies that are so rich and chocolatey, you won’t believe they’re gluten-free and vegan. I hope you enjoy making these as much as I do. Remember, cooking should be fun and full of love. So, let’s gather around that plate, share a story, and make some delicious memories. Happy baking!
PrintHealthy Butternut Squash Fudge Brownies
Delicious and nutritious brownies made with butternut squash, rich cocoa, and maple syrup, perfect for a guilt-free dessert.
- Prep Time: 15 minutes
- Cook Time: 30 minutes
- Total Time: 45 minutes
- Yield: 16 servings 1x
- Category: Dessert
- Method: Baking
- Cuisine: American
- Diet: Vegan, Gluten-Free
Ingredients
- 15 ounces Butternut Squash Puree
- 1/2 cup Maple Syrup
- 1/2 cup Peanut Butter
- 2 teaspoons Vanilla extract
- 1 cup Unsweetened Cocoa Powder
- 1 teaspoon Baking Soda
- 1/2 teaspoon Sea Salt
- 1/4 cup Dark Chocolate Chunks (optional)
Instructions
- Preheat your oven to 350°F (175°C).
- Mix the butternut squash puree, maple syrup, peanut butter, and vanilla extract together until smooth.
- Incorporate the cocoa powder, baking soda, and sea salt into the wet ingredients, stirring gently.
- Add the optional dark chocolate chunks and fold them into the mixture.
- Prepare an 8×8 inch baking dish by lining it with parchment paper.
- Pour the brownie batter into the prepared baking dish, spreading it evenly with a spatula.
- Bake for about 25-30 minutes, or until a toothpick comes out mostly clean.
- Cool in the dish for 10 minutes, then lift out and cool completely on a wire rack before slicing.
Notes
These brownies can be stored in an airtight container for up to 3 days at room temperature or up to a week in the refrigerator.
Nutrition
- Serving Size: 1 brownie
- Calories: 120
- Sugar: 8g
- Sodium: 150mg
- Fat: 6g
- Saturated Fat: 1g
- Unsaturated Fat: 5g
- Trans Fat: 0g
- Carbohydrates: 15g
- Fiber: 2g
- Protein: 4g
- Cholesterol: 0mg
Keywords: butternut squash brownies, vegan dessert, gluten-free brownies