Platefulkitchen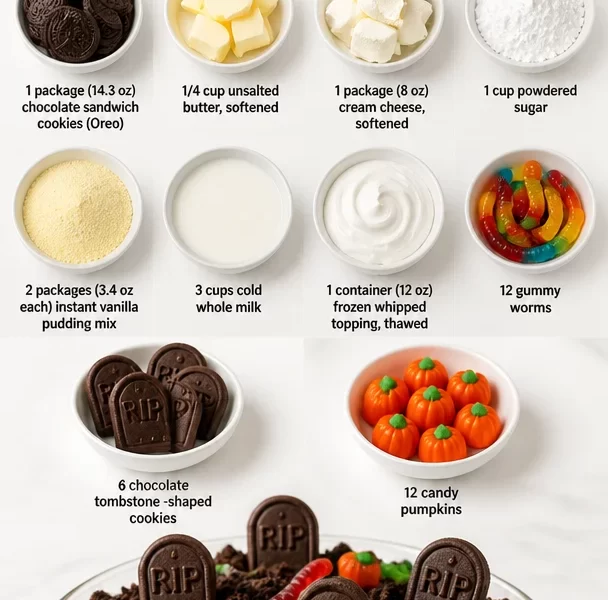
Halloween Oreo Dirt Cake: A Spooktacular Treat to Delight Everyone
As the leaves change and the air turns crisp, the excitement of Halloween begins to creep in like a friendly ghost! There’s something magical about this time of year — pumpkins on porches, spooky decorations, and, of course, the delicious treats that make our taste buds tingle with delight. Today, I want to share with you one of my all-time favorite Halloween desserts: the Halloween Oreo Dirt Cake. This dessert is not only a crowd-pleaser but also a fun way to bring some spooky vibes to any gathering.
Imagine a creamy, chocolatey concoction topped with crushed Oreos that resemble dirt, decorated with gummy worms and miniature tombstone cookies. It’s a dessert that looks like a Halloween-themed masterpiece and tastes absolutely divine! Plus, it’s super easy to make, and you can even get the kids involved, turning your kitchen into a bustling cauldron of creativity.
So, grab those aprons and let’s dive into the world of Halloween Oreo Dirt Cake — a dish that promises to leave smiles on faces and sweetness in hearts!
A Sweet Memory from the Past
Before I guide you through the essentials of making this delightful dessert, let me share a cherished memory that makes this cake even more special. A while back, I hosted a Halloween party at my place, adorned with spooky decorations and flickering candles. I decided to whip up a batch of Oreo Dirt Cake as the centerpiece dessert.
As I was mixing the creamy ingredients, my niece Ava, just six years old at the time, buzzed around the kitchen, her costume smudged with energy — a tiny witch in a fluffy black dress and a pointed hat that was slightly askew. She was fascinated by the whole process, helping me crush the Oreos and sprinkle them on top.
When it was finally time to serve, Ava squealed with delight, pointing at the gummy worms wriggling their way through the "dirt." That night, we dug into the cake, laughter and joy filling the air as each child discovered the hidden surprises in every bite. It was more than just a dessert; it was a wonderful moment of bonding over food that I’ll cherish forever.
Ingredients: Gather Your Spooky Supplies
Here’s what you’ll need to conjure up this delightful Halloween treat:
-
1 package (14.3 oz) chocolate sandwich cookies (Oreo): The star of the show! Not only do these cookies provide the base flavor, but they also give that authentic "dirt" look. If you want to mix it up, you can use vanilla Oreos for a different spin.
-
1/4 cup unsalted butter, softened: This adds richness and helps bind the crust together. If you’re looking for a dairy-free option, try coconut oil in a 1:1 ratio.
-
1 package (8 oz) cream cheese, softened: Cream cheese gives a luscious texture to the filling. Neufchâtel cheese can be a lighter option if you’d like to cut down on fat.
-
1 cup powdered sugar: This sweetens our filling to perfection! If you prefer a less sugary option, you can use agave syrup, adjusting the quantity to taste.
-
2 packages (3.4 oz each) instant vanilla pudding mix: These add creaminess and a touch of vanilla flavor. You can switch this with chocolate pudding mix for an extra chocolatey experience.
-
3 cups cold whole milk: Essential for preparing the pudding. Almond milk or oat milk can be substituted for a dairy-free twist!
-
1 container (12 oz) frozen whipped topping, thawed: This adds lightness and creaminess to the dessert. If you prefer a homemade version, try whipped heavy cream instead.
-
12 gummy worms: The perfect spooky topping! Feel free to experiment with other gummy candies like creepy spiders or eyeballs for a fun visual twist.
-
6 chocolate tombstone-shaped cookies: These add a delightful decoration to your cake. If you can’t find them, try using homemade cookies with a simple tombstone shape or other spooky-themed treats.
-
12 candy pumpkins: To create that classic Halloween vibe. You can use any other seasonal candy or leave them out if you prefer a more minimalist look.
Step-by-Step Instructions: How to Make Magic Happen
Now that you have all your ingredients laid out, let’s get down to business! Follow these step-by-step instructions to create your Halloween Oreo Dirt Cake:
-
Prepare the Oreo Crust:
- Begin by preheating your oven to 350°F (175°C). Yes, I’m aware this is a no-bake dessert, but we want to get everything ready for assembly!
- Take your 14.3 oz package of Oreo cookies and crush them into fine crumbs. You can do this by placing the cookies in a resealable plastic bag and hitting them with a rolling pin or using a food processor for quicker results. You’ll need about 2 cups of crumbs.
- In a mixing bowl, combine the crushed cookies with 1/4 cup softened unsalted butter. Mix until the crumbs resemble wet sand. This will be your crust, which adds a delightful crunch to the dessert.
- Press the mixture evenly into the bottom of a 9×13 inch baking dish, firming it up with a spatula. Set it aside while you prepare the filling.
-
Make the Cream Cheese Filling:
- In a large bowl, add 8 oz of softened cream cheese and mix it with a hand mixer until smooth and creamy. This is where the magic begins!
- Gradually add in 1 cup of powdered sugar, blending until fully incorporated. You want it to be sweet but not overly overpowering.
- Now, it’s time to introduce the pudding! Mix in the two packages of instant vanilla pudding and 3 cups of cold whole milk. Beat it all together until well combined and thick. It should have a lovely, creamy texture!
-
Fold in the Whipped Topping:
- Gently fold the thawed whipped topping into your pudding mixture using a spatula. This adds lightness to the filling. Be careful not to deflate it too much — we want it airy and fluffy.
- Once everything is well incorporated, pour this dreamy mixture over the Oreo crust, spreading it out evenly. It should look like a cloud of deliciousness!
-
Chill the Cake:
- Cover your cake with plastic wrap or aluminum foil and refrigerate for at least 2-4 hours to allow it to set. This step is crucial for achieving that perfect slice later!
-
Decorate with Halloween Flair:
- When you’re ready to serve, remove the cake from the fridge. Grab that remaining crush Oreo cookie and sprinkle a layer on top to resemble dirt.
- Now for the fun part: arrange the gummy worms slithering across the top and set up the tombstone cookies strategically within the "dirt." Finish it off with those adorable candy pumpkins to give it that extra Halloween touch!
Serving Suggestions: How to Plate Your Creation
When it’s finally time to indulge, slice the cake into generous squares. You can serve it in the original 9×13 dish for a rustic touch or transfer it to a beautiful cake stand to showcase the layers of creamy delight. Don’t forget to provide spoons — it’s a must with this dessert! To elevate the presentation, consider adding little flags or decorative picks with spooky designs for extra flair.
Recipe Variations: Get Creative!
If you’re feeling adventurous, here are a few fun variations to switch up your Halloween Oreo Dirt Cake:
-
Pumpkin Spice Dirt Cake: Add a tablespoon of pumpkin spice into the cream cheese filling and swap the vanilla pudding for pumpkin pudding for a festive twist.
-
Chocolate Mud Cake: Substitute half the Oreo crust with crushed chocolate graham crackers and incorporate chocolate pudding instead of vanilla for a chocolate lover’s dream.
-
Nutty Surprise: Mix in chopped nuts, like walnuts or pecans, into the filling for a delightful crunch and unexpected flavor.
-
Vegan Version: Use vegan cream cheese, coconut whipped cream, and dairy-free chocolate cookies for a plant-based take on this classic dessert.
-
Fruit Fun: Layer in some fruit like sliced strawberries or blueberries between the cream cheese layer for a fresh burst of flavor.
Chef’s Notes: Reflection and Evolution
As I crafted this dessert over the years, it has transformed from a simple recipe into a crowd-pleaser that brings friends and family together — much like the meals I grew up with. I often find myself reflecting on how food connects us all, and the Halloween Oreo Dirt Cake has become one of those recipes I love sharing with everyone. One of my fondest memories was when my best friend, who was skeptical about dessert, took a bite and exclaimed that it tasted like childhood in a dish. It is these moments that remind me why I cook.
FAQs and Troubleshooting
-
Can I make this cake ahead of time?
Absolutely! You can make the cake a day in advance. Just keep it covered in the refrigerator. It might actually taste even better as it sets! -
I don’t have Oreo cookies. Can I use something else?
Yes! You can use any chocolate sandwich cookie or even graham crackers if you want a different flavor profile. -
My cream cheese filling turned out lumpy. What happened?
This can happen if the cream cheese is too cold. Make sure to let it soften at room temperature before mixing. If you’re in a pinch, you can use an electric mixer to beat it longer to smooth it out. -
How do I store any leftovers?
Keep any leftovers in an airtight container in the fridge. It should last for about 3-5 days, but I doubt it will stick around that long!
By now, I hope you’re ready to create your very own Halloween Oreo Dirt Cake! This festive dessert is sure to impress your guests and create a little magic in your kitchen. Let’s fill that plate, gather around the table, and make memories that last a lifetime. Happy Halloween cooking!
PrintHalloween Oreo Dirt Cake

A fun and spooky dessert featuring creamy layers topped with crushed Oreos, gummy worms, and tombstone cookies, perfect for Halloween gatherings.
- Prep Time: 15 minutes
- Cook Time: 0 minutes
- Total Time: 240 minutes
- Yield: 12 servings 1x
- Category: Dessert
- Method: No-Bake
- Cuisine: American
- Diet: Vegetarian
Ingredients
- 1 package (14.3 oz) chocolate sandwich cookies (Oreo)
- 1/4 cup unsalted butter, softened
- 1 package (8 oz) cream cheese, softened
- 1 cup powdered sugar
- 2 packages (3.4 oz each) instant vanilla pudding mix
- 3 cups cold whole milk
- 1 container (12 oz) frozen whipped topping, thawed
- 12 gummy worms
- 6 chocolate tombstone-shaped cookies
- 12 candy pumpkins
Instructions
- Preheat your oven to 350°F (175°C).
- Crush the Oreo cookies into fine crumbs and combine with softened butter.
- Press the mixture evenly into the bottom of a 9×13 inch baking dish.
- Add softened cream cheese to a mixing bowl and mix until smooth.
- Gradually incorporate powdered sugar into the cream cheese.
- Mix in pudding mix and milk until well combined and thick.
- Fold in the whipped topping gently until incorporated.
- Pour the mixture over the Oreo crust and spread evenly.
- Cover with plastic wrap and refrigerate for 2-4 hours to set.
- Sprinkle remaining crushed Oreos on top to resemble dirt, then decorate with gummy worms, tombstone cookies, and candy pumpkins.
Notes
Feel free to customize toppings and use alternative ingredients to suit dietary preferences.
Nutrition
- Serving Size: 1 serving
- Calories: 350
- Sugar: 28g
- Sodium: 300mg
- Fat: 18g
- Saturated Fat: 10g
- Unsaturated Fat: 6g
- Trans Fat: 0g
- Carbohydrates: 40g
- Fiber: 1g
- Protein: 5g
- Cholesterol: 30mg
Keywords: Halloween, dessert, dirt cake, Oreo, spooky treat