Platefulkitchen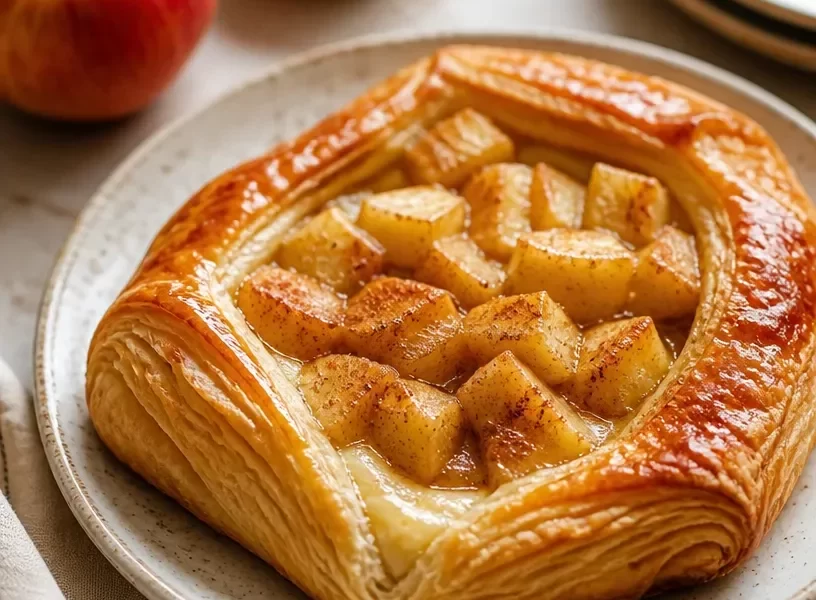
Indulge in a Slice of Heaven: A Homemade Apple Danish Recipe
Hey there, fellow food lovers! Get ready to roll up your sleeves because today we’re diving into a delightful treat that is sure to impress: homemade Apple Danish. This warm, flaky pastry is not only a crowd-pleaser but also a fantastic way to treat yourself on a cozy weekend morning or for an afternoon pick-me-up.
As someone who loves to spend time in the kitchen, there’s just something magical about how a humble ingredient like puff pastry can transform into something so scrumptious with a little bit of love and creativity. The combination of sweet apples, creamy cheese, and a hint of cinnamon will not only tantalize your taste buds but will fill your kitchen with an irresistible aroma that invites everyone to gather around.
And let’s be honest — who doesn’t love a pastry that looks as good as it tastes? The Apple Danish is one of those recipes that makes you feel like a fancy pastry chef, even if you’re just a home cook like me. So, grab your apron, and let’s get started on this delicious journey to pastry perfection!
A Slice of Nostalgia
Let me take you back to a sunny Saturday morning from my childhood. Imagine the family kitchen filled with the comforting scent of freshly baked pastries. In our home, Saturday was always the day we designated for baking sessions. My mom would wake up early, just as the sun was beginning to light up the sky, and she’d whip up a batch of buttery Danish pastries that made the whole house feel warm and inviting.
I remember running into the kitchen, sleep still in my eyes, but that smell instantly woke me up! There she was, rolling out the dough with a perfect blend of excitement and precision. My job was simple — slice the apples. Oh, how I loved that task! I relished each time I chopped those crisp apples, imagining the sweet gooey goodness they would become when wrapped in the flaky pastry.
Fast forward to today, and I’ve taken my mom’s original recipe, added my little twists, simplified it, and made it mine. The apple Danish has become a favorite for brunch gatherings, family get-togethers, and, let’s be honest, just because I wanted something sweet. Each bite brings me back to those sunny weekends, reminding me of the joy of family, food, and laughter around the table.
Ingredients to Gather
Before we get started on creating our gourmet Apple Danish, let’s assemble all the ingredients you’ll need. Here’s the shopping list:
-
1 sheet puff pastry
Puff pastry is the star of our dish. This flaky wonder is light, airy, and absolutely delicious. If you’re in a pinch, you can use pre-made puff pastry from the freezer section, but you can opt for homemade if you want a fun challenge! -
4 oz cream cheese
Cream cheese adds a rich, creamy layer to our pastry. You can substitute it with ricotta or mascarpone if you’re looking for a slightly different flavor, or opt for a light cream cheese to cut down on calories. -
1 apple, diced
I love using Granny Smith apples for their tartness, but feel free to use Honeycrisp, Fuji, or whatever variety you have on hand. They all lend a unique sweetness and crunch to the dish. -
2 tbsp brown sugar
This adds depth and warmth to the apple filling. If you’re looking to cut down on sugar, coconut sugar or honey can be great alternatives. -
1 tsp cinnamon
Cinnamon is what makes the apple filling cozy and nostalgic. If you’re feeling adventurous, try adding some nutmeg or allspice for extra warmth. -
1 egg
We’ll use this for an egg wash to give our Danish a beautiful golden-brown finish. If you’d like a vegan option, you can brush the pastry with a plant-based milk instead.
Gather up these ingredients, and we’ll be ready to create a masterpiece that’ll have everyone asking for seconds!
Let’s Get Cooking!
Now that you have your ingredients prepped, let’s dive into the cooking process! Follow these step-by-step instructions to create your homemade Apple Danish:
-
Preheat Your Oven
Start by preheating your oven to 400°F (200°C). This way, our Danish will bake to perfection while you prepare the filling! -
Prepare the Puff Pastry
Roll out your sheet of puff pastry on a lightly floured surface until it’s about a quarter-inch thick. If you’re using frozen puff pastry, make sure to let it thaw for about 30 minutes before rolling. Don’t have flour? No worries! You can use a silicone mat — it’s a handy way to keep things from sticking. -
Mix the Filling
In a mixing bowl, combine the softened cream cheese, brown sugar, and one teaspoon of cinnamon. Using a spatula or a whisk, mix until smooth and creamy. This filling is versatile and can be adjusted to your liking— so feel free to taste and tweak. Want a little kick? Add a splash of vanilla extract! -
Prepare the Apples
Dice your apple into small chunks, about half an inch each. Toss the diced apples with a tablespoon of brown sugar and a pinch of cinnamon. This helps to draw out the sweetness of the apples and makes for a delicious filling. -
Assemble the Danish
Now for the fun part! Cut your rolled-out puff pastry into a rectangle (about 8×6 inches should do). Spoon a generous amount of the cream cheese mixture in the center of the pastry. Top it with the diced apples, making sure to leave a border around the edges. -
Create Your Signature Fold
Gently fold the edges of the pastry towards the center, creating a sort of "envelope" around the filling. Don’t worry if it’s not perfect! Perfection is not the goal here; we’re looking for rustic charm! -
Egg Wash Time
Beat your egg in a small bowl, then brush the egg wash over the folded edges of the pastry. This step is essential for achieving that golden-brown color that makes the Danish utterly mouthwatering. -
Bake It Up
Place the Danish on a baking sheet lined with parchment paper and pop it into your preheated oven. Bake for 20-25 minutes until it’s puffed up and gloriously golden brown. Keep an eye on it; every oven is a bit different, and we want to reach that perfect golden hue! -
Allow It to Cool
Once it’s ready, take it out of the oven and let it cool for about 5 minutes before slicing. The aroma wafting from this Danish is just the beginning, and trust me, the wait will be well worth it!
Serving Suggestions
There’s something joyous about serving up a freshly baked Apple Danish. I love to serve it warm, accompanied by a generous dollop of whipped cream or a scoop of vanilla ice cream, especially if I’m feeling indulgent. It makes for a perfect dessert, but if you’re enjoying it as a morning or afternoon treat, a simple dusting of powdered sugar adds a lovely touch!
Cut into slices and plate them up, perhaps with a side of fresh berries or a drizzle of caramel sauce for that extra flair. The idea here is to create a moment; this dish invites conversation and complements good company.
Recipe Variations
While our classic Apple Danish is something special on its own, here are a few fun twists you might want to consider:
-
Berry Delight: Swap out the apples for a mix of berries like blueberries, raspberries, and strawberries. They’ll add a fresh, tart contrast to the creaminess of the filling.
-
Nutty Crunch: Add chopped walnuts or pecans to the apple filling for an added crunch and nuttiness. Toasting them beforehand enhances their flavors even more.
-
Pumpkin Spice: In the fall, try adding pumpkin purée to the cream cheese filling with some nutmeg and ginger for a seasonal twist.
-
Vegan Version: Substitute the cream cheese with a vegan alternative and use a flax egg instead of a regular egg for brushing the pastry.
-
Chocolate Lovers’ Dream: Add a handful of chocolate chips to the apple filling for a sweet surprise in every bite!
Chef’s Notes
I owe a lot of my kitchen skills to those mornings spent watching my mom bake. Over time, this Apple Danish recipe has evolved a lot! What started as a more complicated version with layers and countless steps has transformed into this approachable, easy-to-make delight.
I still remember the time I tried to impress some friends with an elaborate Danish that ended with a kitchen disaster — flour everywhere and a pastry that just refused to puff up. But we laughed, made an impromptu pancake breakfast instead, and created a cherished memory. That’s often how it goes in the kitchen, isn’t it?
Don’t be afraid to make this recipe your own, and remember that the most important ingredient in any dish is a good spirit and a willingness to experiment!
FAQs and Troubleshooting
-
Why did my puff pastry not puff up?
A common issue can be dull or improperly stored puff pastry. Ensure it’s chilled and fresh. Also, avoid overloading it with filling, as this can weigh it down. -
Can I make this in advance?
Absolutely! You can prepare the filling a day beforehand and refrigerate it. Assemble the pastry right before baking to keep that flaky texture. -
How do I store leftovers?
Keep any leftovers covered in an airtight container in the fridge for up to 2-3 days. Reheat in the oven for best results! -
What kind of apples should I use?
Granny Smith apples are a classic choice for their tartness, but feel free to experiment with your favorites for a sweeter flavor or more texture.
Nutritional Info
While this recipe is a treat, here’s a quick glance at the nutritional breakdown (per serving, assuming 4 servings total):
- Calories: 250
- Carbohydrates: 28g
- Protein: 4g
- Fat: 14g
- Sugar: 8g
Please note that these numbers can vary based on exact ingredients and sizes used!
And there you have it! Your homemade Apple Danish is ready to delight your taste buds and fill your heart with nostalgic joy. Cooking should always feel like an adventure, so I hope you’ve enjoyed this journey with me.
Don’t forget to share your creations with me! Snap a photo and tag your culinary masterpiece on social media. Grab a slice, take a bite, and relish in every flakey, gooey moment of deliciousness. Happy baking, friends!