Platefulkitchen
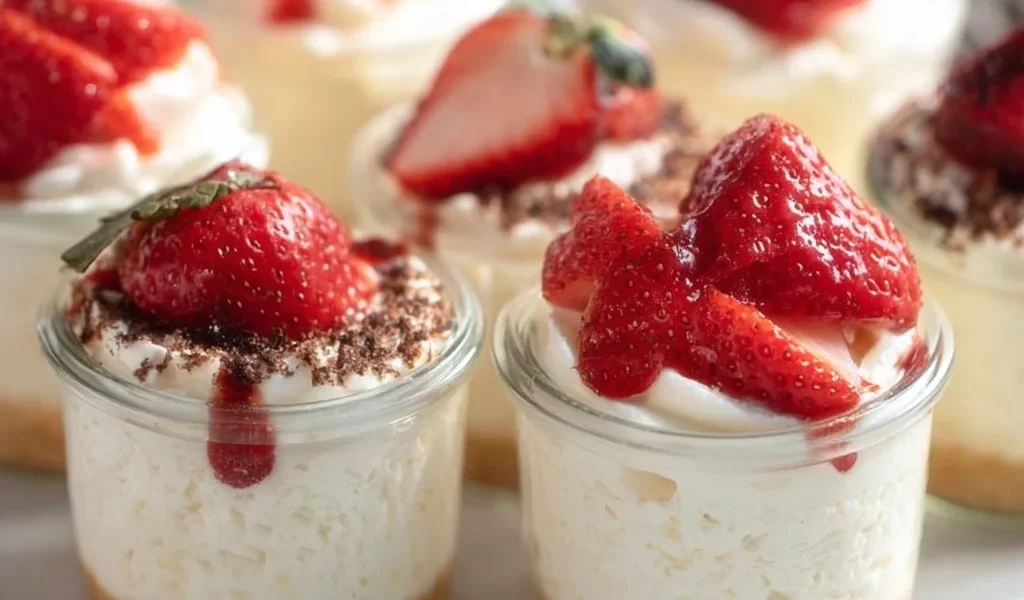
The Ultimate No-Bake Cheesecake Cups: A Sweet Treat for Every Occasion
Hello, fellow food lovers! 🌟 If you’ve ever dreamed of diving into a creamy, dreamy dessert without the hassle of baking, then you’re in for a treat today. I’m Sophie Caldwell, and I’m absolutely thrilled to share with you one of my all-time favorite dessert recipes: No-Bake Cheesecake Cups. These little delights are not just a feast for the eyes; they’re the epitome of simplicity and indulgence in a cup.
Imagine this: a buttery graham cracker crust, luscious cream cheese filling, and a dollop of fresh berries on top. Yum, right? What I love most about these cheesecake cups is their versatility. Whether you’re hosting a summer gathering, celebrating a birthday, or simply craving something sweet on a Tuesday night, these no-bake cheesecake cups hit all the high notes.
Let’s face it: life is busy, and we all need those quick, delicious recipes that don’t complicate our kitchen time. As you know by now, I believe in filling our plates (and our hearts) with generous, comforting food. And trust me, these cheesecake cups are just that.
Prepare to impress your family and friends with a dessert that’s as easy to whip up as it is delightful. So, grab your aprons and let’s dive into the buttery, silky goodness that is No-Bake Cheesecake Cups!
Personal Story
Let me take you back to a warm summer afternoon several years ago. It was one of those days filled with sunshine and laughter, and my kitchen was buzzing with family. My cousin had come over for a long-awaited visit, and we were excited to catch up.
As we rummaged through the pantry, we found ourselves pondering over dessert. We had a block of cream cheese, some heavy cream, and a box of graham crackers — it was like a sweet invitation to create something special. We decided on a no-bake cheesecake since it required no oven and just a bit of refrigerator magic.
We started mixing, giggling, and reminiscing about family gatherings filled with homemade treats. With each layer, we could almost taste the memories — kitchen experiments gone awry, successes that became family favorites, and, of course, the laughter that echoed through the house. By the time we layered the filling into our cups, we couldn’t wait to dig in.
That day, those simple no-bake cheesecake cups transformed into more than just dessert; they became a treasure trove of memories shared, smiles exchanged, and a reminder that in the kitchen, it’s not just about the food — it’s about connection.
Ingredients
Here’s what you’ll need to create these delightful no-bake cheesecake cups:
-
8 oz cream cheese, softened
Softened cream cheese provides the foundation for your cheesecake filling. It’s rich and creamy, giving that delightful texture we crave. Tip: If you’re in a pinch, you can substitute with mascarpone cheese for a slightly different flavor. -
1/2 cup powdered sugar
Sweetness is key to balancing the tanginess of the cream cheese. Powdered sugar mixes smoothly into fillings, leaving no gritty residue. Chef Insight: If you’re looking for a less sugary option, try using honey or maple syrup, adjusting to taste. -
1 cup heavy cream
Whipping heavy cream creates that velvety texture we love. It lightens up the cream cheese, making it fluffy and airy. Substitution: You can use coconut cream for a dairy-free version; just chill the can overnight and scoop out the solid part. -
1 tsp vanilla extract
A dash of vanilla extract elevates the flavor, bringing warmth and inviting notes to each bite. Tip: Use pure vanilla extract for the best flavor; imitation vanilla doesn’t quite do justice. -
Graham cracker crumbs (for serving)
These provide a crunchy contrast to the creamy filling. It’s the classic cheesecake base! Variation: Crushed digestive biscuits or Oreos can add a fun twist if you want something different. -
Fresh fruit or berry topping (optional)
Fruit toppings add a burst of freshness and color that enhances both the visual appeal and flavor profile. Chef’s Note: Try berries for tartness, or caramelized peaches for something warm and comforting.
Step-by-Step Instructions
Now that you’ve gathered your ingredients, let’s get started on making these delightful cheesecake cups! Follow this step-by-step guide and prepare for a kitchen adventure full of joy.
Step 1: Prepare the Filling
- Soften Your Ingredients: Start by ensuring your cream cheese is softened. I recommend letting it sit out for about 30 minutes before you start. You want it creamy, not cold and stiff!
- Mix Cream Cheese and Sugar: In a large mixing bowl, combine the softened cream cheese and powdered sugar. Use an electric mixer on medium speed for about 1-2 minutes until smooth and creamy. (Tip: Make sure there are no lumps for that velvety texture!).
- Add Vanilla: Pour in the vanilla extract and mix again until well incorporated. The smell at this point will make you want to dive right in!
Step 2: Whip the Cream
- Whip Heavy Cream: In another bowl, pour your heavy cream. Use a handheld mixer or stand mixer to whip it until it reaches stiff peaks (should take about 2-3 minutes). It will stay light and fluffy — don’t overdo it, or you’ll get butter!
- Fold the Cream: Gently fold the whipped cream into your cream cheese mixture using a spatula. Chef Hack: Go slow and be gentle — folding helps keep the mixture airy and light.
Step 3: Assemble the Cheesecake Cups
- Prepare Your Cups: Grab your desired serving cups or glasses. You can use anything from mason jars to fancy dessert glasses; they all make the dessert look fabulous!
- Add Graham Cracker Crumbs: Start with a layer of graham cracker crumbs at the bottom of each cup. Push down lightly to create a solid base. How much you add is up to you, but I usually do about 1-2 tablespoons.
- Layer the Cheesecake Filling: Spoon or pipe the cream cheese mixture on top of the crumbs. Don’t fill to the top just yet; you want space for more layers and your fruit topping!
- Repeat Layers: If you have enough room and want to be extra indulgent, you can repeat the layers of graham cracker crumbs and cheesecake filling until all your mixture is used. Tip: Try to leave a bit of room at the top for your fruit topping.
Step 4: Chill and Serve
- Chill: Cover your cheesecake cups with plastic wrap or a lid, and pop them in the fridge for at least 2-4 hours (or overnight if you can wait!). This allows all the flavors to meld perfectly together.
- Garnish and Enjoy: When you’re ready to serve, top with fresh fruit or berries of your choice. This little decoration transforms your sweet treat into something truly special.
Serving Suggestions
When it comes to plating, presentation is everything! Serve your no-bake cheesecake cups chilled straight from the fridge. If you’re using mason jars, they look great stacked high on a dessert table. Garnish with fresh mint leaves or a sprinkle of extra graham cracker crumbs on top for added flair. You could even drizzle honey or chocolate sauce for a fancy touch!
Recipe Variations
Feeling adventurous? Here are some fun variations to try:
-
Chocolate No-Bake Cheesecake: Add melted chocolate into your cream cheese mixture for a rich chocolate dessert. You can also use chocolate cookie crumbs for the base.
-
Fruit-Infused Cheesecake: Mix in a fruit puree like raspberry, lemon, or strawberry into the filling for a fruity twist.
-
Nutty Cheescake: Incorporate finely crushed nuts (like pecans or almonds) into the graham cracker crust for extra crunch and flavor.
-
Pumpkin Spice Cups: Swap out cream cheese for pumpkin puree and add pumpkin pie spice for a seasonal spin.
-
Dairy-Free Version: Replace cream cheese with vegan cream cheese and use coconut cream as your heavy cream substitute for a dairy-free delight.
Chef’s Notes
This no-bake cheesecake cups recipe has truly evolved over the years. What started as a spontaneous kitchen project with my cousin has turned into one of the first desserts I recommend to anyone looking for something sweet but simple. I’ve played around with countless flavors and toppings! Once, I even swapped the graham cracker crust for crumbled pretzels for a sweet-and-salty experience. If you know me, you know I’m always up for some kitchen experimentation!
One of my favorite kitchen memories is when I brought these cheesecake cups to a family picnic, and they vanished before I could even grab a second cup. That joy — the smiles, the contented sounds while people devoured them — is what it’s all about.
FAQs and Troubleshooting
1. Can I make these cheesecake cups ahead of time?
Absolutely! These cheesecake cups are perfect for prepping in advance. They can stay refrigerated for up to 3 days, making them a fantastic option for parties or gatherings.
2. My filling turned out lumpy. What happened?
This usually happens due to the cream cheese not being softened enough. Always ensure your cream cheese is at room temperature to guarantee a smooth mixture.
3. How can I ensure my whipped cream doesn’t deflate?
When folding the whipped cream into your cream cheese mixture, do it gently and avoid overmixing. The airy texture of the whipped cream is what gives these cups their dreamy consistency!
4. What can I do if I don’t have heavy cream?
You can substitute with a can of coconut cream for a dairy-free version. Just make sure to chill it overnight, so it separates, and use only the solid part.
Nutritional Info (Optional)
While I always say that desserts should be enjoyed without counting calories, having a rough idea can be helpful for those keeping an eye on portions. Here’s an approximate breakdown per cheesecake cup (not including toppings):
- Calories: 220
- Total Fat: 18g
- Saturated Fat: 10g
- Sugars: 8g
- Protein: 3g
I hope this recipe inspires you to fill your kitchen and your plates with joyful desserts that everyone loves! Remember, cooking is about sharing and creating memories. Now, let’s celebrate that with some No-Bake Cheesecake Cups! Happy cooking, and don’t forget to share your creations with loved ones! 🥳
PrintNo-Bake Cheesecake Cups
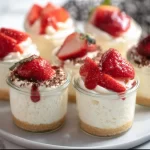
Delicious no-bake cheesecake cups with a buttery graham cracker crust and creamy filling, topped with fresh berries.
- Prep Time: 15 minutes
- Cook Time: 0 minutes
- Total Time: 240 minutes
- Yield: 4 servings 1x
- Category: Dessert
- Method: No-Bake
- Cuisine: American
- Diet: Vegetarian
Ingredients
- 8 oz cream cheese, softened
- 1/2 cup powdered sugar
- 1 cup heavy cream
- 1 tsp vanilla extract
- Graham cracker crumbs (for serving)
- Fresh fruit or berry topping (optional)
Instructions
- Prepare the Filling: Soften your cream cheese for about 30 minutes. Mix cream cheese and powdered sugar in a bowl until smooth. Add vanilla extract and mix until incorporated.
- Whip the Cream: In another bowl, whip heavy cream until stiff peaks form. Gently fold the whipped cream into the cream cheese mixture.
- Assemble the Cheesecake Cups: Layer graham cracker crumbs at the bottom of each cup, followed by the cheesecake filling. Repeat layers if desired.
- Chill and Serve: Cover the cups and refrigerate for at least 2-4 hours. Top with fresh fruit before serving.
Notes
These no-bake cheesecake cups can be made ahead of time and stored in the refrigerator for up to 3 days.
Nutrition
- Serving Size: 1 serving
- Calories: 220
- Sugar: 8g
- Sodium: 180mg
- Fat: 18g
- Saturated Fat: 10g
- Unsaturated Fat: 4g
- Trans Fat: 0g
- Carbohydrates: 20g
- Fiber: 1g
- Protein: 3g
- Cholesterol: 70mg
Keywords: no-bake, cheesecake, dessert, easy recipe, summer treat