Platefulkitchen
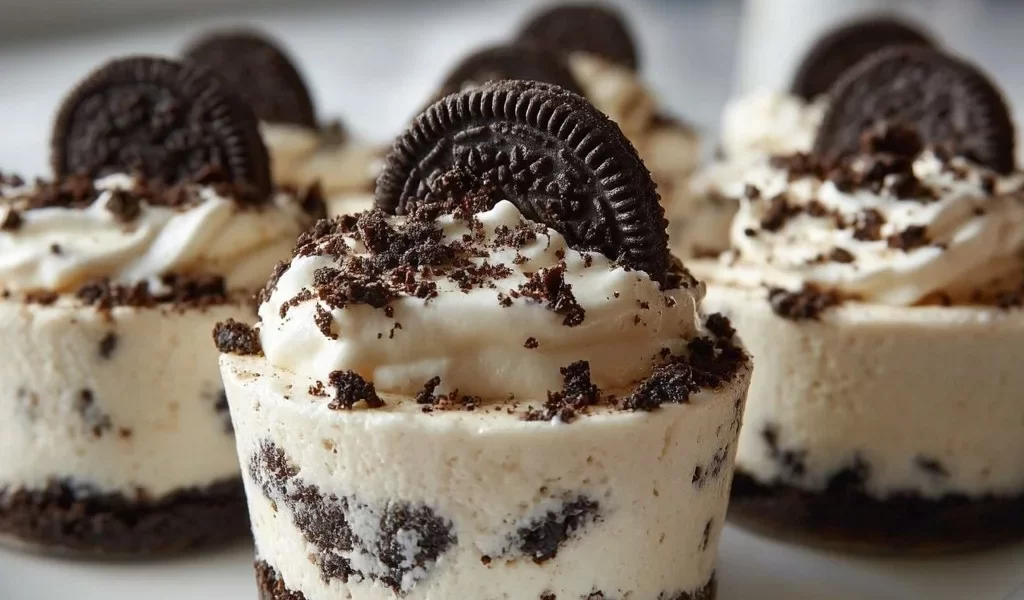
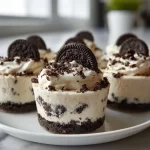
No-Bake Oreo Cheesecake Cups: A Sweet Treat for Every Occasion
Hey there, sweet tooth enthusiasts! Today, I’m thrilled to share one of my all-time favorite desserts: No-Bake Oreo Cheesecake Cups! If you’ve ever found yourself drooling over a decadent cheesecake but felt intimidated by the idea of baking one from scratch, you’re in for a treat. These delightful little cups pack all the rich, creamy goodness of traditional cheesecake, but without the oven time. Yup, you heard that right! With just a handful of ingredients and a bit of chilling time in the fridge, you can whip up these heavenly treats that will make any gathering feel special.
Imagine this: it’s a warm evening, you’ve just wrapped up a fantastic dinner with your loved ones, and there’s a table full of smiles and laughter. You want to end the meal with something that keeps the fun going while also impressing your guests. That’s where these No-Bake Oreo Cheesecake Cups come in! They’re not just delicious; they’re also super cute and perfect for portion control. Plus, who can resist the combination of creamy cheesecake and crunchy Oreo cookie crumble?
So, grab your aprons, and let’s dive into this easy, no-fuss recipe! Whether it’s a dinner party, birthday celebration, or just a sweet treat for yourself, these cheesecake cups are sure to be a hit.
Personal Story
I’ll never forget the first time I made these No-Bake Oreo Cheesecake Cups. It was a rainy Sunday, and I was in my kitchen tinkering with some leftover Oreos from last week’s grocery run. As I rummaged through my cabinets, I came across a block of cream cheese and a tub of whipped topping begging to be used. With my family lounging on the couch, I decided to whip up something delicious and fun.
In a flurry of excitement mixed with anticipation, I crushed those Oreos and blended them with cream cheese, sugar, and vanilla. The moment I mixed everything together and tasted the creamy filling was pure bliss! It brought me right back to my childhood, when my mom would make her famous cheesecakes, only with a twist of my own. After layering the filling into cups and adding mini Oreos as a garnish, I served them to my family. The joy on their faces and the instant requests for seconds made my heart swell. Those sweet moments in the kitchen reminded me that food is more than just sustenance; it’s about creating sweet memories with the ones we love.
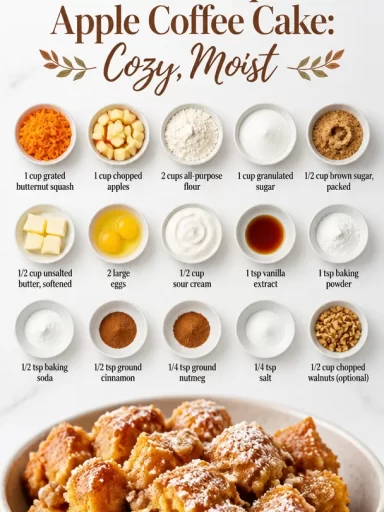
Ingredients
Here’s what you’ll need to create these scrumptious No-Bake Oreo Cheesecake Cups:
-
18 Oreo cookies
These bring the classic Oreo flavor that makes this dessert a fan favorite. If you want to explore, try using the flavored Oreos, like mint or peanut butter! -
3 tbsp melted butter
This helps to bind the crushed cookies together and creates a deliciously rich crust. If you prefer a lighter option, you can substitute with coconut oil. -
8 oz cream cheese
Use full-fat cream cheese for a creamy texture. For a lighter version, opt for reduced-fat cream cheese or a dairy-free alternative, like vegan cream cheese. -
1/2 cup powdered sugar
This sweetens up the cheesecake and gives it that velvety texture. If you want to cut down on sugar, try using a sugar substitute like Stevia or Monk Fruit sweetener. -
1 tsp vanilla extract
This flavor enhancer adds depth to the cheesecake. For a fun twist, consider using almond extract instead for a nutty flavor! -
1 1/2 cups whipped topping
This gives the cheesecake its lightness and fluffiness. You can use store-bought whipped topping, or whip up your own with heavy cream for a fresher taste. -
Mini Oreos for garnish
The perfect finishing touch! These add a cute touch to your cups and make them even more delightful.
Step-by-Step Instructions
Ready to create dessert magic? Let’s break it down step by step.
-
Crush the Oreos:
Start by placing the 18 Oreo cookies in a sturdy ziplock bag. Use a rolling pin, or anything you have handy, to crush them into fine crumbs. You want them to resemble sand—fine, yet with a bit of texture. If you have a food processor, feel free to use it for an even finer crumb! -
Mix the Crust:
In a mixing bowl, combine the crushed Oreos with 3 tablespoons of melted butter. Use a fork to mix until all the crumbs are coated in butter. It should hold together when pressed, kind of like damp sand. If the mixture feels too dry, you can add a tad more butter. -
Prep the Cups:
Scoop a generous tablespoon of the Oreo crust mixture into the bottom of small cups or jars. Press down firmly to create an even layer. Feel free to use dessert glasses, mason jars, or even shot glasses for fun miniature servings. -
Prepare the Cheesecake Filling:
In a large mixing bowl, beat the 8 oz cream cheese using an electric mixer until smooth and creamy. Add in the powdered sugar and mix until well combined. This step ensures there are no lumps! -
Flavor It Up:
Pour in the 1 teaspoon of vanilla extract and mix until fully incorporated. The vanilla brings a lovely warmth to the cheesecake! -
Fold in the Whipped Topping:
Gently fold in 1 1/2 cups of whipped topping into the cream cheese mixture. Use a spatula and work in gentle motions; you want to keep the mixture light and airy. This is what gives the cheesecake that light, fluffy texture! -
Fill the Cups:
Spoon the cheesecake filling over the crust in each cup, filling them about three-quarters full. Give each cup a little shake to level the top, and if you’re feeling fancy, use a piping bag for a swirled effect! -
Chill:
Place the filled cups in the fridge for at least 2 hours or until set. This chilling time helps the flavors meld together and firm up the cheesecake to perfection. -
Garnish:
Just before serving, add a mini Oreo on top of each cheesecake cup for that perfect final touch! Maybe even sprinkle some crushed cookies on top for extra flair.
And voilà! You’ve made a delicious dessert that looks as good as it tastes.
Serving Suggestions
When it’s time to serve, set these adorable little cheesecake cups on a lovely platter or a tiered serving stand for a show-stopping presentation. You can even create a dessert bar by providing various toppings—think chocolate syrup, caramel sauce, or fresh berries. This adds an interactive element, letting your guests customize their treats!
Recipe Variations
Looking to switch it up a bit? Here are some fun ideas:
-
Chocolate Drizzle: Drizzle melted chocolate over the cups for an extra layer of sweetness and a decadent look.
-
Minty Fresh: Add a few drops of peppermint extract to your filling for a refreshing twist perfect for holidays or summer get-togethers.
-
Fruit Topping: Toss on some fresh berries or sliced bananas for a fruity contrast to the rich cheesecake.
-
Nutty Delight: Mix in crushed nuts, like toasted pecans or walnuts, into the crust for an added crunch.
-
Chocolate Oreo Cups: Use chocolate sandwich cookies instead of regular Oreos for a double-chocolate delight!
Chef’s Notes
This No-Bake Oreo Cheesecake Cup recipe has become a staple in my household. It’s funny how something so simple has evolved into a family favorite and a go-to for potluck dinners. Every time I whip these up, I’m reminded of that rainy Sunday when I first discovered this blissful combination of flavors.
And oh, the friendships I’ve forged over these cups! I once made too many for a gathering, and by the end of the night, my friends were digging into the fridge for leftovers. It’s a complete win when your dessert becomes the talk of the night!
FAQs and Troubleshooting
1. Can I skip the chilling time?
While you can technically eat them right after assembly, the cheesecake needs time to set properly. Chilling helps it firm up and allows the flavors to blend beautifully. So, patience is key!
2. What can I do if my filling is too runny?
If your filling seems too runny, it might be due to over-mixing or using overly soft cream cheese. Try adding a bit more powdered sugar to thicken it up, or let it chill longer before serving.
3. How long will these keep?
Stored in the fridge, these cheesecake cups will stay fresh for about 3-4 days. Just remember to cover them to keep them from absorbing any odors from your fridge!
4. Can I use different cookies besides Oreos?
Absolutely! Feel free to experiment with different cookie bases such as chocolate chip cookies, graham crackers, or even gluten-free cookie options to suit your needs.
Nutritional Info (Optional)
Here’s a rough nutritional breakdown per serving if you’re keeping track:
- Calories: 220
- Fat: 10g
- Carbohydrates: 31g
- Sugar: 15g
- Protein: 2g
Note: Nutritional values can vary based on specific ingredients used and portion sizes.
There you have it! Your guide to creating delicious No-Bake Oreo Cheesecake Cups that are bound to impress anyone who takes a bite. Whether you’re cooking for yourself, a small gathering, or a big family feast, I hope this recipe finds you inspired and ready to fill your plate with sweetness. Happy baking—oops, I mean mixing!
PrintNo-Bake Oreo Cheesecake Cups
Delightful, no-bake cheesecake cups made with Oreos and cream cheese, perfect for any occasion.
- Prep Time: 15 minutes
- Cook Time: 0 minutes
- Total Time: 120 minutes
- Yield: 4 servings 1x
- Category: Dessert
- Method: No-Bake
- Cuisine: American
- Diet: Vegetarian
Ingredients
- 18 Oreo cookies
- 3 tbsp melted butter
- 8 oz cream cheese
- 1/2 cup powdered sugar
- 1 tsp vanilla extract
- 1 1/2 cups whipped topping
- Mini Oreos for garnish
Instructions
- Crush the Oreos: Place the 18 Oreo cookies in a ziplock bag and crush them into fine crumbs.
- Mix the Crust: Combine the crushed Oreos with 3 tablespoons of melted butter.
- Prep the Cups: Scoop a tablespoon of the crust mixture into small cups and press down.
- Prepare the Cheesecake Filling: Beat the 8 oz cream cheese until smooth, then mix in the powdered sugar.
- Flavor It Up: Add 1 teaspoon of vanilla extract and mix well.
- Fold in the Whipped Topping: Gently fold in 1 1/2 cups of whipped topping.
- Fill the Cups: Spoon the cheesecake filling over the crust in each cup.
- Chill: Refrigerate the cups for at least 2 hours or until set.
- Garnish: Add a mini Oreo on top of each cup before serving.
Notes
Add various toppings for a dessert bar experience.
Nutrition
- Serving Size: 1 cup
- Calories: 220
- Sugar: 15g
- Sodium: 200mg
- Fat: 10g
- Saturated Fat: 5g
- Unsaturated Fat: 4g
- Trans Fat: 0g
- Carbohydrates: 31g
- Fiber: 1g
- Protein: 2g
- Cholesterol: 30mg
Keywords: cheesecake, no-bake, dessert, Oreo, easy recipe