Platefulkitchen
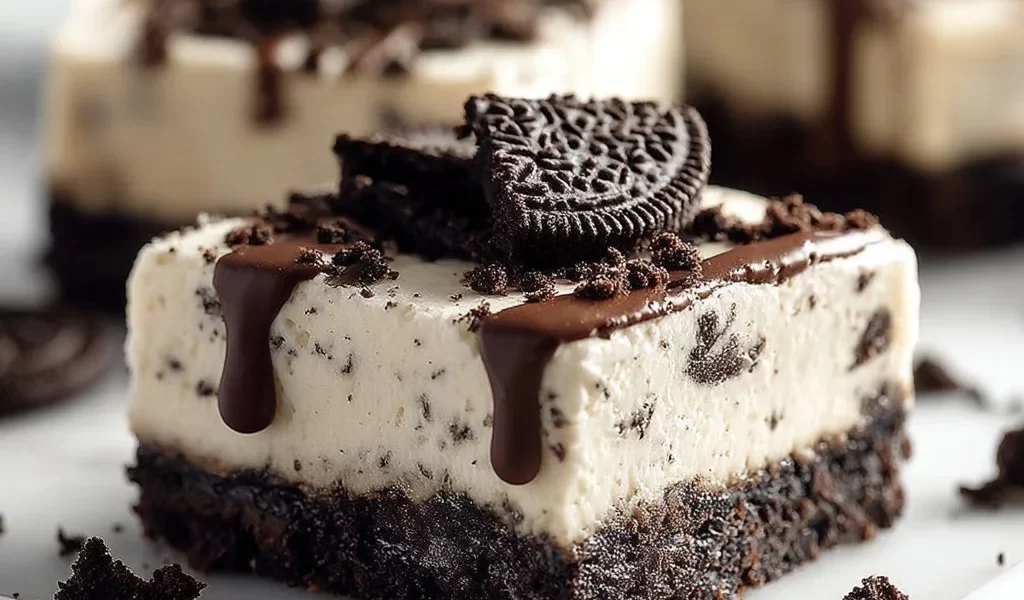
No-Bake Oreo Cheesecake Bars: A Decadent, Easy Dessert You’ll Love!
Hello, lovely foodies! Today, we’re diving into one of my all-time favorite desserts: No-Bake Oreo Cheesecake Bars! 🎉 Trust me, if you’re a fan of creamy, dreamy, and utterly delicious desserts, you’re in for a treat. These bars are the perfect blend of rich flavors and delightful textures, with that classic Oreo crunch and a silky smooth cheesecake filling.
What’s fantastic about these bars (besides their incredible taste) is how easy they are to whip up. You don’t need an oven, which means you can enjoy this deliciousness even in the heat of summer without breaking a sweat! The best part? They only require a handful of simple ingredients that you probably already have in your pantry.
I’ll share a bit of my personal story behind this recipe, some fun tips, and of course, everything you need to know to make these indulgent desserts easily! Are you ready? Let’s get started!
Personal Story
I’ll never forget the first time I made these No-Bake Oreo Cheesecake Bars. It was a sweltering July afternoon, and my friends had come over for a little BBQ. I had planned to make a classic chocolate cake, but when I realized I had forgotten to turn on the oven (classic Sophie move!), I was in a bit of a panic.
Remembering an old family recipe tucked away in my brain, I decided to whip up something cool and refreshing instead. I grabbed a pack of Oreos from the pantry and got to work! As I layered that creamy cheesecake filling over the crunchy crust, I could already see my friends eyeing the dessert with excitement. When the first batch was ready, everyone gathered around as I cut those bars, and you could feel the anticipation in the air.
The moment those bars touched our taste buds, it was pure magic. Everybody was in love! It turned out to be one of those memorable summer days. Now, every time I make these bars, I’m taken back to that sunshiny afternoon filled with laughter and the clinking of glasses—a perfect reminder of how food brings people together.
Now, let’s make some memories of your own with these No-Bake Oreo Cheesecake Bars!
Ingredients
Here’s what you’ll need to make these delightful bars:
-
24 Oreo Cookies (plus extra for topping)
- Chef Insight: The classic Oreo provides that chocolatey crunch, but feel free to get creative with other flavors like Golden Oreos for a vanilla twist!
-
60 ml Unsalted Butter, melted
- Substitution Tip: If you’re out of butter, you can use coconut oil for a subtle flavor enhancement or even a flavored spread if you’re feeling adventurous!
-
450 g Cream Cheese, softened
- Chef Insight: Make sure to let your cream cheese sit at room temperature to soften. Cold cream cheese won’t blend smoothly into your filling.
-
100 g Granulated Sugar
- Substitution Tip: For a healthier twist, swap white sugar with coconut sugar or even a natural sweetener like agave syrup, adjusting to taste!
-
1 teaspoon Vanilla Extract
- Chef Insight: Pure vanilla extract elevates the flavor of the cheesecake. If you’re in a pinch, vanilla essence works, but try to opt for pure!
-
240 ml Heavy Cream
- Chef Insight: Whipping your cream to soft peaks creates that wonderful airy texture in your cheesecake filling that makes it so indulgent!
-
30 g Powdered Sugar
- Substitution Tip: If you’re looking for a smoother finish, the powdered sugar is your friend here. You can skip it in a pinch, just remember it adds a touch of sweetness!
-
1 Pinch of Salt
- Chef Insight: A little salt enhances the sweetness and balances the flavors, making your cheesecake bars taste even more luscious.
Step-by-Step Instructions
Let’s jump into the nitty-gritty of making these delightful bars, shall we? It’s super straightforward, and I promise you’ll have fun along the way!
Step 1: Prepare Your Pan
Start by grabbing an 8×8 inch square baking dish. Line it with parchment paper, leaving some overhang on the sides for easy removal later. This little trick will save you from any sticky situations when it’s time to cut those bars.
Step 2: Make the Crust
In a medium bowl, crush your 24 Oreo cookies until they resemble fine crumbs. You can use a food processor for a super speedy process or toss the cookies into a resealable bag and smash them with a rolling pin—perfect stress relief! Give those crumbs a little more texture if you prefer.
- Tip: If you want a bit of a chewy bite, feel free to save a few cookie pieces aside and fold them into the crust!
Next, combine the cookie crumbs with 60 ml of melted unsalted butter. Thoroughly mix until all crumbs are moistened. Once your mixture resembles wet sand, pour it into the prepared baking dish, pressing down firmly to create an even crust. Ensure it’s nice and compact—it’ll help your crust hold up beautifully when you slice into the bars.
Step 3: Make the Cheesecake Filling
In a large mixing bowl, add your 450 g of softened cream cheese and 100 g of granulated sugar. Beat together using an electric mixer on medium speed until smooth and creamy. Aim for no lumps here; your taste buds will thank you later!
Next, mix in the 1 teaspoon of vanilla extract. Just the right amount of sweetness and aroma—trust me, this step is vital!
In a separate bowl, whip the 240 ml of heavy cream until it reaches those soft peaks we talked about earlier. This is where the magic happens! Gently fold the whipped cream into the cream cheese mixture until it’s fully combined. You want to maintain that airy texture. Be tender!
- Pro Tip: Use a spatula and bring it up from the bottom in a folding motion rather than stirring. This keeps it light and fluffy!
Step 4: Assemble Your Bars
Once you have your creamy filling ready, pour it over the prepared crust! Use a spatula to smooth the surface evenly, creating a beautiful layer.
Optional: Crumble additional Oreo cookies on top for that added crunch and an eye-catching finish.
Step 5: Chill and Set
Cover your baking dish with plastic wrap and pop it into the refrigerator. You’ll want to let these chill for at least 4 hours, or ideally overnight. I know waiting is hard, but good things come to those who wait, right? 😉 This step helps those flavors meld beautifully and gives the bars that perfect set!
Step 6: Cut and Serve
When you’re ready to enjoy, remove the bars from the refrigerator. Use the overhanging parchment paper to pull them out easily. Place them on a cutting board and slice them into squares or bars—whatever you fancy!
Serving Suggestions
For a delightful serving, serve these bars chilled. You can plate them on a beautiful dessert platter, drizzling some chocolate sauce on the plate for a touch of elegance. Add berries on the side for a pop of color and freshness. You can also top each slice with a dollop of whipped cream for that extra treat!
Recipe Variations
Feel free to get creative with these bars! Here are some delicious variations to try out:
-
Minty Oreo Cheesecake Bars: Swap regular Oreos for mint Oreos to get that refreshing twist and pair it with a hint of peppermint extract in the filling.
-
Peanut Butter Cup Bars: Layer in some crushed Reese’s Peanut Butter Cups into the crust and fold in some creamy peanut butter into the filling. Pure joy!
-
Flavored Cream Cheese: Try using fruit-flavored cream cheese like strawberry for a fruity twist that brightens your bars.
-
Chocolate Drizzle: Drizzle melted chocolate over the top before serving for that decadent touch.
-
Nutty Toppings: Try adding chopped nuts or coconut flakes either into the crust or as a topping for a delightful crunch!
Chef’s Notes
These No-Bake Oreo Cheesecake Bars have evolved from a last-minute summer treat into a staple in my recipe repertoire. I often find myself making them for various gatherings, family celebrations, or just because life is too short not to love cheesecake!
Whenever I make these bars, I find myself reminiscing about that fun BBQ day with friends. It’s amazing how one recipe can carry so many joyful memories. Plus, seeing friends dig into them and their eyes widen in delight—there’s no better reward!
FAQs and Troubleshooting
Here are some common questions and troubleshooting tips to help make your baking journey smooth!
1. Why is my cheesecake not firm enough?
This could be from not chilling long enough. Ideally, if you let it sit longer, it should firm up nicely. Give it another hour or so in the fridge before digging in.
2. Can I use low-fat cream cheese?
You can, but keep in mind that the texture and flavor might not be as rich. I recommend sticking to full-fat cream cheese for that perfect cheesecake experience.
3. How long do these bars last?
Stored in an airtight container in the fridge, your bars can last about 4-5 days. But let’s be honest: they’re so good, they probably won’t last that long!
4. Can I freeze these bars?
Absolutely! Before cutting them, place the entire pan in the freezer. Once frozen, slice them and layer them between sheets of parchment for easy serving later. Just thaw them in the fridge a few hours before you want to enjoy them!
Nutritional Info
If you’re curious about the nutritional information for these delicious No-Bake Oreo Cheesecake Bars, here’s a rough estimate per slice (assuming 12 servings):
- Calories: 280
- Total Fat: 18g
- Saturated Fat: 10g
- Sugar: 17g
- Protein: 4g
Note: Nutritional values can vary based on ingredient substitutions.
There you have it folks! Plenty of tips, tricks, and personal stories that make this No-Bake Oreo Cheesecake Bars recipe one to revisit time and time again. Food should be joyful and shareable; let’s fill our plates and make those wonderful memories together. Happy baking! 🍰❤️
PrintNo-Bake Oreo Cheesecake Bars
A creamy and dreamy dessert made with Oreo cookies and a silky cheesecake filling that doesn’t require baking.
- Prep Time: 20 minutes
- Cook Time: 0 minutes
- Total Time: 240 minutes
- Yield: 12 servings 1x
- Category: Dessert
- Method: No-Bake
- Cuisine: American
- Diet: Vegetarian
Ingredients
- 24 Oreo Cookies (plus extra for topping)
- 60 ml Unsalted Butter, melted
- 450 g Cream Cheese, softened
- 100 g Granulated Sugar
- 1 teaspoon Vanilla Extract
- 240 ml Heavy Cream
- 30 g Powdered Sugar
- 1 Pinch of Salt
Instructions
- Prepare your pan by lining an 8×8 inch square baking dish with parchment paper.
- Make the crust by crushing the Oreo cookies and mixing with melted butter.
- Press the mixture into the bottom of the pan to form a crust.
- Beat the softened cream cheese and sugar together until smooth.
- Mix in the vanilla extract, then fold in whipped heavy cream.
- Pour the cheesecake filling over the crust and smooth the surface.
- Chill in the refrigerator for at least 4 hours or overnight.
- Cut into bars and serve chilled with optional toppings.
Notes
Great for summer parties; can be customized with different Oreo flavors or toppings.
Nutrition
- Serving Size: 1 bar
- Calories: 280
- Sugar: 17g
- Sodium: 200mg
- Fat: 18g
- Saturated Fat: 10g
- Unsaturated Fat: 5g
- Trans Fat: 0g
- Carbohydrates: 30g
- Fiber: 1g
- Protein: 4g
- Cholesterol: 40mg
Keywords: Oreo, Cheesecake, No-Bake, Dessert, Easy Dessert