Platefulkitchen
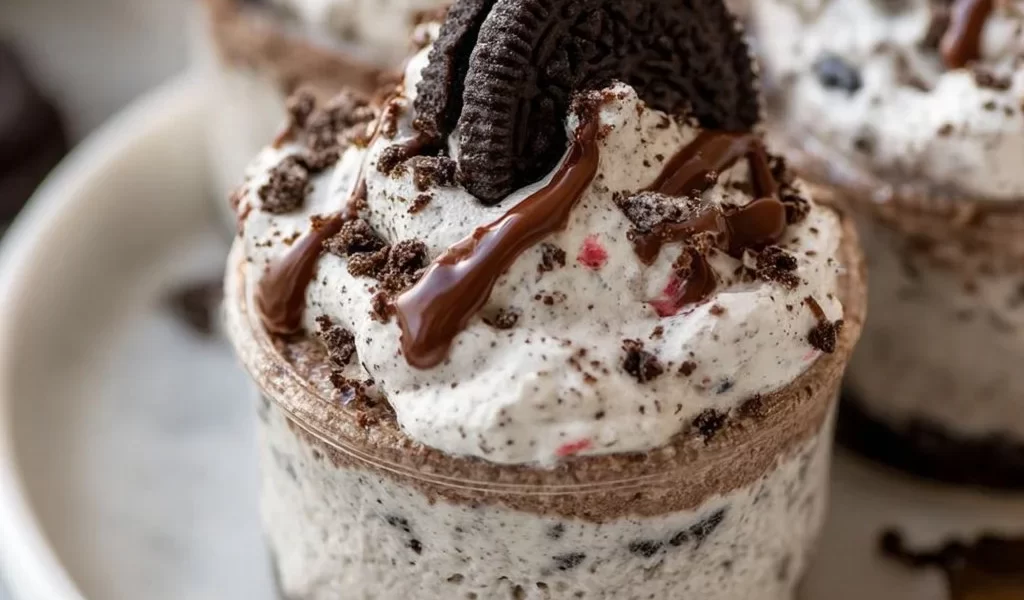
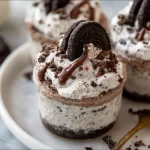
Delightfully Easy Oreo No-Bake Cheesecake Cups
Introduction
Hey there, fellow food lovers! I’m so excited to share one of my all-time favorite recipes with you today: Oreo No-Bake Cheesecake Cups. If you’ve ever craved something sweet and creamy without having to turn on the oven, you’ve just hit the jackpot! This delightful dessert combines the rich and velvety goodness of cheesecake with the fun crunch of everyone’s favorite cookie – the Oreo.
Imagine this: you’ve had a long day, and all you want is a simple, delicious treat to enjoy while you unwind. These no-bake cheesecake cups are a game-changer. They’re perfect for satisfying a sweet tooth and require minimal effort—seriously, they come together in no time! Plus, who can resist the allure of a dessert that looks as good as it tastes?
The beauty of these Oreo cheesecake cups lies not only in their flavor but also in their versatility. You can whip them up for a dinner party, holiday gathering, or just because. They’re a delightful way to end any meal, and you can serve them in individual cups for a stylish presentation. So grab your mixing bowl, and let’s dive into making these creamy, dreamy cheesecake cups that will leave everyone asking for seconds!
Personal Story
I still remember the first time I made these Oreo No-Bake Cheesecake Cups for my best friend’s birthday party. It was a sunny Saturday afternoon, and I wanted to create something special without spending hours in the kitchen. As I was crushing the Oreos for the crust, my younger brother wandered into the kitchen, eyes wide with curiosity.
"Can I help?" he asked, and I couldn’t resist letting him join in on the fun. We turned it into a mini baking session filled with laughter, cookie crumbs, and plenty of taste-testing. As we layered the creamy filling over the cookie base, I watched his face light up; he couldn’t believe how easy it was to whip up such a delicious-looking treat.
When we finally served them at the party, they were an instant hit. Everyone loved them! I’ll never forget the way my brother beamed as he proudly declared, “We made these!” This little kitchen adventure not only created sweet memories but also solidified my love for easy, impactful desserts. I still make these cups regularly, and they never fail to bring a smile to faces—especially my own!
Ingredients
To create these scrumptious Oreo No-Bake Cheesecake Cups, you’ll need the following ingredients. Each ingredient plays a crucial role in crafting the perfect texture and flavor. Here’s what you need to gather:
-
1 8 oz block of cream cheese, softened
The star of the show! Cream cheese gives the cheesecake its rich and creamy texture. Make sure it’s softened for easy mixing. If you’re looking for a lighter option, you can use Neufchâtel cheese—a bit lower in fat but still creamy. -
1 8 oz Cool Whip or whipped topping
This will make your cheesecake light and fluffy! If you prefer to make your own whipped cream, just whip up some heavy cream until it forms stiff peaks, adding a bit of sugar for sweetness. -
2/3 cup powdered sugar
This ingredient sweetens the filling without affecting the texture too much, giving it that perfect dessert flavor. If you want to reduce sugar, feel free to cut it down or use a sugar substitute. -
1 tsp vanilla extract
Vanilla brings out all the delicious flavors! It’s like a hug in dessert form. A great substitute if you’re feeling adventurous is almond extract, but use it sparingly, as it packs a punch. -
24-26 Oreo cookies (more as desired)
The beloved Oreo ties everything together! You’ll use some for the crust and save the rest for topping. If you’re feeling creative, try Golden Oreos or even the seasonal varieties (like Pumpkin Spice or Mint) for a fun twist.
Step-by-Step Instructions
Now that you have everything ready to go, let’s assemble these Oreo No-Bake Cheesecake Cups! Follow these detailed steps, and let me know if you have any questions along the way.
-
Prepare Your Ingredients:
Start by gathering all your ingredients and letting your cream cheese come to room temperature. This makes it super easy to blend—no one likes lumpy cheesecake! -
Crush the Oreos:
Place 18-20 Oreos in a resealable plastic bag and crush them using a rolling pin, or pour them into a food processor for a quicker method. You want them to be fine crumbs, almost like sand. Save a few for topping later!Chef’s Tip: If you want a little texture variety, you can leave a few Oreo chunks intact for a crunchy surprise!
-
Mix the Oreo Crust:
In a bowl, combine your crushed Oreos with 4 tablespoons of melted butter. Mix until the crumbs are well-coated; it should feel like wet sand.Chef Hack: If you’d like a sweeter crust, add a tablespoon of powdered sugar into the mixture!
-
Layer the Crust in Cups:
Grab your favorite dessert cups or jars—about 6-8 should do the trick. Spoon the crust mixture into the bottom of each cup, pressing it down firmly with the back of a spoon. -
Blend the Cheesecake Filling:
In a medium bowl, use an electric mixer to beat the softened cream cheese until it’s smooth and creamy. Slowly add in the powdered sugar and continue mixing until combined. Then, incorporate the vanilla extract. -
Fold in the Cool Whip:
Gently fold in the Cool Whip (or homemade whipped cream) into the cream cheese mixture until everything is just combined. Be careful not to deflate the whipped cream! -
Fill the Cups:
Spoon the creamy cheesecake filling over the Oreo crusts in your cups, filling them about three-quarters full.Chef Insight: Use a piping bag to get that perfect look if you want to get fancy with it!
-
Chill:
Now, it’s time to chill! Cover the cups and place them in the refrigerator for at least 2 hours, or until set. This is the part where you wait (patience is a virtue!). -
Add Toppings (Optional):
Just before serving, top your cheesecake cups with whipped cream, crushed Oreos, or a drizzle of chocolate syrup for that extra flair.
And there you have it! Your Oreo No-Bake Cheesecake Cups are all set to impress!
Serving Suggestions
To serve these delightful cups, simply place them on a decorative platter or individual dessert plates. Take a moment to pause and enjoy their aesthetic appeal before indulging! You can garnish each cup with a sprig of mint or a sprinkle of cocoa powder for that extra fancy touch. Trust me, your guests (and yourself!) will appreciate the beautiful presentation.
Recipe Variations
Want to switch things up? Here are a few creative twists you can consider:
-
Peanut Butter Oreo Cheesecake: Add a 1/4 cup of creamy peanut butter to the filling for a nutty flair. Top with crushed peanut butter cups instead of Oreos!
-
Mint Oreo Delight: Use Mint Oreos for a refreshing twist and add a few drops of peppermint extract for that festive feel.
-
Berry Bliss: Add fresh berries into the filling or use them as a topping for a fruity contrast!
-
Gluten-Free Option: Use gluten-free Oreos or another gluten-free cookie for the crust to meet dietary needs.
-
Chocolate Lovers Dream: Mix in some melted chocolate into the filling for an ultra-chocolatey experience!
Have fun experimenting; the possibilities are endless!
Chef’s Notes
I’ve been making these Oreo No-Bake Cheesecake Cups for years, and they have become a staple at all my gatherings. Sometimes I’ll mix in whatever leftovers I have on hand—like sauces or flavor extracts—and it always turns out delicious! The funniest moment I recall was when a friend tried to convince me they were dairy-free. So, we had a good laugh, but it defined my thought on sharing dessert recipes—food education is key!
These cups are surprisingly resilient too – you can prep them a day in advance, making them fantastic for busy schedules. If you have kids, they love helping layer the ingredients; it’s always a win-win in the kitchen.
FAQs and Troubleshooting
1. Can I make these ahead of time?
Absolutely! These cups are perfect for making ahead. Just cover them and store them in the fridge for up to 2-3 days before serving.
2. My cheesecake is too runny; what went wrong?
This can happen if your cream cheese wasn’t softened enough or if it’s too warm when mixed. Make sure it’s soft but not too hot, and try chilling the mixture longer if needed.
3. How do I store leftovers?
Keep any leftover cheesecake cups covered in the fridge. They’ll remain fresh for up to 3 days, but they’re so delicious, I doubt there will be any leftovers!
4. Can I freeze these?
Yes! You can freeze the cups (without toppings) for up to a month. Just let them thaw in the refrigerator before serving, and add your toppings just before enjoying!
Nutritional Information
(Per cup, serves approximately 8 cups)
- Calories: 280
- Total Fat: 17g
- Saturated Fat: 10g
- Carbohydrates: 32g
- Sugars: 22g
- Protein: 4g
Now you’ve got everything you need to whip up these Oreo No-Bake Cheesecake Cups! I can’t wait for you to bring this sweet treat to your kitchen and share it with friends and family. No matter the occasion, these delightful dessert cups are sure to bring joy and satisfaction. Happy cooking, and remember—every plateful is an opportunity to create memories! Let’s get cookin’!
PrintOreo No-Bake Cheesecake Cups
Delicious, creamy Oreo No-Bake Cheesecake Cups that are perfect for satisfying your sweet tooth without turning on the oven!
- Prep Time: 15 minutes
- Cook Time: 0 minutes
- Total Time: 135 minutes
- Yield: 8 servings 1x
- Category: Dessert
- Method: No-Bake
- Cuisine: American
- Diet: Vegetarian
Ingredients
- 1 (8 oz) block of cream cheese, softened
- 1 (8 oz) Cool Whip or whipped topping
- 2/3 cup powdered sugar
- 1 tsp vanilla extract
- 24–26 Oreo cookies (more as desired)
- 4 tbsp melted butter
Instructions
- Prepare your ingredients by gathering all and letting cream cheese come to room temperature.
- Crush the Oreos in a resealable bag or food processor until fine crumbs.
- Mix the crushed Oreos with melted butter until coated, feeling like wet sand.
- Layer the crust in individual dessert cups, pressing it down firmly.
- Blend the cream cheese until smooth, then mix in powdered sugar and vanilla extract.
- Fold in Whipped topping gently, avoiding deflation.
- Fill the cups with cheesecake filling, about three-quarters full.
- Chill for at least 2 hours in the refrigerator until set.
- Add toppings just before serving, such as whipped cream and crushed Oreos.
Notes
These cheesecake cups can be made ahead and stored in the fridge for 2-3 days. Great for gatherings!
Nutrition
- Serving Size: 1 cup
- Calories: 280
- Sugar: 22g
- Sodium: 150mg
- Fat: 17g
- Saturated Fat: 10g
- Unsaturated Fat: 2g
- Trans Fat: 0g
- Carbohydrates: 32g
- Fiber: 1g
- Protein: 4g
- Cholesterol: 30mg
Keywords: Oreo, cheesecake, no-bake, dessert, quick dessert, easy recipe