Platefulkitchen
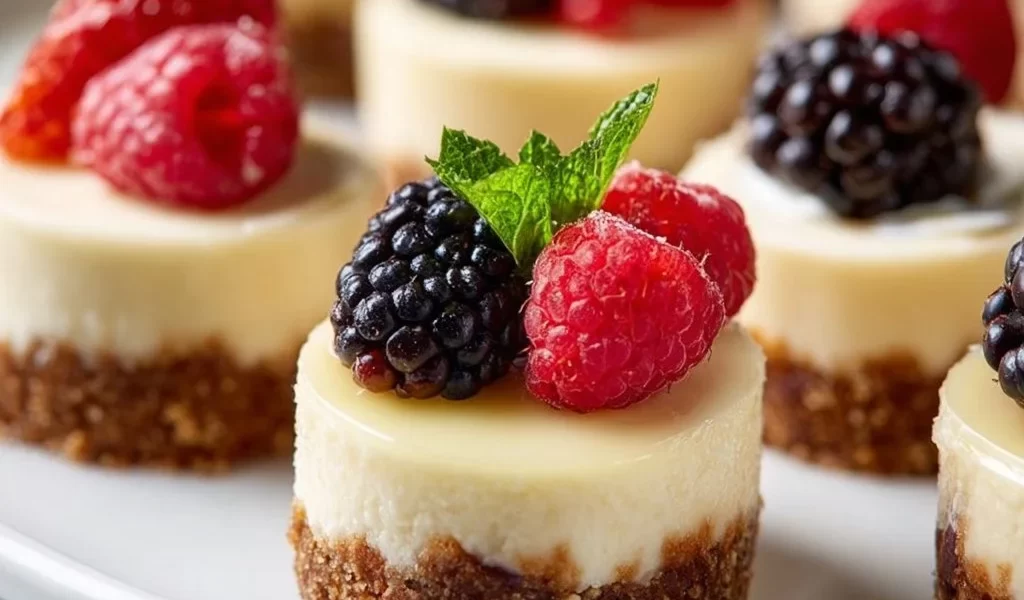
Mini Cheesecake Bites: A Taste of Decadence in Every Little Bite
Hello, fellow foodies! If you’re like me, the thought of a creamy, dreamy cheesecake can make your heart skip a beat. But let’s be real: sometimes, a full-sized cheesecake can feel like a commitment. Enter the charmingly bite-sized mini cheesecake bites! These delightful treats take all the sweet, cheesy goodness of traditional cheesecake and pack it into a perfectly portioned morsel. They’re perfect for sharing at parties, sweetening up a casual get-together, or just indulging in a little pick-me-up during the week.
Picture this: it’s a rainy Sunday afternoon, and the kitchen smells like a bakery. You’ve got a batch of mini cheesecakes in the refrigerator, just waiting to be devoured. These little beauties come topped with fresh strawberries and a drizzle of strawberry jam that glistens like jewels on each golden-hued bite. Trust me—these cheesecake bites are not just delicious; they’re a celebration of life’s little moments.
The beauty of these mini cheesecakes is that they are simple to make yet offer a flavor punch that’ll make you the star of any gathering. Whether you’re a seasoned baker or someone who just wants to whip up something sweet, you’ll find that these bites are approachable, satisfying, and a joy to share. So grab your apron, roll up your sleeves, and let’s dive into the world of mini cheesecakes!
Personal Story
As a kid, my weekends were often spent baking with my mom. I’d pull up a chair to help her mix batter, sift flour, and taste-test along the way. One memory that stands out is the time we decided to get adventurous and try our hand at cheesecakes. My mom had a classic recipe, and I remember how we both stood in rapt attention as she pulled it from the oven, the top perfectly golden, the smell heavenly.
But here’s where our adventure took a hilarious turn. As we excitedly set the cheesecake to cool, a little too close to the edge of the counter, our dog, Max, thought it was his lucky day! In a flash, the cheesecake was on the floor, and I was left in stitches while my mom tried to salvage whatever she could.
Although the cheesecake was a goner, that day sparked a lifelong love of dessert-making for me. Fast forward to today, and I’ve found a way to scale things down into these delightful mini cheesecake bites. They hold all the nostalgia and sweetness of that first cheesecake with none of the stress. Each mini bite is a memory, a testament to resilience—and dog-proof!
Ingredients
Let’s gather our ingredients! Here’s what you’ll need to bring these mini cheesecake bites to life:
-
Graham cracker crumbs (1 cup): These form the crunchy, buttery base of your crust. If you’re gluten-free, feel free to swap them out for gluten-free cookie crumbs!
-
Melted butter (4 tablespoons): This helps bind the crust together. For a dairy-free option, you can use coconut oil or dairy-free margarine.
-
Cream cheese (8 oz, softened): The creamy base of the filling that makes these cheesecake bites rich and luscious. If you’re looking for lower-fat alternatives, consider Neufchâtel cheese, which offers a similar taste.
-
Heavy cream (½ cup): Whipped into the mixture, this lightens the texture of the cheesecake. If you want to keep it lighter, you can swap for full-fat Greek yogurt.
-
Powdered sugar (½ cup): This sweetens the filling without any grainy texture. You can use regular sugar, but make sure you beat it really well to get that smooth texture you want.
-
Vanilla extract (1 teaspoon): Adds a gentle, aromatic flavor. For an extra touch, try using vanilla bean paste for those lovely little flecks throughout.
-
Fresh strawberries (1½ cups, chopped): They’re bright, fresh, and take these mini bites to the next level of deliciousness. You can substitute with any berries or fruits you love—raspberries or blueberries work beautifully, too!
-
Strawberry jam (2 tablespoons): Adds a layer of shine and sweetness to the topping. Feel free to swap in another fruit jam or even a drizzle of chocolate sauce for fun twists!
Step-by-Step Instructions
Ready to bake some magic? Let’s get into the nitty-gritty of making these scrumptious mini cheesecake bites!
Step 1: Preheat the Oven
Begin by preheating your oven to 325°F (160°C). This ensures an even bake. While that warms up, line a mini muffin pan with paper liners or lightly grease it with cooking spray to keep things from sticking. Trust me; you want to make clean-up easy!
Step 2: Prepare the Crust
In a mixing bowl, combine your graham cracker crumbs and melted butter. Mix them together until all the crumbs are moistened.
Chef Tip: You should be looking for a texture that resembles wet sand. If it’s too crumbly, add a little extra melted butter. Then, using your fingers or the back of a spoon, firmly press the mixture into the bottom of each mini muffin cup. Aim for about 1 tablespoon of crust per cup.
Step 3: Bake the Crust
Pop your crust-lined muffin pan into the oven for 5-7 minutes. This pre-baking step helps the crust set up nicely. The goal is a subtle golden color. While it bakes, it’s time to whip up that dreamy filling!
Step 4: Mix the Filling
In a large bowl, using an electric mixer, beat the cream cheese until smooth and creamy. Remember—softened cream cheese is key here!
Chef Hack: If your cream cheese is a little cold, pop it in the microwave for about 10 seconds. Just be careful not to melt it!
Add in the heavy cream, powdered sugar, and vanilla extract. Beat until everything is well combined and creamy. You want this mixture light and fluffy, so take your time mixing.
Step 5: Fill the Cups
Once your crusts have cooled for a minute, take your cream cheese mixture and spoon it over the crusts in each muffin cup. Aim to fill them about three-quarters of the way full.
Bonus Tip: The mixture will settle a little, so don’t overfill. Leave room for toppings!
Step 6: Bake the Cheesecakes
Now it’s time for the moment of truth! Carefully place the muffin pan back into the oven and bake for 15-20 minutes until the tops look set but the centers might still jiggle a little. Don’t worry—once they cool, they’ll firm up perfectly!
Step 7: Cool and Chill
After baking, take them out and let them sit at room temperature for about 10 minutes. This helps prevent cracking as they cool. Then, transfer the muffin pan to the fridge for at least two hours (or overnight if you can wait!) to let them set completely.
Step 8: Add the Toppings
Once your mini cheesecakes are chilled and set, it’s time to top these bites with fresh chopped strawberries and a dollop of strawberry jam.
Serving Tip: For optimal presentation, I suggest mounding the strawberries on top and then drizzling the jam over that!
Serving Suggestions
These mini cheesecake bites are perfect for serving at parties or as a sweet treat at home. To plate them, simply remove them from their liners and arrange them on a pretty platter. You can garnish with a sprinkle of mint leaves or even a dusting of powdered sugar for an extra touch of elegance. Trust me; everyone will swoon over these scrumptious little bites!
Recipe Variations
Feel like getting creative? Here are a few ideas to switch things up:
-
Chocolate Mini Cheesecakes: Add ¼ cup of melted chocolate into the filling for a rich chocolatey twist!
-
Lemon Zest & Juice: Add the zest of one lemon and a tablespoon of lemon juice to the filling for a zesty, fresh flavor.
-
Nutty Crust: For a more robust flavor, substitute half of the graham crackers with finely crushed nuts like almonds or walnuts!
-
Pumpkin Spice: For fall flavors, add a ½ cup of pumpkin puree and 1 teaspoon of pumpkin pie spice into the filling.
-
No-Bake Version: Want an even simpler version? Try swapping the filling for a mixture of whipped cream cheese and whipped cream for a no-bake treat!
Chef’s Notes
I love experimenting with this recipe! It’s one of those base formulas that you can play around with endlessly. Plus, every time I make these mini cheesecake bites, I’m reminded of that moment in the kitchen with my mom, and it brings a smile to my face.
One time, I made them for a friend’s birthday. I was all set to present this beautiful platter, and I tripped on the last step—and you guessed it—the cheesecake bites went flying! But hey, nothing a good plate of “oops”-cakes couldn’t fix. We laughed, put a few back into the pan, and still enjoyed every delicious bite. Baking isn’t just about the end result; it’s about the joy (and sometimes chaos) that happens along the way!
FAQs and Troubleshooting
Q1: My mini cheesecakes cracked. What happened?
Cracking usually happens if the oven temperature is too high or they’re baked too long. Always watch for that gentle jiggle in the center when they’re done.
Q2: Can I freeze these mini cheesecakes?
Absolutely! They freeze well. Just place them in an airtight container with layers of parchment paper in between to prevent sticking. Thaw them in the fridge when you’re ready to enjoy!
Q3: What can I use if I don’t have mini muffin tins?
You can use a regular muffin tin; just be sure to adjust the baking time as they’ll take longer to set. Another option is to use a 9×9 inch baking pan and cut them into squares after cooling.
Q4: How can I make them less sweet?
If you prefer a less sweet bite, reduce the powdered sugar in the filling or use a sugar alternative that matches your flavor preference. Just taste as you go!
Nutritional Info
Per mini cheesecake bite (approximately):
- Calories: 120
- Fat: 8g
- Carbohydrates: 10g
- Protein: 2g
(Note: Nutritional values are estimates and will vary based on specific ingredients used.)
And there you have it—your guide to making delightfully satisfying mini cheesecake bites! I hope you enjoy every delicious moment spent in the kitchen. Let’s fill those plates and make some memories! Grab a batch for your next gathering, and you’ll have everyone leaning back in their chairs, satisfied and happy. Happy cooking!
PrintMini Cheesecake Bites

Delightful mini cheesecake bites showcasing creamy goodness in a perfect bite-sized portion, topped with fresh strawberries and strawberry jam.
- Prep Time: 20 minutes
- Cook Time: 20 minutes
- Total Time: 120 minutes
- Yield: 24 servings 1x
- Category: Dessert
- Method: Baking
- Cuisine: American
- Diet: Vegetarian
Ingredients
- 1 cup graham cracker crumbs
- 4 tablespoons melted butter
- 8 oz cream cheese, softened
- ½ cup heavy cream
- ½ cup powdered sugar
- 1 teaspoon vanilla extract
- 1½ cups fresh strawberries, chopped
- 2 tablespoons strawberry jam
Instructions
- Preheat the oven to 325°F (160°C) and prepare a mini muffin pan with liners.
- Combine graham cracker crumbs and melted butter in a mixing bowl, then press into the muffin cups.
- Bake the crust for 5-7 minutes until golden.
- Beat cream cheese until smooth, then add heavy cream, powdered sugar, and vanilla, mixing until creamy.
- Spoon the filling into the crusts, filling each about three-quarters full.
- Bake for 15-20 minutes until set, but still jiggly in the center.
- Cool for 10 minutes at room temperature, then refrigerate for at least 2 hours.
- Top with chopped strawberries and a drizzle of strawberry jam before serving.
Notes
These mini cheesecakes can be topped with various fruits or even drizzled with chocolate for different flavors.
Nutrition
- Serving Size: 1 bite
- Calories: 120
- Sugar: 7g
- Sodium: 150mg
- Fat: 8g
- Saturated Fat: 5g
- Unsaturated Fat: 3g
- Trans Fat: 0g
- Carbohydrates: 10g
- Fiber: 0g
- Protein: 2g
- Cholesterol: 30mg
Keywords: cheesecake, dessert, mini bites, party treat, strawberry topping