Platefulkitchen
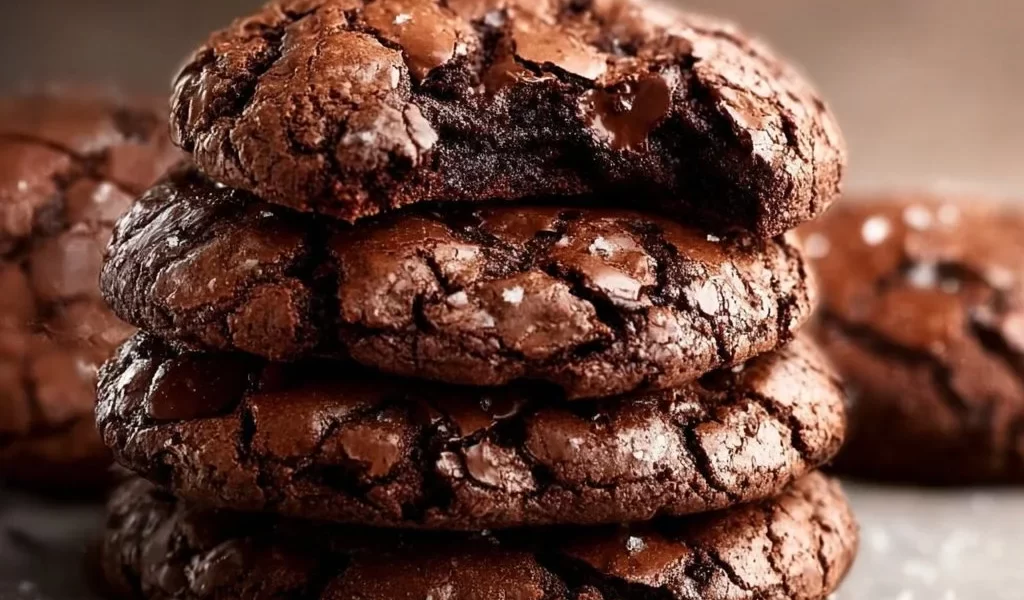
Gourmet Brownie Cookies: A Sweet Journey to Decadence
Hello, fellow food lovers! Today, we’re diving into the delightful world of Gourmet Brownie Cookies. If you’ve ever found yourself caught between the rich, fudgy goodness of brownies and the sweet satisfaction of cookies, then this recipe is a dream come true! Imagine sinking your teeth into a cookie that offers the best of both worlds—soft, chewy, and packed with chocolatey goodness. Trust me, these cookies are sure to steal the spotlight at any gathering or cozy night in.
I remember the first time I created this recipe. It was a rainy Saturday afternoon, and I was feeling particularly nostalgic for the sweet treats of my childhood. My kitchen was filled with the comforting aroma of melted chocolate and warm butter, and before I knew it, I had a batch of cookies forming on my baking sheets. Those first bites were pure bliss—crispy edges with a gooey center that made me feel like I was eight years old again, sneaking a cookie before dinner. The friends I shared them with that day were equally enamored, and right then, I knew I’d stumbled onto something special.
So, grab your mixing bowl, preheat your oven, and get ready for a journey of flavors and memories—you won’t want to miss out on these Gourmet Brownie Cookies!
Personal Story
One of my most cherished memories revolves around cookie baking marathons with my grandmother. She had a way of making the kitchen feel like a magical haven, filled with warmth, laughter, and, of course, the irresistible scent of baked goodies wafting in the air. I vividly recall standing on a stool beside her, ready to stir the batter as she tossed in chocolate chips like they were treasure. The joy of working alongside her, sharing secrets about how to make the cookies extra chewy, is a feeling I carry with me.
Those afternoons formed the foundation of my love for baking. Fast forward to today, and I still channel that joyful energy whenever I whip up a batch of treats. This recipe, especially, takes me back to those afternoons filled with love and laughter, where every cookie was an adventure that cropped up in the most tender of moments. Now, I can’t wait to pass on that tradition to you!
Ingredients
Let’s get down to business! Here’s what you’ll need to make your own batch of Gourmet Brownie Cookies:
-
1 cup unsalted butter
*Why: This is the fat that brings our cookies to life, lending them that rich, buttery flavor.
Tip: If you’re in a pinch, feel free to use salted butter and reduce the salt measurement a bit. -
1 cup granulated sugar
*Why: Granulated sugar provides the sweetness and helps achieve a slightly crunchy exterior.
Tip: You can substitute half of this with coconut sugar for a lower glycemic index option! -
1 cup brown sugar
*Why: Dark brown sugar adds moisture and caramel notes, enhancing the overall flavor.
Tip: For a lighter flavor, use light brown sugar, but I love the depth that dark brown sugar brings! -
2 large eggs
*Why: Eggs bind everything together and create that gooey texture we crave.
Tip: For a vegan alternative, you can use flaxseed meal (1 tablespoon of flaxseed mixed with 2.5 tablespoons of water). -
1 teaspoon vanilla extract
*Why: Vanilla adds warmth and aromatic goodness to the cookie dough.
Tip: Homemade vanilla extract makes a world of difference—consider making your own! -
1 cup all-purpose flour
*Why: This is the structure of your cookies, providing the perfect chewy base.
Tip: If you’re gluten-free, almond flour or a gluten-free all-purpose blend works well! -
1/2 cup unsweetened cocoa powder
*Why: Cocoa powder is essential for that rich brownie flavor.
Tip: High-quality cocoa powder, like Dutch-processed, will yield deeper chocolate notes! -
1/2 teaspoon baking powder
*Why: Baking powder adds a little lift to our cookies, ensuring they don’t become too dense.
Tip: Baking soda is a suitable substitute—just remember to adjust the quantities! -
1/4 teaspoon salt
*Why: Salt enhances flavor and balances out the sweetness.
Tip: If using salted butter, you can skip this entirely! -
1 cup chocolate chips
*Why: The gems of melted chocolate oozing out enrich flavors with every bite.
Tip: Mix dark chocolate chips with white chocolate or even peanut butter chips for a fun twist!
Step-by-Step Instructions
Let’s get to the fun part—baking these beauties! Follow these steps and watch your kitchen transform into a cookie wonderland.
-
Preheat the Oven:
Start by preheating your oven to 350°F (175°C). This ensures your cookies bake evenly and get that perfect crisp on the outside while staying soft inside. -
Melt the Butter:
In a medium saucepan over low heat, melt the unsalted butter. Stir it well to avoid letting it burn. Once melted, set it aside and let it cool slightly. This prevents the eggs from cooking when added. -
Combine Sugars:
In a mixing bowl, combine the granulated sugar and brown sugar. I like to use a whisk here—not only does it combine the sugars nicely, but it’s also therapeutic to whisk away! Pour in the melted butter and whisk again until combined and smooth. -
Add Eggs and Vanilla:
Crack in the eggs, one at a time, whisking well after each addition. Add the vanilla extract and mix until combined. The mixture will become light and creamy—this is your cookie base! -
Mix Dry Ingredients:
In another bowl, whisk together the flour, cocoa powder, baking powder, and salt. Make sure there are no lumps in the cocoa powder, as it can clump up and create bitter cocoa pockets. Gradually add the dry mixture to the wet mixture and stir until just combined. -
Add Chocolate Chips:
Fold in the chocolate chips using a rubber spatula to ensure an even distribution. Try not to over-mix, as you want to retain that fudge-like texture! -
Scoop and Shape:
Use a cookie scoop or tablespoon to drop heaping spoonfuls of dough onto a baking sheet lined with parchment paper. Give them some space to spread out—about 2 inches apart should do the trick! -
Bake:
Slide the baking sheets into the oven and bake for 10-12 minutes. Keep an eye on them; you want the edges to be set, while the centers look slightly underbaked, as they will continue to cook once out of the oven. -
Cool:
Allow your cookies to cool on the baking sheet for 5 minutes before transferring them to a wire rack. This helps them retain their soft center and prevents them from breaking apart. -
Enjoy!
Once they’re cool enough to handle, grab a couple and indulge in their deliciousness. Share them with friends or hoard them all to yourself—I won’t judge!
Serving Suggestions
To serve your Gourmet Brownie Cookies, I recommend placing them on a decorative platter with a side of ice cream for that extra indulgent touch. Drizzle some chocolate sauce or even sprinkle a little sea salt on top! For a cozy movie night, pair them with a hot cup of coffee or a rich glass of milk. Trust me; your guests will be begging for the recipe!
Recipe Variations
Feeling adventurous? Here are a few creative twists to customize your Gourmet Brownie Cookies:
- Nutty Delight: Add 1/2 cup of chopped walnuts or pecans for an added crunch. It complements the fudginess beautifully.
- Mint Chocolate: Incorporate 1 teaspoon of peppermint extract and use mint chocolate chips for a refreshing flavor.
- Spicy Kick: Add a dash of cayenne pepper or cinnamon for those who enjoy a hint of spice alongside their chocolate.
- Fruit Fusion: Toss in 1/3 cup of dried cherries or cranberries for slight tartness to contrast with the sweetness.
- Peanut Butter Swirl: Drop some peanut butter on the dough before baking and swirl gently for a decadent treat!
Chef’s Notes
Baking this cookie recipe is like a culinary hug. It’s amazing how a few simple ingredients can transform into something both nostalgic and exciting! Over the years, I’ve played around with ingredients, adjusting sugar for personal preference and experimenting with add-ins. Every time I make them, it feels like a homecoming—like reuniting with an old friend. I once had a batch mysteriously disappear before I could even taste test them! Turns out, my friends couldn’t resist the warm cookies. So, if you want to keep these cookies around for the family, hide them as soon as they’re cool!
FAQs and Troubleshooting
-
Why are my cookies flat?
If your cookies spread too much, it could be due to melted butter that was too hot, or the dough was too warm before baking. Make sure to let your melted butter cool slightly and chill the dough for 30 minutes before baking if needed. -
What can I do if the cookies are too crumbly?
Crumbly cookies can often be saved by mixing in a little extra melted butter or a splash of milk. Don’t fear the wet ingredients! -
How do I store leftover cookies?
To keep your cookies fresh, store them in an airtight container at room temperature for up to a week. You can also freeze them for later—just toss them in a ziplock bag and they’ll be deliciously ready whenever you’re craving some cookie goodness! -
Can I make these ahead of time?
Absolutely! You can prepare the dough ahead of time and refrigerate it for up to 3 days. Just scoop out the dough and bake fresh cookies whenever the cravings hit!
Nutritional Info
While indulging in cookies, it’s good to have a rough idea about their nutritional content. Here’s a general breakdown per cookie (based on making 24 cookies):
- Calories: 190
- Protein: 2g
- Fat: 10g
- Carbohydrates: 26g
- Fiber: 1g
- Sugars: 15g
(Note: Nutritional values can vary based on specific brands and measurements.)
Now that you’ve got the scoop on these Gourmet Brownie Cookies, I can’t wait for you to step into your kitchen and whip up a batch! May they bring you as much joy as they’ve brought into my life. Happy baking, and remember—there’s always room for a little extra chocolate! 🍪🍫
PrintGourmet Brownie Cookies

Delicious brownie cookies that combine fudgy brownie texture with cookie sweetness.
- Prep Time: 15 minutes
- Cook Time: 12 minutes
- Total Time: 27 minutes
- Yield: 24 cookies 1x
- Category: Dessert
- Method: Baking
- Cuisine: American
- Diet: Vegetarian
Ingredients
- 1 cup unsalted butter
- 1 cup granulated sugar
- 1 cup brown sugar
- 2 large eggs
- 1 teaspoon vanilla extract
- 1 cup all-purpose flour
- 1/2 cup unsweetened cocoa powder
- 1/2 teaspoon baking powder
- 1/4 teaspoon salt
- 1 cup chocolate chips
Instructions
- Preheat the oven to 350°F (175°C).
- Melt the unsalted butter in a medium saucepan over low heat and let cool.
- Combine the granulated sugar and brown sugar in a mixing bowl, then whisk in the melted butter.
- Add the eggs one at a time, whisking well after each addition, and then add the vanilla extract.
- Mix the flour, cocoa powder, baking powder, and salt in another bowl, then gradually stir them into the wet mixture.
- Fold in the chocolate chips until evenly distributed.
- Scoop heaping spoonfuls of dough onto a baking sheet lined with parchment paper, spaced about 2 inches apart.
- Bake for 10-12 minutes until edges are set, and centers look slightly underbaked.
- Cool on the baking sheet for 5 minutes before transferring to a wire rack.
- Enjoy! Indulge in the deliciousness and share with friends.
Notes
For a nutty variation, add 1/2 cup of chopped walnuts or pecans.
Nutrition
- Serving Size: 1 cookie
- Calories: 190
- Sugar: 15g
- Sodium: 100mg
- Fat: 10g
- Saturated Fat: 6g
- Unsaturated Fat: 4g
- Trans Fat: 0g
- Carbohydrates: 26g
- Fiber: 1g
- Protein: 2g
- Cholesterol: 30mg
Keywords: cookies, brownies, dessert, chocolate cookies, baking