Platefulkitchen
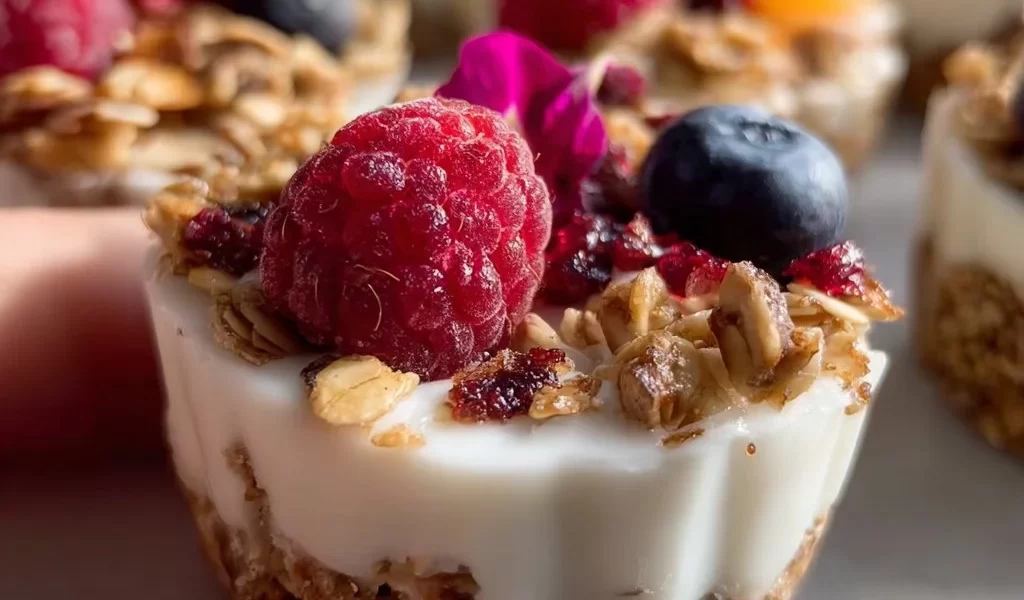
Frozen Yogurt Granola Power Cups: A Refreshing Treat for Every Occasion
Hello, my fellow food enthusiasts! Today, we’re diving into a delightful and nutritious treat that will make your snack time just as special as dessert: Frozen Yogurt Granola Power Cups! Being a home cook, I know how important it is to have recipes that not only taste amazing but also offer some nutritional benefits. These little cups are packed with flavor, featuring creamy Greek yogurt, crunchy granola, and juicy, fresh berries. Nothing screams summer like the combination of tangy yogurt and sweet fruit, don’t you think?
I still remember the first time I whipped up a batch of these delicious cups. It was a hot afternoon, and my kids were craving something refreshing while we were in the middle of one of our epic summer backyard sessions. The sound of their giggles filled the air as they splashed in the pool, and I felt inspired to create something cool, satisfying, and healthy that would give them a little energy boost to keep the fun going. I rummaged through my pantry and fridge, layered some yogurt and toppings into cups, and voilà! A new family favorite was born.
Now, you can enjoy these little powerhouses of flavor and nutrition whenever the mood strikes! Whether you’re looking for a quick breakfast, a post-workout snack, or a refreshing dessert, these Frozen Yogurt Granola Power Cups are the answer. Trust me, once you try these, you’ll want to make them a regular part of your culinary lineup. So, let’s roll up our sleeves and get cooking together!
Personal Story
One sunny afternoon in July, my kids and I decided to host an impromptu picnic in our backyard. The smell of freshly cut grass and the sound of birds chirping made it feel like the perfect day for some creativity in the kitchen. As we gathered a mix of fruits and snacks, I was trying to think of something light yet fulfilling that we could enjoy under the shade of our big oak tree. That’s when I remembered those cups I had made previously with Greek yogurt and granola—simple yet delicious!
The kids and I put on our aprons, and the kitchen quickly transformed into our own little culinary playground. We started mixing, layering, and enjoying the process. By the time we finished, the cups were bursting with color—bright red strawberries, dark blue blueberries, and a little sprinkle of granola on top for crunch. Watching the kids devour those cups while laughing about their favorite fruits made my heart happy. I knew then that this recipe was about more than just a treat; it was about creating moments, making memories, and filling our plates with love.
Ingredients
Here’s what you’ll need to whip up these scrumptious Frozen Yogurt Granola Power Cups! Each ingredient plays a crucial role in delivering taste, texture, and nutrition.
-
3/4 cup Rolled oats
Oats are a fantastic source of fiber and will help keep you feeling full. They create a wholesome granola base. You can substitute them with quick oats if that’s what you have on hand, but keep in mind they might not be as chewy. -
1/4 cup Natural almond butter
Almond butter adds creaminess and healthy fats that are good for your heart. If you have a nut allergy, feel free to swap it out with sunflower seed butter or tahini for a similar texture. -
3–4 tbsp Honey (or maple syrup)
This is our natural sweetener! Honey gives a lovely floral flavor, but if you’re vegan or prefer a plant-based option, maple syrup works beautifully too. -
1 tsp Vanilla extract
Vanilla extract brings warmth and enhance the flavor of your yogurt. If you’re out, you can use a few drops of almond extract for a twist. -
1/2 tsp Ground cinnamon
Cinnamon adds a lovely aromatic touch and pairs perfectly with yogurt and fruit. If you want to mix things up, try a dash of ginger or pumpkin pie spice instead! -
1 1/2 cups Greek yogurt (full-fat recommended)
Greek yogurt is packed with protein and will give our power cups their creamy texture. Low-fat works too if you’re watching the calories, but I recommend keeping the full-fat version for a richer taste. -
1 cup Mixed fresh berries (strawberries, blueberries, raspberries)
Fresh berries are not only delicious but also loaded with antioxidants! You can substitute with other berries like blackberries or even sliced bananas if berries aren’t in season.
Step-by-Step Instructions
Let’s dive into the nitty-gritty of how to create these lovely Frozen Yogurt Granola Power Cups. Stick with me through each step, and I’ll share little chef insights along the way. Ready? Let’s get cooking!
-
Prepare Your Ingredients
Start by gathering all your ingredients on the countertop. This will make the process smoother and more enjoyable. Prepping your station is key in the kitchen! For my kiddos, I like to involve them in measuring the oats or mixing the yogurt just to keep it interactive. -
Mix Your Granola Base
In a bowl, combine the rolled oats, almond butter, honey (or maple syrup), vanilla extract, and ground cinnamon. Mix it with a spoon or spatula until everything is thoroughly coated. This mixture should be sticky but not overly wet. If it feels too dry, add a smidge more almond butter or honey. If it’s too wet, sprinkle a few extra oats! -
Layer the Power Cups
Grab your cups or a muffin tin. Start by adding a spoonful of the granola mixture—about a tablespoon or so—into the bottom of each cup. Gently press it down to create a firm base. This step is crucial if you want your cups to hold their shape once frozen! -
Add the Greek Yogurt
Now, scoop the Greek yogurt on top of the granola layer, filling the cups about two-thirds of the way. You’re creating delicious layers here! Don’t skip on the yogurt; this part is the star of the show. Keep it smooth, and if you like, you can do a little creative swirl with a spoon! -
Top with Fresh Berries
Now comes the fun part—topping them off! Add a handful of mixed fresh berries on top of the yogurt layer. You can be as generous as you like here. This not only adds flavor but also gives a wonderful pop of color. -
Finish with More Granola
Don’t stop there! Add a final sprinkle of the granola mixture on top of the berries. This will give you that lovely crunch when you take a bite. Plus, it looks pretty! We’ve got to make it Instagram-worthy, right? -
Freeze and Enjoy!
Carefully place the cups in the freezer for at least 4 hours or until completely set. Once frozen, you can pop them out of the cups and store them in a freezer-safe container. Just don’t forget to let them sit out for a few minutes before enjoying, as they can be a tad hard to bite into straight from the freezer.
Serving Suggestions
When it comes to serving these Frozen Yogurt Granola Power Cups, I absolutely love presenting them in clear cups so the beautiful layers can shine through. Arrange them on a colorful platter, garnish with a sprig of mint, or drizzle some honey for an elevated touch. These cups are great as a refreshing snack, a healthy breakfast, or the pièce de résistance at a brunch gathering. Let your creativity soar!
Recipe Variations
Looking to switch things up? Here are some fun variations to elevate your Frozen Yogurt Granola Power Cups:
- Nut Butter Swaps: Try peanut butter or cashew butter instead of almond butter for a fun twist.
- Fruity Fun: Experiment with different fruit combinations! You can even add bananas, mango chunks, or chopped peaches based on your preference.
- Chocolate Delight: Mix in some cocoa powder into the yogurt or sprinkle mini chocolate chips on top for a dessert-like cup.
- Grain Options: Swap out the rolled oats for granola or even puffed quinoa for a lighter texture.
- Dairy-Free Delight: Use dairy-free yogurt alternatives made from almond, coconut, or oat milk for a vegan-friendly treat.
Chef’s Notes
Let me share a little something to keep you smiling: the first time I made these cups, I forgot to keep an eye on the time while they were freezing! I got caught up in kids’ art projects, and by the time I checked, they were rock-solid. After a few attempts, I learned to enjoy a little patience when it comes to freezing recipes! Now, I always set an alarm, but hey—life happens in the kitchen! My kids still giggle about the "ice cream rocks" we made that day, and every time we make them, they remind me to keep track of the clock!
These Frozen Yogurt Granola Power Cups have evolved over time. I started with simple layers, but now I love to incorporate seasonal fruits or even get creative with how I layer them as the seasons change. Your kitchen is always evolving, just like your palate!
FAQs and Troubleshooting
1. What’s the best way to store these cups?
Once fully frozen, transfer the cups into a freezer-safe container or a Ziploc bag. They can last up to a month in the freezer, but I’m sure they’ll be gone before that!
2. My granola didn’t stick together, what did I do wrong?
It sounds like you may not have added enough almond butter or sweetener. Make sure to mix well and press it down firmly. If you’re using quick oats, they might need a tiny bit more moisture to bind.
3. Can I use frozen berries?
Absolutely! Frozen berries work perfectly in this recipe. Just note that they may release some juice as they thaw, adding a lovely splash of color and flavor to your cups.
4. How do I make these vegan?
Substituting the Greek yogurt with dairy-free yogurt (like coconut or almond) and using maple syrup in place of honey will transform this into a delicious vegan-friendly treat!
Nutritional Info
While nutritional values can vary based on brand and specific ingredients, here’s a rough estimate per power cup (without added extras):
- Calories: 185
- Protein: 7 g
- Carbohydrates: 24 g
- Fat: 7 g
- Fiber: 4 g
- Sugar: 10 g (from natural sweeteners and fruit)
And there you have it! Your guide to making these irresistible Frozen Yogurt Granola Power Cups. As always, I hope you enjoyed cooking with me today, and can’t wait for you to try this recipe yourself. Remember, cooking is not just a routine; it’s an experience filled with joy, creativity, and love. So grab a spoon, dig in, and share these delightful cups with family and friends. Happy cooking from your kitchen buddy, Sophie!
PrintFrozen Yogurt Granola Power Cups

A refreshing and nutritious treat packed with Greek yogurt, granola, and fresh berries, perfect for any occasion.
- Prep Time: 15 minutes
- Cook Time: 0 minutes
- Total Time: 240 minutes
- Yield: 4 servings 1x
- Category: Snack
- Method: Freezing
- Cuisine: American
- Diet: Vegetarian
Ingredients
- 3/4 cup Rolled oats
- 1/4 cup Natural almond butter
- 3–4 tbsp Honey (or maple syrup)
- 1 tsp Vanilla extract
- 1/2 tsp Ground cinnamon
- 1 1/2 cups Greek yogurt (full-fat recommended)
- 1 cup Mixed fresh berries (strawberries, blueberries, raspberries)
Instructions
- Prepare your ingredients by gathering all items on the countertop.
- Mix the rolled oats, almond butter, honey, vanilla extract, and ground cinnamon in a bowl.
- Layer the granola mixture into the bottom of each cup, pressing down to create a firm base.
- Add a scoop of Greek yogurt on top of the granola layer.
- Top with fresh berries, adding a handful over the yogurt layer.
- Finish with a sprinkle of granola on top of the berries.
- Freeze for at least 240 minutes or until completely set.
Notes
Serve in clear cups to showcase the layers. These cups can also be prepared as a breakfast or refreshing snack.
Nutrition
- Serving Size: 1 cup
- Calories: 185
- Sugar: 10g
- Sodium: 50mg
- Fat: 7g
- Saturated Fat: 1g
- Unsaturated Fat: 5g
- Trans Fat: 0g
- Carbohydrates: 24g
- Fiber: 4g
- Protein: 7g
- Cholesterol: 5mg
Keywords: frozen yogurt, granola, healthy snack, Greek yogurt, summer treat, easy recipe