Platefulkitchen
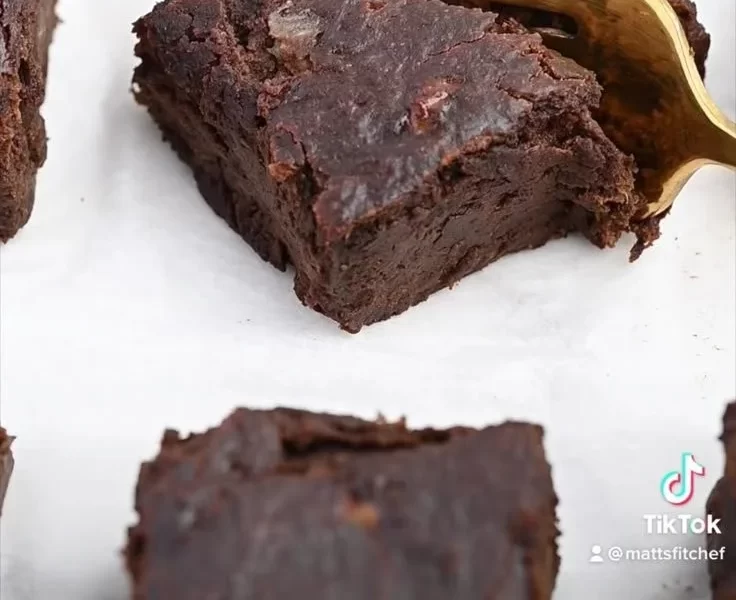
The Ultimate Flourless Brownies: Comfort in Every Bite
Hello, fellow foodies! If you’re anything like me, you know the joy that comes from whipping up something sweet in the kitchen. There’s something so satisfying about the smell of baked goods wafting through your home, wrapping you in a cozy embrace. Today, I’m thrilled to share a treat that’s not just delicious, but also surprisingly easy to make: Flourless Brownies!
Now, hold on—before you start raising your eyebrows at the idea of flourless brownies, let me tell you, these little beauties are incredibly rich, decadent, and oh-so-chocolatey. They’re the kind of treats that make you lean back in your chair, grinning from ear to ear, and wondering if you can eat just one more. And the best part? They’re made from just three simple ingredients that you probably have on hand: ripe bananas, peanut butter, and cocoa powder. You don’t need fancy gadgets, pristine baking skills, or even flour to pull off this indulgent dessert. Let’s dive into the world of flourless brownies that pack a punch of flavor, nourish your sweet tooth, and leave you feeling fabulous!
So, grab your apron, heat that oven to 350°F (175°C), and let’s get ready for some kitchen magic. I promise that you’re going to want to share this recipe with everyone you know!
Personal Story
I have to tell you about the first time I made flourless brownies. It was a rainy Saturday afternoon, and the skies were gloomy, making it the perfect day for some cozy baking. I had a few overly ripe bananas sitting on the counter—those brown-speckled beauties that most people turn their noses up at. But not me! I knew those bananas would add the perfect sweetness and texture to something fabulous.
I decided to channel my inner chocolatier and experiment. I grabbed my trusty peanut butter and some cocoa powder, threw everything into a bowl, and mixed away. The batter was thick and rich, just begging to be baked. Once they were out of the oven, the house smelled like a chocolate factory, and I could hardly wait for them to cool down. When I finally took a bite, oh boy! It was like a warm hug from the inside. My family couldn’t believe how delicious they were—nobody suspected they were made without flour. That day turned into not just a fun baking adventure, but also a cherished memory that I hold onto tightly, reminding me that simple ingredients can lead to exceptional outcomes.
Ingredients
Let’s take a look at the star ingredients that will make these flourless brownies shine! Here’s what you’ll need:
-
3 Ripe Bananas
- Explanation: The foundation of our brownies! Ripe bananas add natural sweetness and moisture, resulting in a fudgy texture.
- Substitution Tip: You can substitute with applesauce in equal amounts if you need a lower-fat option.
-
1 Cup Peanut Butter
- Explanation: This creamy delight not only adds flavor but also contributes healthy fats that make these brownies rich.
- Chef Insight: Choose natural, unsweetened peanut butter for the best flavor. If peanut allergies are a concern, almond or sunflower seed butter works beautifully.
-
1/2 Cup Cocoa Powder
- Explanation: The star player that gives our brownies that deep, chocolatey flavor you crave.
- Substitution Tip: If you’re out of cocoa powder, unsweetened carob powder can be a good alternative, though the flavor will differ.
Step-by-Step Instructions
Now that we’ve gathered our ingredients, let’s get cooking! Follow these steps, and you’ll have a batch of flourless brownies that’s ready to impress.
Step 1: Preheat Your Oven
Start by preheating your oven to 350°F (175°C). This step is crucial; a properly heated oven helps your brownies rise just right without becoming too dense.
Step 2: Prepare Your Baking Dish
Grab an 8-inch square baking dish and line it with parchment paper. This ensures easy removal and cleanup. Pro Tip: Leave some overhang on the sides so you can easily lift out the brownies later.
Step 3: Mash the Bananas
In a medium-sized bowl, mash your ripe bananas using a fork or a potato masher until smooth. No lumps here, please! The more mashed they are, the better the texture of your brownies will be.
Step 4: Mix in Peanut Butter
Add the peanut butter to the bananas. Use a spatula or your trusty wooden spoon to mix until well combined. The mixture will be creamy and inviting—a little bit of elbow grease goes a long way here!
Step 5: Add the Cocoa Powder
Now, we introduce the cocoa powder to the party! Sift it in for a lump-free mix, and fold it into the banana-peanut butter mixture until everything is seamlessly combined. You’ll notice that the batter becomes thick and fudgy—this is a sign of deliciousness!
Step 6: Pour and Spread
Transfer your brownie batter into the prepared baking dish. Use a spatula to spread it evenly, making sure to reach the corners. This step is important; we want a uniform bake!
Step 7: Bake
Pop those beauties into your preheated oven for about 20-25 minutes. Keep an eye on them towards the end; they’re done when a toothpick inserted in the center comes out mostly clean with just a few moist crumbs.
Step 8: Cool and Slice
After baking, let your brownies cool in the dish for about 15 minutes. Then, use that parchment paper overhang to lift them out onto a cutting board. Allow them to cool completely before slicing into squares. Enjoy the sweet aroma filling the kitchen during this time—it’ll be worth the wait!
Serving Suggestions
When it comes to serving these glorious flourless brownies, keep it simple but delightful! A sprinkle of sea salt on top right before serving adds an unexpected flavor pop. You can also drizzle some melted dark chocolate on top or add a dollop of whipped cream or vanilla ice cream. Fresh berries or a scoop of your favorite yogurt on the side can brighten up the dish beautifully!
Recipe Variations
Why stop at the classic recipe? Here are a few delicious twists you might enjoy:
- Nutty Chocolate Swirl: Add a handful of chocolate chips or chopped nuts to the batter for extra texture and flavor.
- Minty Freshness: Incorporate some peppermint extract for a refreshing mint brownie experience.
- Caramel Drizzle: Top your brownies with a homemade or store-bought caramel sauce before serving for an indulgent treat.
- Vegan Option: Make these vegan by using almond butter or sunflower seed butter instead of peanut butter—delicious and equally satisfying!
- Spicy Kick: For those who like a little heat, add a pinch of cayenne or espresso powder to intensify the chocolate flavor.
Chef’s Notes
These flourless brownies hold a dear place in my heart, and they’ve evolved over time. Initially, I had to experiment with the ratios to find just the right balance. One time, I was a little too heavy-handed with the cocoa, and instead of brownies, we ended up with cocoa-flavored clouds! It was a disaster turned fun; we smothered them in whipped cream, and everyone still wanted seconds!
Remember, cooking is all about growth and creativity. Don’t be afraid to play around with this recipe—it’s forgiving and oh-so-delicious!
FAQs and Troubleshooting
Q: My brownies came out too dense. What happened?
A: Browning can happen if you overmix the batter! Make sure to mix only until combined. Also, baking them for too long can result in a dry texture.
Q: Can I use ripe bananas that are starting to brown?
A: Absolutely! In fact, overripe bananas work best because they are super sweet—just make sure they’re not moldy.
Q: How should I store leftovers?
A: These brownies can be stored in an airtight container for up to a week. You can also freeze them for a longer shelf life! Just thaw them at room temperature before enjoying.
Q: Why is my brownie mixture so thick?
A: Flourless brownies tend to have a different texture, which should be thick. However, if it seems too dry, try adding a splash of almond milk or water to loosen it slightly.
Nutritional Info
Each brownie (based on a typical batch of 16 squares) contains approximately:
- Calories: 110
- Protein: 3g
- Carbohydrates: 12g
- Fat: 6g
- Fiber: 2g
This is a treat that’s both satisfying and guilt-free!
And there you have it, a fantastic recipe for flourless brownies that is bound to bring joy to your kitchen and your table! I hope you create wonderful memories making and sharing these with your family and friends. Happy baking, and remember to fill that plate! 🍽️❤️
PrintFlourless Brownies
Indulge in these rich, fudgy flourless brownies made with ripe bananas, peanut butter, and cocoa powder. Simple, delicious, and sure to satisfy your sweet tooth!
- Prep Time: 10 minutes
- Cook Time: 25 minutes
- Total Time: 35 minutes
- Yield: 16 servings 1x
- Category: Dessert
- Method: Baking
- Cuisine: American
- Diet: Gluten-Free, Vegetarian
Ingredients
- 3 ripe bananas
- 1 cup peanut butter
- 1/2 cup cocoa powder
Instructions
- Preheat your oven to 350°F (175°C).
- Prepare an 8-inch square baking dish lined with parchment paper.
- Mash the ripe bananas in a medium bowl until smooth.
- Mix in the peanut butter until well combined.
- Add the cocoa powder and fold until thoroughly mixed.
- Transfer the brownie batter into the prepared baking dish.
- Bake for 20-25 minutes or until a toothpick comes out mostly clean.
- Cool in the dish for 15 minutes before lifting out to slice.
Notes
Serve with a sprinkle of sea salt or a drizzle of melted dark chocolate for extra indulgence. Enjoy with fresh berries or ice cream!
Nutrition
- Serving Size: 1 brownie
- Calories: 110
- Sugar: 5g
- Sodium: 100mg
- Fat: 6g
- Saturated Fat: 1g
- Unsaturated Fat: 5g
- Trans Fat: 0g
- Carbohydrates: 12g
- Fiber: 2g
- Protein: 3g
- Cholesterol: 0mg
Keywords: flourless brownies, gluten-free dessert, easy brownie recipe, healthy dessert