Platefulkitchen
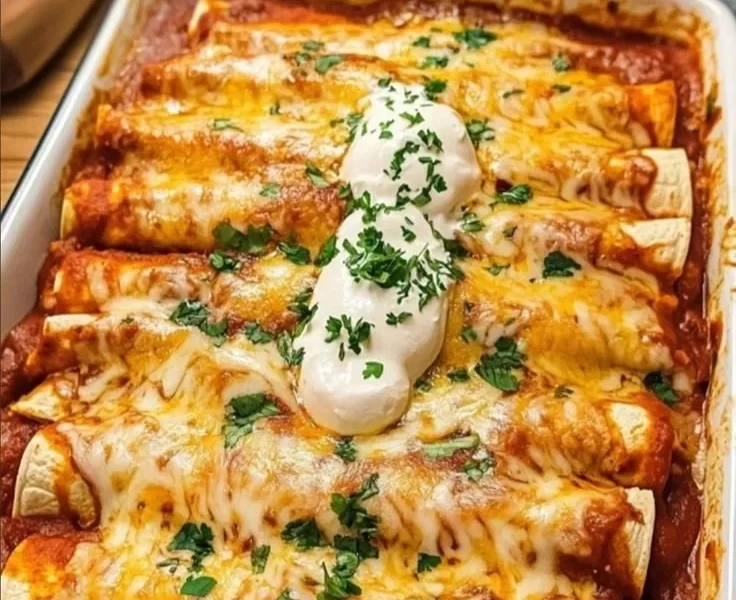
Delicious Chicken Enchiladas: A Culinary Love Letter from My Kitchen to Yours
Hello, fellow food lovers! Gather around because today I’m excited to share a dish that’s close to my heart and guaranteed to be a hit in your kitchen — Chicken Enchiladas! These flavorful, cheesy bundles of joy bring together the best of Mexican cuisine right to your dinner table.
Let’s be honest: who doesn’t love a dish that combines tender chicken, savory spices, and a rich, zesty sauce, all wrapped in warm tortillas and topped with melted cheese? Well, I can tell you that my family certainly loves it, and I’m sure yours will too!
Cooking shouldn’t feel overwhelming; it should feel fulfilling, especially when you get to share a meal with those you love. That’s why I’m here to simplify the cooking process and help you enjoy every step of this recipe. There’s something magical about the rhythm of the kitchen — chopping onions, sautéing garlic, and assembling those beautiful enchiladas. Each step brings us closer to a meal that will not only fill our bellies but also warm our hearts.
Picture this: you’ve had a long day, and you want nothing more than to create something comforting yet uncomplicated for dinner. Enter my Chicken Enchiladas: they are a weeknight wonder that comes together quicker than you might think! Let’s dive into this delicious adventure, where I’ll guide you every step of the way, making sure that your enchiladas turn out magical. So, grab your apron, roll up your sleeves, and let’s fill the plate!
Personal Story
I remember the first time I had homemade enchiladas. I was in high school, standing in my best friend Maria’s kitchen, which always had the cozy aroma of spices dancing through the air. Maria’s mom was bustling about, and there I was, the eager sous chef, soaking in every moment like a sponge.
Watching her deftly roll the tortillas stuffed with seasoned chicken, I thought that there was an art to it. The way she poured the enchilada sauce so generously over the top, and the sound of cheese bubbling and melting in the oven — that was pure magic to me!
Later, we gathered around the dinner table, plates piled high with those delicious enchiladas; laughter and stories filled the room. That evening ignited my passion for cooking and my love for making food that brings people together. It’s one of those moments that reminds me that cooking is not just about the food; it’s about connection, memories, and a table full of love. Every time I whip up a batch of chicken enchiladas, nostalgia washes over me, making the experience all the more special.
Ingredients
Now, let’s talk about what you’ll need for these mouthwatering Chicken Enchiladas:
-
2 cups Cooked and Shredded Chicken
Use rotisserie chicken for an extra boost of convenience, or you can poach and shred your own chicken if you’re feeling adventurous! -
1 can Red Enchilada Sauce (10 oz)
Adds a zesty kick to your enchiladas. You can choose mild or spicy based on your preference! I usually go for medium to keep things exciting but not overwhelming. -
2 cups Shredded Monterey Jack Cheese
This cheese melts beautifully, giving your enchiladas that creamy texture they deserve. Feel free to mix it up with cheddar or pepper jack for an extra punch of flavor! -
8 pieces Flour Tortillas
Soft and pliable, these tortillas make rolling easy and enjoyable! If you prefer corn tortillas, use them; just make sure to warm them up before rolling to prevent cracking! -
1 tablespoon Vegetable Oil
This is used for sautéing onions and garlic. You can substitute with olive oil for a bit of flavor, or even coconut oil for a subtle sweetness. -
1 small Onion, chopped
The onion adds sweetness and depth to your filling. If you’re not a fan, shallots or leeks could work as alternatives! -
2 cloves Garlic, minced
Garlic brings in a wonderful aroma and flavor. Want a stronger garlic flavor? Use 3 or even 4 cloves! -
1 teaspoon Cumin
Cumin adds warmth and earthiness. If you’re out, coriander or smoked paprika could substitute in a pinch! -
1 teaspoon Chili Powder
Adds a nice little kick! Adjust to taste if you prefer a milder flavor. -
Salt and Pepper to taste
Helps bring everything together. Always start with a little; you can always add more later! -
For garnish:
- Chopped Cilantro to add a pop of color and freshness.
- Sour Cream for creaminess and a tangy finish.
Step-by-Step Instructions
Step 1: Preheat Your Oven
Let’s kick things off by preheating your oven to 350°F (175°C). This ensures your enchiladas get bubbly and golden by the time they’re ready to serve.
Step 2: Sauté the Aromatics
In a medium skillet, heat the vegetable oil over medium heat. Add the chopped onion and sauté for about 5 minutes, until they’re soft and translucent. Next, throw in the minced garlic and sauté for an additional 1-2 minutes. The aroma will whisk you away; it’s the magic ingredient that starts bringing our enchiladas to life!
Step 3: Mix the Filling
In a large bowl, combine the sautéed onions and garlic with the shredded chicken, 1 cup of cheddar cheese, cumin, chili powder, salt, and pepper. Mix everything well — this is where the flavors begin to develop.
Step 4: Prepare Your Tortillas
Grab those flour tortillas! If they are a bit stiff, warm them up for about 15-20 seconds in the microwave between damp paper towels. This softens them, making them easier to roll without cracking.
Step 5: Assemble the Enchiladas
Take a tortilla and place about 1/4 cup of the chicken mixture in the center. Roll it up tightly and place it seam-side down in a baking dish. Repeat this process with the remaining tortillas and filling. Don’t worry if you have a little filling left over; we can sprinkle that on top later!
Step 6: Add the Sauce
Pour the red enchilada sauce evenly over the top of the rolled enchiladas, making sure they’re generously coated. Feel free to drizzle some extra on those unfortunate exposed ends — we don’t want any dry tortillas here!
Step 7: Sprinkle on the Cheese
Now, sprinkle the remaining Monterey Jack cheese (about 1 cup) generously on top. This is where magic happens — as it melts, it envelops the enchiladas in a cheesy hug!
Step 8: Bake!
Cover your baking dish with aluminum foil, which helps trap steam and keeps the enchiladas moist. Bake in the preheated oven for 20 minutes. After that, remove the foil and bake for an additional 10-15 minutes until the cheese is bubbly and golden.
Step 9: Garnish and Serve
Once those enchiladas are done baking, take them out (be careful; they’ll be hot!). Let them cool for a couple of minutes. Then, garnish your beautiful creation with chopped cilantro and serve with sour cream on the side. Now is the exciting part—dig in and savor every single bite!
Serving Suggestions
Plating these enchiladas is all about showcasing that glorious cheese and vibrant sauce. Serve them on colorful dinner plates, add a dollop of sour cream, and sprinkle some chopped cilantro on top for that visual flair. Pair them with Mexican rice or a refreshing salad for a complete meal. Trust me; your family will appreciate the aesthetic as much as the taste!
Recipe Variations
Want to mix things up? Here are a few fun twists to put your own spin on this classic dish:
- Vegetarian Enchiladas: Swap the chicken for roasted vegetables like bell peppers, zucchini, or black beans to make a delightful vegetarian version.
- Spicy Kick: Add diced jalapeños or a dash of hot sauce to the chicken mixture for an extra kick!
- Creamy Sauce: For a creamy twist, use a combination of enchilada sauce and heavy cream or sour cream in the recipe.
- Cheesy Explosion: Mix in some crumbled queso fresco or feta along with the Monterey Jack for bomb cheese flavor.
- Make it Your Own: Feel free to experiment with different proteins like turkey, beef, or even shrimp — it’s all about your preference!
Chef’s Notes
Over the years, I’ve learned that cooking is all about creating memories and making adjustments along the way. I started making chicken enchiladas with simply store-bought sauce and pre-cooked chicken, but my passion for flavor led me to create my own enchilada sauce from scratch.
I’ve also played around with different fillings, swapping chicken for remnants of last night’s roast, or even leftovers from taco night when ‘creative cooking’ kicked in. The beauty of this dish is in its versatility, so don’t be afraid to get a little experimental with what you have! Cooking is not just about following a recipe but infusing it with your stories and flavors.
FAQs and Troubleshooting
Can I make enchiladas ahead of time?
Absolutely! You can assemble the enchiladas up to a day in advance and store them covered in the fridge. Just pop them in the oven when you’re ready!
What if my tortillas break when I roll them?
If you’re using corn tortillas, make sure to warm them up to make them more pliable. If you’re using flour tortillas and they break, you might need to increase the warmth or moisture.
How do I store leftovers?
Keep any leftovers in an airtight container — they’ll last about 3-4 days in the fridge. You can reheat them in the microwave or bake them again in the oven for that fresh-out-of-the-oven vibe.
Can I freeze my enchiladas?
Yes! Just assemble them without baking and freeze them covered tightly. When you’re ready to eat, bake from frozen, but add an extra 15-20 minutes to your time.
Nutritional Info
(Optional section, can be customized based on actual nutritional data)
These chicken enchiladas provide a hearty dose of protein, fiber, and calcium, making them a balanced, satisfying meal. A single serving (1 enchilada) contains approximately:
- Calories: 350
- Protein: 24g
- Carbohydrates: 28g
- Fat: 15g
- Fiber: 2g
(Note: Nutritional information will vary based on specific brands and ingredients used.)
And there you have it, my delicious Chicken Enchiladas! I hope this recipe brings you as much joy in your kitchen as it has for me. Remember, cooking isn’t just about the food; it’s about the stories, the laughter, and the love that we share around the table. Happy cooking, and let’s fill the plate! 🌮❤️
PrintDelicious Chicken Enchiladas

Flavor-packed chicken enchiladas filled with tender chicken and topped with cheese and enchilada sauce, perfect for a comforting meal.
- Prep Time: 15 minutes
- Cook Time: 35 minutes
- Total Time: 50 minutes
- Yield: 4 servings 1x
- Category: Main Course
- Method: Baking
- Cuisine: Mexican
- Diet: Non-Vegetarian
Ingredients
- 2 cups Cooked and Shredded Chicken
- 1 can Red Enchilada Sauce (10 oz)
- 2 cups Shredded Monterey Jack Cheese
- 8 pieces Flour Tortillas
- 1 tablespoon Vegetable Oil
- 1 small Onion, chopped
- 2 cloves Garlic, minced
- 1 teaspoon Cumin
- 1 teaspoon Chili Powder
- Salt and Pepper to taste
- Chopped Cilantro (for garnish)
- Sour Cream (for serving)
Instructions
- Preheat your oven to 350°F (175°C).
- Sauté the chopped onion in vegetable oil for about 5 minutes until soft, then add minced garlic and sauté for 1-2 more minutes.
- Mix the sautéed onions and garlic with chicken, 1 cup of cheddar cheese, cumin, chili powder, salt, and pepper in a large bowl.
- Prepare tortillas by warming them in the microwave for 15-20 seconds if needed.
- Assemble the enchiladas by placing 1/4 cup of the chicken mixture in the center of each tortilla, rolling tightly, and placing seam-side down in a baking dish.
- Add red enchilada sauce over the top of the rolled enchiladas.
- Sprinkle remaining Monterey Jack cheese on top.
- Bake for 20 minutes covered with foil, then remove foil and bake for an additional 10-15 minutes until cheese is bubbly.
- Garnish with cilantro and serve with sour cream.
Notes
Feel free to customize the filling or add spices according to your taste. These enchiladas can be made ahead of time and are fantastic for leftovers.
Nutrition
- Serving Size: 1 enchilada
- Calories: 350
- Sugar: 2g
- Sodium: 600mg
- Fat: 15g
- Saturated Fat: 7g
- Unsaturated Fat: 5g
- Trans Fat: 0g
- Carbohydrates: 28g
- Fiber: 2g
- Protein: 24g
- Cholesterol: 60mg
Keywords: chicken enchiladas, Mexican food, comfort food