Platefulkitchen
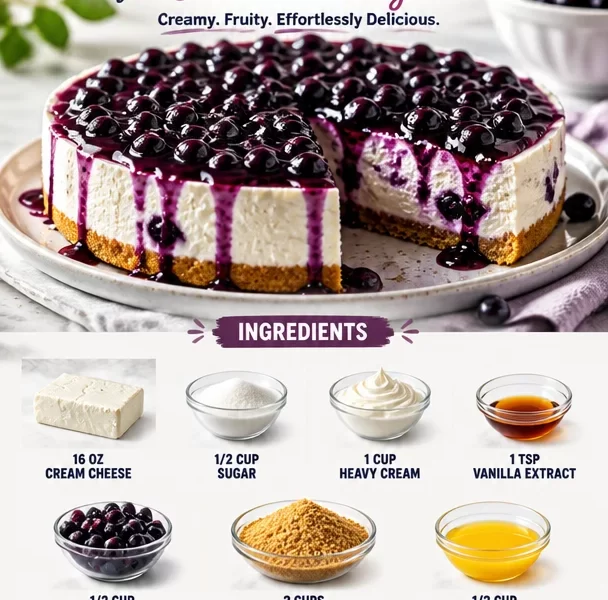
Huckleberry No-Bake Cheesecake: The Sweetest Slice of Summer
Welcome back, food lovers! Today, I’m excited to share a dessert that captures the essence of summer in every creamy, dreamy bite — Huckleberry No-Bake Cheesecake. It’s a delightful combination of rich cream cheese and the sweet, slightly tart huckleberries that will have you daydreaming of sun-drenched afternoons and cozy gatherings around the dinner table.
When I think about cheesecake, I’m immediately transported back to the backyard barbecues of my childhood. The sun setting, laughter filling the air, and the table overflowing with vibrant dishes. But there was always one thing that stole the show — my grandma’s famous cheesecake. It had that magical ability to make everyone stop mid-conversation as the first slice was served.
What I love about this huckleberry variation is that it’s a no-bake recipe! Perfect for those hot summer days when you want to stay cool while still impressing friends and family with a delicious dessert. Let’s dive into the world of huckleberries and create a cheesecake that not only tastes fabulous but also fills your kitchen with warmth and love.
A Slice of Nostalgia: My Grandma’s Backyard BBQ
Imagine this: The smell of something delicious wafts through the air as family and friends gather in the backyard. The sun casts a golden hue over everything, making the great outdoors feel magical. I remember my grandma, wearing her floral apron, preparing her famous cheesecake the day before.
It was always a special treat, one that had everyone asking for the recipe. But it’s funny, because she never wrote it down. Instead, she would say, “Just use what you have and let your heart guide you.” Little did I know then that this would become my own kitchen mantra.
As I grew older, I wanted to carry on that tradition. One summer, while wandering in the woods, I stumbled upon a patch of wild huckleberries. It was like fate! I picked a handful and rushed back home to recreate that cherished cheesecake. Hence, the huckleberry no-bake cheesecake was born. This recipe brings back those sweet memories while adding my unique twist. You can bet that it will become a family favorite in no time!
Ingredients
Here’s what you’ll need to make this Huckleberry No-Bake Cheesecake. Gather your ingredients and let’s embark on this delicious culinary journey!
-
16 oz cream cheese
Ensure it’s at room temperature for easy mixing. If you need a lighter version, you can swap for Neufchâtel cheese, which has less fat but a similar texture. -
1/2 cup sugar
This sweetens the cheesecake, but feel free to use honey or a sugar substitute if you’re looking for a healthier option. -
1 cup heavy cream
Whipping cream works well too! It gives the cheesecake that light, airy texture. If you’re dairy-free, almond or coconut cream can be a great alternative. -
1 tsp vanilla extract
This adds a warm depth of flavor. Pure vanilla is ideal, but feel free to use an imitation if that’s what you have on hand. -
1/2 cup huckleberries
Fresh is best, but frozen works too! If you can’t find huckleberries, blueberries are a delicious substitute! -
2 cups graham cracker crumbs
These form the base. If you want to go gluten-free, crushed gluten-free cookies work just as well! -
1/2 cup melted butter
This binds the graham cracker crumbs together. Coconut oil can be a healthier option here as well, but it will add a subtle flavor.
With these ingredients in hand, we’re ready to create a match made in dessert heaven!
Step-by-Step Instructions
Now, let’s make this Huckleberry No-Bake Cheesecake step by step. Don’t worry; I’ll share some handy chef hacks along the way to ensure your creation is a smash hit!
Step 1: Prepare the Crust
-
Combine the Crust Ingredients
In a medium bowl, mix the graham cracker crumbs and melted butter until you get a sandy texture. Don’t just stir — get in there with your hands! It’s a great way to blend and makes for a fun experience. -
Press Into a Springform Pan
Transfer the crumb mixture to a 9-inch springform pan. Press it down firmly with the back of a measuring cup or your fingers until it’s an even layer. This will be the base of your cheesecake and critical for structure.
Step 2: Blend the Filling
-
Beat the Cream Cheese
In a large mixing bowl, beat the cream cheese with an electric mixer until it’s smooth and creamy. This step is crucial as you want a lump-free base. Remember, room temperature cream cheese will make this much easier! -
Add Sugar and Vanilla
Gradually add the sugar and vanilla extract to the cream cheese. Beat until well combined, scraping down the sides to incorporate everything evenly. -
Whip the Cream
In another bowl, whisk the heavy cream until stiff peaks form. This is where the magic happens! You want to be gentle here so as not to deflate the fluffy cream. Fold it carefully into the cream cheese mixture until just combined.
Step 3: Incorporate Huckleberries
- Add Huckleberries
Gently fold in the huckleberries. If you are using frozen berries, make sure to keep them frozen until this step to prevent them from bleeding too much into the mixture.
Step 4: Assemble the Cheesecake
-
Pour into the Crust
Pour the huckleberry cream cheese filling onto the prepared crust, smoothing out the top with a spatula. Give it a little shake to settle everything in, and voilà— it’s looking fantastic! -
Chill
Cover the cheesecake with plastic wrap and refrigerate for at least 4 hours (or overnight, if you can wait!). This helps it set up nicely, keeping its shape when sliced.
Serving Suggestions
Now that the cheesecake is set and chilled, it’s time to serve! Carefully run a knife around the edges of the cheesecake and unclasp the springform pan. Slice into generous pieces and plate with a few additional huckleberries on top for presentation. A dollop of whipped cream never hurts either!
Recipe Variations
-
Berry Blast
For a twist, mix in other berries like strawberries or raspberries along with the huckleberries. A berry medley is always a hit! -
Chocolate Drizzle
Before serving, drizzle melted chocolate over each slice for an indulgent touch. Who could say no to that? -
Nutty Crust
Substitute half of the graham cracker crumbs with finely chopped nuts like almonds or pecans for a crunchy twist. -
Zesty Lemon
Add the zest of one lemon to the cream cheese filling for a refreshing citrus pop that complements the huckleberries beautifully. -
Vegan Option
Replace the cream cheese with a vegan alternative and use coconut cream for the whipped cream to make this dessert vegan-friendly.
Chef’s Notes
As with any beloved recipe, I’ve tweaked this cheesecake over the years. I remember a time I was out of huckleberries and used a combination of berries instead, and to my surprise, it was just as delightful! This recipe has a flexible foundation, allowing you to adapt based on what you have on hand, much like my grandmother always encouraged.
Be sure to give this cheesecake your own twist and let your creative spirit run wild! And if you find yourself with leftover filling, it’s delicious served on its own. Trust me, no one will complain!
FAQs and Troubleshooting
1. My cheesecake didn’t set! What went wrong?
This is usually due to not allowing enough chilling time. A solid four hours is needed for it to firm up properly.
2. Can I use another type of cheese?
Absolutely! Swap the cream cheese for mascarpone for a slightly different texture and flavor. Just be mindful that it can be a bit softer.
3. Why did my whipped cream deflate?
When whipping cream, over-mixing can cause it to turn into butter. Stop as soon as it forms stiff peaks to maintain those lovely airy bubbles.
4. Can I freeze leftover cheesecake?
Yes! Wrap slices tightly with plastic wrap and place in an airtight container. It can be frozen for up to a month. Allow it to thaw in the fridge overnight before serving for the best texture.
Nutritional Info
This no-bake cheesecake may vary based on ingredients used, but on average, a slice contains about:
- Calories: 350
- Total Fat: 25g
- Saturated Fat: 15g
- Cholesterol: 70mg
- Sodium: 150mg
- Carbohydrates: 30g
- Fiber: 2g
- Sugar: 15g
- Protein: 4g
While it’s definitely a treat, remember that everything is best enjoyed in moderation!
And there you have it! A delightful Huckleberry No-Bake Cheesecake that’s sure to impress both your taste buds and your guests. Take this recipe and make it your own, remembering that it’s the joy of cooking and sharing that truly fills our plates with abundance. Happy baking, friends!
PrintHuckleberry No-Bake Cheesecake
A delightful no-bake cheesecake featuring rich cream cheese and sweet huckleberries, perfect for summer gatherings.
- Prep Time: 15 minutes
- Cook Time: 0 minutes
- Total Time: 240 minutes
- Yield: 8 servings 1x
- Category: Dessert
- Method: Chilling
- Cuisine: American
- Diet: Vegetarian
Ingredients
- 16 oz cream cheese, at room temperature
- 1/2 cup sugar
- 1 cup heavy cream
- 1 tsp vanilla extract
- 1/2 cup huckleberries (fresh or frozen)
- 2 cups graham cracker crumbs
- 1/2 cup melted butter
Instructions
- Combine the graham cracker crumbs and melted butter in a medium bowl until sandy.
- Press it into a 9-inch springform pan to form the crust.
- Beat the cream cheese until smooth and creamy in a large mixing bowl.
- Add sugar and vanilla extract to the cream cheese and beat until combined.
- Whip the heavy cream until stiff peaks form, then gently fold into the cream cheese mixture.
- Add the huckleberries and fold gently.
- Pour the filling onto the crust and smooth the top.
- Chill in the refrigerator for at least 4 hours or overnight.
Notes
Feel free to experiment with different berries or add chocolate drizzle for variation.
Nutrition
- Serving Size: 1 slice
- Calories: 350
- Sugar: 15g
- Sodium: 150mg
- Fat: 25g
- Saturated Fat: 15g
- Unsaturated Fat: 6g
- Trans Fat: 0g
- Carbohydrates: 30g
- Fiber: 2g
- Protein: 4g
- Cholesterol: 70mg
Keywords: cheesecake, no-bake, huckleberry dessert, summer recipe