Platefulkitchen
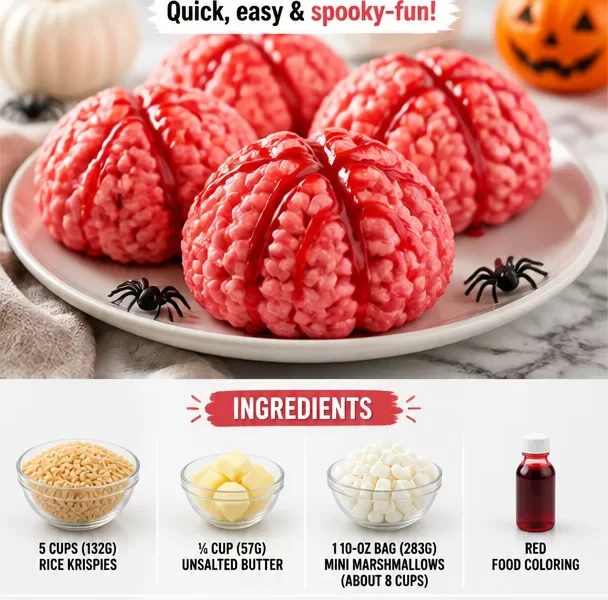
Spooktacular Rice Krispies Brains: Fun and Flavor for Your Halloween Bash!
Welcome to Plateful Kitchen! If you’re looking for a spooky treat that’ll thrill your guests while keeping it easy and fun, you’ve hit the jackpot with these Rice Krispies Brains! Perfect for Halloween gatherings, school parties, or just a fun weekend project with the kids, these crispy creations are guaranteed to get everyone in the festive spirit.
Picture this: a group of friends gathered around a table decorated with spider webs, eerie candles, and an array of Halloween-themed snacks. The air is filled with laughter, and your Rice Krispies Brains take center stage, their ooey-gooey marshmallow goodness inviting everyone to dig in. Plus, you can’t go wrong with a dessert that can be made in under 30 minutes! Trust me, these sweet treats are about to become your go-to Halloween recipe.
So let’s roll up our sleeves, grab our mixing bowls, and dive into a fun and flavorful experience that you and your loved ones will cherish for years to come!
A Nostalgic Treat: My First Batch of Rice Krispies Brains
I can still remember the first time I made Rice Krispies treats. It was a chilly fall afternoon, and I was home from school, itching to try my hand at cooking something festive. My mom guided me as we melted butter and marshmallows together, the sweet scent wafting through our kitchen like a warm hug.
Fast forward a few years, and Halloween rolled around. I thought, “How can I make these classic treats even more fun?” That’s when the idea hit me: why not shape them into creepy brains? The results were a deliciously delightful and slightly ghoulish masterpiece that delighted everyone who tried them. Between the squishy texture, the originality, and the nostalgia of my childhood, these Rice Krispies Brains became a family favorite! Now I’m excited to share this spooky twist on a classic recipe with you!
Ingredients
Here’s what you’ll need to whip up these deliciously creepy Rice Krispies Brains:
-
5 cups (132g) Rice Krispies (or any kind of crispy rice cereal)
A classic favorite, Rice Krispies provide that perfect crunchy texture. Feel free to swap them for gluten-free crispy rice cereal if you need to accommodate dietary restrictions. -
¼ cup (57g) unsalted butter
Butter adds richness and helps bind your treats. You can use coconut oil for a dairy-free option or a flavored butter like garlic herb for a unique twist, but keep in mind it will change the overall taste! -
1 10-oz bag (283g) mini marshmallows (about 8 cups)
Mini marshmallows melt beautifully, creating the gooey base for your treats. Did you know you can substitute these with large marshmallows? Just use about 4-5 large marshmallows to every cup of mini marshmallows. -
Red food coloring
This is what transforms your Rice Krispie treats into spooky treats. You can use gel food coloring for a more vibrant red shade, or try beet juice for a natural alternative if you’re feeling adventurous!
Step-by-Step Instructions
Let’s get cooking! Follow these steps to create your very own Rice Krispies Brains:
-
Prep Your Workstation:
Start by greasing a large mixing bowl and your hands with non-stick cooking spray. This makes it much easier to handle the sticky mixture later. Also, line a baking sheet or a mold with parchment paper, so the treats don’t stick. -
Melt the Butter:
In a large saucepan over low heat, add the unsalted butter. Stir continuously until completely melted and bubbly. Be careful not to let the butter brown — we want it to stay lovely and light for that fluffy texture! -
Add the Marshmallows:
Once the butter is melted, add in the mini marshmallows. Keep stirring until they are completely melted and create a gooey mixture — it should resemble a thick, fluffy cloud. -
Color the Marshmallow Mixture:
Add drops of red food coloring to the melted marshmallows. Stir until you achieve your desired brain-like shade. You can get creative here; add more or less food coloring based on how gory or fun you’d like your treats to appear! -
Combine the Cereal:
Remove the saucepan from heat and quickly stir in the Rice Krispies, mixing until they are evenly coated with the red marshmallow mixture. My tip? Use a spatula coated in butter or spray to prevent sticking! -
Shape into Brains:
Working quickly, take handfuls of the mixture and shape them into brain-like forms. You can do this by forming a rounded shape and then pinching the sides to create that classic brain look. Don’t worry about perfection — every brain has its unique personality! -
Let Them Set:
Place your Rice Krispies Brains onto the lined baking sheet and let them set for about 30 minutes. You can chill them in the fridge if you want to speed up the process! -
Enjoy the Spooky Treats:
Once set, serve them up on a festive platter or in a cauldron for extra flair. You can even drizzle melting chocolate on top for a “bloody” look — just make sure to melt and cool the chocolate first before drizzling.
Serving Suggestions
These Rice Krispies Brains are best served on a spooky-themed platter, perhaps surrounded by some Halloween candies or ghoulishly good snacks (eyeball cupcakes, anyone?). You can also dress them up with edible glitter or strategically placed gummy worms for added effect. The more fun, the better!
Recipe Variations
Feeling adventurous? Here are some creative twists to make your Rice Krispies Brains even more special:
-
Chocolate-Covered Brains: Dip the cooled Rice Krispies in melted chocolate for a decadent treat that looks rich and gory.
-
Monster Mash: Mix in some candy eyeballs while shaping the brains to create little monster faces peeking out.
-
Nutty Brain Treats: Add crushed nuts like pecans or walnuts to the mixture for an unexpected crunch. Just be mindful of allergies!
-
Coconut Brain Treats: Swap out a cup of cereal for sweetened shredded coconut for a chewy twist. You can color the coconut for even more fun!
-
Flavored Brains: Add a few drops of almond or peppermint extract for a surprise flavor twist in each bite!
Chef’s Notes
As with any recipe, these Rice Krispies Brains have evolved over time in my kitchen. I once tried making them blue for a “Frozen” themed party, which resulted in laughs and a playful spin on the traditional treat. I’ve learned that creativity and fun are crucial in the kitchen! Often, I find my best kitchen stories come from moments of pure joy (and sometimes delicious disaster)! Just remember, cooking is all about experimenting and making cherished memories along the way.
FAQs and Troubleshooting
1. My Rice Krispies aren’t sticking together. What went wrong?
You might not have used enough marshmallows or the mixture may have cooled too much before you shaped it. Make sure to melt them thoroughly and shape them while everything is still warm!
2. Can I make these ahead of time?
Absolutely! Rice Krispies treats can be made up to two days in advance. Just keep them wrapped tightly in plastic wrap or in an airtight container to maintain their freshness.
3. Can I use flavored cereal instead?
Yes! Feel free to experiment! Just be sure the flavor pairs well with the sweetness from the marshmallows. Think cocoa rice cereal or even fruit-flavored varieties for an unexpected twist.
4. How do I store leftovers?
To keep them fresh, store your Rice Krispies Brains in an airtight container at room temperature. They’ll be good for up to a week, but I doubt they’ll last that long!
Nutritional Info
While these Rice Krispies Brains are definitely a treat treat, here’s a rough estimate of the nutritional info per serving (one brain):
- Calories: 150
- Fat: 5g
- Carbohydrates: 25g
- Sugars: 10g
- Protein: 1g
As with all desserts, indulge responsibly and share with those you love!
So there you have it, all the steps and insider tips you need to whip up your own Rice Krispies Brains. I hope you have as much fun making these as I did! Happy Halloween, and let’s fill that plate with spooky goodness!
PrintRice Krispies Brains

Spooky Rice Krispies treats shaped like brains, perfect for Halloween gatherings and fun projects with kids.
Ingredients
- 5 cups (132g) Rice Krispies
- ¼ cup (57g) unsalted butter
- 1 10-oz bag (283g) mini marshmallows
- Red food coloring
Instructions
- Prep your workstation: Grease a large mixing bowl and your hands with non-stick cooking spray and line a baking sheet with parchment paper.
- Melt the butter in a large saucepan over low heat until completely melted and bubbly.
- Add the mini marshmallows and stir continuously until melted into a gooey mixture.
- Color the marshmallow mixture by adding red food coloring until your desired shade is achieved.
- Combine the Rice Krispies into the mixture, mixing until evenly coated.
- Shape handfuls into brain-like forms by rounding off and pinching the sides.
- Let them set on the lined baking sheet for about 30 minutes, or chill in the fridge.
- Enjoy the spooky treats, optionally drizzling with melted chocolate for a